
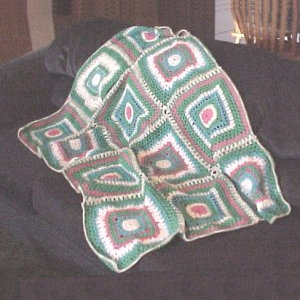
Joanna's Pillowghan
 Designed By Julie A. Bolduc
This crochet afghan pattern was first introduced as a stitch along project but now it has been all put together into one file for everyone to enjoy. There are 2 different square designs that are put together into a pillowghan.
Materials Needed
Baby Sport Pompadour acrylic yarn in white 1 6oz skein
Baby Sport Pompadour acrylic yarn in pink 1 6oz skein
Baby Sport Pompadour acrylic yarn in green 2 6oz skeins
Baby Sport Pompadour acrylic yarn in blue 1 6oz skein
Baby Sport Pompadour acrylic yarn in Candy Print 1 6oz skein
Size H/8 aluminum crochet hook
Metal Yarn needle for weaving in ends
Yarn Thickness: 3mm
Gauge: 5dc=1"
Finished Size: 12"x12" for each square
Skill Level: Beginner

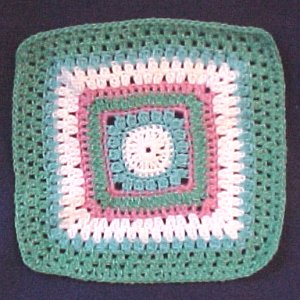
Instructions
RND 1: With pink, ch4, join w/slst to first ch to form ring.
RND 2: Starting Bobble. Ch1. *Bl in next sc. Ch1. Rep from * around. Join w/slst to top of starting bobble. Fasten off pink.
RND 3: Join white in any ch1 sp. Ch3, 2dc in same sp. 3dc in each ch1 sp around. Join w/slst to top of ch3. Fasten off white.
RND 4: Join green in same st as slst. Ch1. Sc in each of the next 8 sts. Ch3. *Sc in each of the next 9 dc. Ch3. Rep from * around. Join w/slst to ch1.
RND 5: Ch3. Dc in each of the next 8 sc. 3dc, ch2, 3dc in next ch3 sp. *Dc in each of the next 9 sc. 3dc, ch2, 3dc in next ch3 sp. Rep from * around. Join w/slst to ch3. Fasten off green.
RND 6: Join blue in same st as slst. Ch1. Sc in each of the next 11dc. 2sc, ch2, 2sc in next ch2 corner sp. Sc in each of the next 3 dc. *Sc in each of the next 12dc. 2sc, ch2, 2sc in next ch2 sp. Sc in each of the next 3 dc. Rep from * around. Join w/slst to ch1.
RND 7: Ch4. Sk next st, dc in next st, ch1, 6 times. Dc, ch2, dc in next ch2 sp. Ch1, sk 1 st, dc in next st twice. Ch1. Sk 1 st. *Dc in next st, ch1, sk next st, 7 times. Dc, ch2, dc in next ch 2sp. Ch1, sk 1 st, dc in next st twice. Rep from * around. Join w/slst to 3rd ch of ch4.
RND 8: Ch1. Sc in next ch1 sp, sc in next dc 7 times. (3sc in next ch2 corner sp. Sc in next dc, sc in next ch 1 sp, 3 times.) *Sc in next dc, sc in next ch 1 sp 7 times. Sc in next dc. Rep bet () once. Rep from * around. Join w/slst to ch1. Fasten off blue.
RND 9: Join white in same st as slst. Ch3, dc in same st. Sk 1 st. 2dc in next st, sk 1 st 7 times. (2dc, ch2, 2dc in 2nd sc in corner. Ch1. Sk 1 st. Dc in next st, sk 1 st, 3 times.) *Dc in next st, sk 1 st 8 times. Rep bet () once. Rep from * around. Join w/slst to top of ch3. Fasten off white.
RND 10: Join green in any ch2 corner sp. Ch3, dc, ch2, 2dc in same sp. (2dc in each of the next 12 sps bet 2dc groups. *2dc, ch2, 2dc in next ch2 corner sp. Rep bet () once. Rep from * around. Join w/slst to top of ch3.
RND 11 & 12: Slst into next dc and into the next ch2 corner sp. Ch3, dc, ch2, 2dc in same sp. (2dc in each sp across to next corner.) *2dc, ch2, 2dc in next ch2 corner sp. Rep bet () once. Rep from * around. Join w/slst to top of ch3. At the end of rnd 12, fasten off green.
RND 13: Join pink in ch2 corner sp. Starting bl, ch2, bl in same sp. Ch1. (Bl, ch1 in each sp across to the next corner.) *Bl, ch2, bl in next ch2 corner sp. Ch1. Rep bet () once. Rep from * around. Join w/slst to top of starting bobble. Fasten off pink.
RND 14: Join green in ch2 corner sp. Ch3, dc, ch2, 2dc in same sp. (2dc in each sp across to next corner.) *2dc, ch2, 2dc in next ch2 corner sp. Rep bet () once. Rep from * around. Join w/slst to top of ch3. At the end of rnd 12, fasten off green. Weave all ends into back of work.
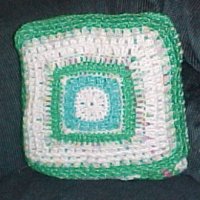
Instructions for Square 2
RND 1: With white. Ch4. Join w/slst to first ch to form ring. Ch3. Dc in ring. Ch1. *2dc in ring, ch1. Rep from * 6 times more. Join w/slst to top of ch3.
RND 2: Ch1. Sc in same st as slst. Sc in next dc. Sc in next ch1 sp. *Sc in each of the next 2 dc. Sc in ch1 sp. Rep from * around. Join w/slst to top of ch3. Fasten off white.
RND 3: Join blue in same st as slst. Sc in same st. Sc in each of the next 4 sc. 3sc in next sc. *Sc in each of the next 5 sc. 3sc in next sc. Rep from * around. Join w/slst to first sc.
RND 4: Staring bl in same st as slst. Ch1. Sk next sc. (Bl in next sc. Ch1. Sk next sc. Bl in next sc. Ch1. Sk next sc. Bl, ch2, bl in next sc. Ch1. Sk next sc.) *Bl in next sc. Ch1. Sk next sc. Rep bet () once. Rep from * around. Join w/slst to top of staring bl. Fasten off blue.
RND 5: Join pink in any ch2 corner sp. 5sc in same sp. (Sc in next bl, sc in ext ch1 sp, 4 times. Sc in next bl.) *5sc in next ch2 corner sp. Rep bet () once. Rep from * around. Join w/slst to first sc. Fasten off pink.
RND 6: Join green in same st as slst. Starting bl in same st. Ch1. Sk 1 st. (Bl, ch2, bl in next st. Ch1. Sk 1 st. Bl in next st. Bl in each of the next 11 sts.) *Bl in next st. Ch1. Sk 1 st. Rep bet () once. Rep from * around. Join w/slst to top of starting bl. Fasten off green.
RND 7: Join pink in any ch2 corner sp. Ch3, dc, ch2, 2dc in same sp. (Sk next bl. Dc in each of the next 13 bl. Sk next bl.) *2dc, ch2, 2dc in next ch2 corner sp. Rep bet () once. Rep from * around. Join w/slst to top of ch3. Fasten off pink.
RND 8: Join white in any ch2 corner sp. Ch3, 1dc, ch2, 2dc in same sp. (Sk next dc. 2dc in each of the next 2 dc, sk 1 dc, twice. 2dc in each of the next 3 dc. Sk 1 dc. 2dc in each of the next 2 dc, sk 1 dc, twice.) *2dc, ch2, 2dc in next ch2 corner sp. Rep bet () once. Rep from * around. Join w/slst to top of ch3.
RND 9: Slst into the next dc and into the next ch2 corner sp. Ch3, dc, ch2, 2dc in same sp. (2dc in each sp bet 2dc across to next corner.) *2dc, ch2, 2dc in next ch2 corner sp. Rep bet ()once. Rep from * around. Join w/slst to top of ch3. Fasten off white.
RND 10: Join blue in any ch2 corner sp. Starting bl in same sp, ch2, bl in same sp. Ch1. (Bl, ch1 in each sp bet 2dc groups across to next corner.) Bl, ch2, bl in next ch2 corner sp. Rep bet () once. Rep from * around. Join w/slst to top of first bl. Fasten off blue.
RND 11: Join green in any ch2 corner sp. Ch3, dc, ch2, 2dc in same sp. (2dc in each ch1 sp across.) *2dc, ch2, 2dc in next ch2 corner sp. Rep bet () once. Rep from * around. Join w/slst to top of ch3.
RND 12 & 13: Slst in next dc and in next ch2 corner sp. Ch3, dc, ch2, 2dc in same sp. (2dc in each sp bet 2dc groups across to next corner.) *2dc, ch2, 2dc in next ch2 corner sp. Rep bet () once. Rep from * around. Join w/slst to top of ch3. At the end of round 13, fasten off, weave ends into back of work.
Finishing NOTE: If you run out of any color yarn, feel free to substitute for another color. I had to. I ran out of pink and I had some mulit colored pompadour yarn so where I had to put pink, I used the mulitcolored yarn instead.
Assembly Instructions
Use which ever yarn you have the most of to join the squares together.
Layout all squares in the arrangement that you want them in as long as you have them in a 3 x 4 pattern. Lay the 13th square on the bottom center square wrong side facing you. This is where you will start joining the squares. When you make the first join, you will be joining 3 layers together. 2 for the pillow part then 1 for the right bottom corner.
You will join each square one side at a time throughout. Always work from the right to the left of each square from one ch2 corner space to the other.
STEP 1: Start with the pillow section. Pick up the 2 pillow squares and the one square on the right. Just as you layed them down. Join yarn to the 2 layers of the pillow section in the bottom right ch2 corner. Ch3. dc in same corner. Now pick up the bottom right square and 2dc in the bottom left ch2 corner of that square so that the correct side of the square is facing away from you. *Work 2 dc in the next sp bet 2dc groups of the pillow section. Work 2 dc in the next sp bet 2dc groups on the square on the back. Rep from * until you reach the ch2 corner sps of both the pillow section and the next square. Make sure to work 2dc in each of the 2 ch2 corner spaces. Fasten off. Do not weave ends in until you have all of the squares joined. You will weave them later in a special way.
STEP 2: Do the same thing with the opposite side of the pillow section. Work from right to left making sure the pillow section is facing you and the next square is the bottom left square that you join to the pillow section.
STEP 3: Join the next 3 squares in the next row in the same manner making sure that the first row is always in front of your work. When you get to the pillow section, just join to the back square of the pillow secion to leave an open pocket for stuffing the pillow section with the rest of the afghan. When you get the 3 squares joined. Join the side squares to the center squares working from the outside to the inside where the 4 corners meet.
STEP 4: Follow this joining pattern for the rest of the squares. When you are done with joining all of the squares together, then it is time to join and weave the intersections together. Join them by making sure the tops of the dcs meet and form a square hole about 1" across. Basically what you are trying to do is make them look as the would look if you went around a corner but there will not be a chain 2 between the 2dc groups in each corner of each square. After you are done joining and weaving the intersections, it is time to weave the outside ends at each seam.
STEP 5: Join the same color yarn that you used to join the squares in any of the ch2 corner spaces on the outside perimeter of the afghan. Work 3 sc in each corner, 1sc ineach st across each square and 2sc in each dc in the seams plus 1 more sc in the center of each seam. Join w/slst in first sc when you get back to the beginning.
If you have trouble understanding these instructions, please let me know.
Design written on Friday, July 30, 2004. Copyright © 2004-2007 By Julie A. Bolduc p120006
All items in our online shop ship free within the US only. I currently offer U.S. shipping only and it is from rural Maine. Delivery can vary from 2–14 days depending on your distance from Maine. Expedited shipping is not available.
Please note: I am now selling all of my paper bead making tools and other items from this web site using Paypal payments.
I have removed all of my paper bead making tools from Amazon. My Kindle crochet pattern books and paper template paperback books continue to be available on Amazon, as they are printed and fulfilled directly by Amazon. A limited number of paper bead making tools remain available on Etsy but I am not linking to those tools from this site.
Random Quick Tip!
Easy Crochet NecklacesYou can use any decorative crochet braid or rope to make a necklace. Just make the rope, attach a clasp on each end then hang a charm or pendant from the center of it. You may even sew on a few small beads on the rope for an added touch. Or if the holes in the beads are big enough, you could put a few beads on the rope with the larges one in the center. But in order for the crochet rope to show, you may want to put only about 4 large beads on with the charm hanging in the center of them. This would be a good use for gold or silver thread. You could even sell these at craft bazaars.