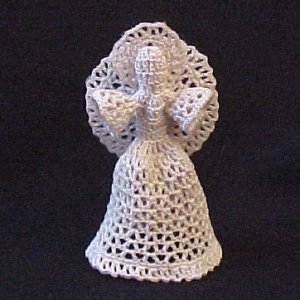
Heavenly Angel
 Designed By Julie A. Bolduc
This angel is made in 3 parts then glued together using hot glue. You can make it in just a few hours.
Materials Needed
Size 10 crochet cotton in ecru
Size 7 steel crochet hook
Hot Glue and gun
Tapestry Needle for weaving in ends
Polyester Fiber fill
Yarn Thickness: 10thread
Gauge: 10sc = 1"
Finished Size: 5½"" tall
Skill Level: Intermediate
Instructions
RND 1: Head: Ch3. 12dc in 3rd ch from hook. Join w/slst to top of ch3.
RND 2: Ch3. Dc in each dc around. Join w/slst to top of ch3.
RND 3: Ch3. Yo, insert hook in next st, yo, pull up a lp, yo, pull through 2 lps on hook, twice, yo, pull through all lps on hook. (dec made)*Dc in next st. Dec. Rep from * around. Join w/slst to top of ch3.
RND 4: Ch3. Dc in each st around. Join w/slst to top of ch3.
RND 5: Ch3. 2dc in same st as slst. 3dc in each st around. Join w/slst to top of ch3. (24 sts)
RND 6: Ch3. Dc in each of the next 7 dc. (Dc, ch2, dc in next dc, ch2, 3 times. Dc, ch2, dc in next dc.) Dc in each of the next 8 dc. Rep bet () once. Join w/slst to top of ch3.
RND 7: Ch1. Sc in each of the next 7 dc. Sk next dc, each of the next 7 ch2 sps, & next dc. Sc in each of the next 8 dc. Sk next dc, each of the next 7 ch2 sps & next dc. Join w/slst to ch1.
RND 8: Ch3. Dc in each sc around. Join w/slst to top of ch3.
RND 9: Ch3. Dec. *Dc in each of the next 2dc. Dec. Rep from * around. Dc in last dc. Join w/slst to top of ch3. (12 sts)
RND 10: Ch5. Dc in same st as slst. (Ch2. Dc, ch2, dc in next dc 5 times.) Ch2, dc in enxt dc, 6 times. Ch2. Join w/slst to 3rd ch of ch5. This makes the front of the skirt flatter than the back. It will make the back look like it has a bustle.
RND 11-19: Slst into the first ch 2 sp. Ch5, dc in same sp. Dc, ch2, dc in each ch2 sp around. Join w/slst to 3rd ch of ch5.
RND 20: Ch1. 2sc in next ch2 sp. Sc in next dc. *Sc in next dc. 2sc in next ch2 sp. Sc in next dc. Rep from * around. Join w/slst to top of ch1.
RND 21: Ch5. Dc in same st as slst. Sk 1st. *Dc, ch2, dc in next st. Sk 1 st. Rep from * around. Join w/slst to 3rd ch of ch5. Fasten off. Weave ends into back of work. Stuff Head
RND 1 Arms: Rejoin thread on first ch 2 sp on round 6. Ch5. Dc in same sp. Dc, ch2, dc in each of the next 6 ch2 sps. Join w/slst to 3rd ch of ch5.
RND 2: Slst into the first ch2 sp. Ch5. dc in same sp. Dc, ch2, dc in each ch2 sp around. Join w/slst to 3rd ch of ch5.
RND 3: Ch1. 2sc in enxt ch2 sp. Sc in next dc. *Sc in next dc. 2sc in next ch2 sp. Sc in next dc. Rep from * around. Join w/slst to ch1. Fasten off. Repeat with other side.
RND 1Wings: Ch1 12. Join w/slst to first ch to form ring. Ch5. *Dc in ring. Ch2. Rep from * 12 times more. Join w/slst to 3rd ch of ch5. (14 ch2 sps)
ROW 1 First side: Slst into the first ch 2 sp. Ch5, dc in same sp. Dc, ch2, dc in each of the next 6 ch2 sps. Ch1, turn.
ROW 2 & 3: Slst into the first ch2 sp. Ch5, dc in same sp. Dc, ch2, dc in each of the next 6 ch2 sps. Ch1, turn.
ROW 4: 2sc in first ch2 sp. *Sc in each of the next 2 dc. *2sc in next ch2 sp. Sc in each of the next 2 dc. Rep from * 4 times more. 3sc in last ch2 sp. Ch5, turn.
ROW 5: Dc in first sc. *Sk 1 st. Dc, ch2, dc in next sc. Rep from * 12 times more. Dc, ch2, dc in last sc. Fasten off.
ROW 1-4 2nd side: Rejoin thread in next unworked ch2 sp on round 1. Rep rows 1-4.
ROW 5: Ch5, dc in same sp. Dc, ch2, dc in next sc. *Sk 1 sc. Dc, ch2, dc in next sc. Rep from * 12 times more. Fasten off. Weave ends into back of work.
Halo
RND 1 : Ch4. Join w/slst to first ch to form ring. Ch5. *Dc in ring. Ch2. Rep from * 6 times more. Join w/slst to 3rd ch of ch5.
RND 2: Ch1. 2sc in next ch2 sp. *Sc in next dc. 2sc in next ch2 sp. Rep from * around. Join w/slst to ch1.
RND 3: Ch5, dc in same st as slst. Sk 1 st. *Dc,c h2, dc in next st. Sk 1 st. Rep from * around. Join w/slst to 3rd ch of ch5. Fasten off. Weave all ends into back of work.
Finishing Stiffening: Stiffen all parts with fabric stiffener and allow to dry completely. Shape as needed while they are drying.
Finishing Assembly: Using hot glue, glue wings to back and halo to back of head.
Design written on Friday, July 9, 2004. Copyright ©2004 By Julie A. Bolduc f104001
JPF Crochet Club where Crocheting is Just Plain Fun http://www.jpfun.com This pattern is for personal use only and not to be resold.
