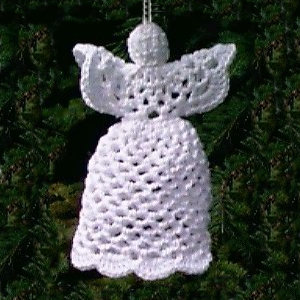
Net Stitch Angel
 Designed By Julie A. Bolduc
This angel is the first one I designed for my website. It is fast and easy to make and would look great on your Christmas Tree!
Materials Needed:
Small amount White Knit-Cro-Sheen or size 10 crochet cotton.
Size 7 steel crochet hook
1 8" high styrofoam cone
Fabric Stiffener
Plastic Wrap
A few Pins
Gold metalic thread
Yarn Thickness: 10thread
Gauge: 10sc per inch
Finished Size: =3" high
Skill Level: =Easy
Instructions
RND 1: Ch 3, work 11 dc in 3rd ch from hook. Join with sl st to top of ch 3.
RND 2: Ch 3, dc in dc around. Join with a sl st to top of ch 3.
RND 3: * dc in dc, dec over the next 2 dcs. Repeat from * until you have 9sts left.
RND 4: Ch 1, sc in each dc around. Sl st to ch 1.
RND 5: Ch 4, dc in same st as sl st. Work the fol into ech sc around, (1 dc, ch 1, 1 dc). Sl st to top of ch 3.
RND 6: Sl st into ch 1 sp. *Ch 4, sc bet the next dcs, ch 4, sc in next ch 1 sp. repeat from * until you come to the first ch 1 sp. Sl st in first sc made.
RND 7-8: Sl st to the 2nd ch of ch 4 lp. Sc in same lp. * ch 4, sc in next ch 4 lp. Repeat from * until you come to the beg of the round. Ch 4, sl st in first sc.
RND 9: Sl st into 2 ch of ch 4 lp. Work 2 sc in same ch 4 lp. (work 4 sc in next ch 4 lp. Work 2 sc in next ch 4 lp.) Sk the next 6 ch 4 lps. Work 2 sc in next ch 4 lp. Repeat bet () 1 more time. sk next 6 ch 4 lps. Sl st in next sc.
RND 10: *Ch 3, sc in next sc. Repeat from * until you come to the beg of rnd. sl st into first sc.
RND 11-24: Sl st into first ch of ch 3 lp. Sc in same lp, * ch 3, sc in next ch 3 lp. Repeat from * until you come back to the beg of rnd. Sl st to first sc.
RND 25: Sl st to center of ch 3 lp. *Work 6 dc in the next ch 3 lp. Sc in next ch 3 lp. Repeat from * until you reach the last 6 dc group. Sl st in first sc made. Fasten off and weave ends into work.
Finishing the Wings
RND 1: Tie thread to the 8th row in one of the lps where there are 2 scs right side facing you. Ch 3, sc in next ch 4 lp. *Ch 4, sc in the next ch 4 lp. Repeat from * 4 times more. Ch 3, sc in next lp which has 2 scs in it. Sl st to first sc made on wing.
RND 2: Sc in first ch 3 lp. *Work 8 ds in next ch 4 lp. Sc in next ch 4 lp. Repeat from * 2 times more. You will actually sc in ch 3 lp the 2nd time. sl st into ch 3 lp. Fasten off. Weave ends into work.
Repeat with other wing on other side.
To Stiffen
Stuff head with a small amount of polyester fiberfill. Dip angel up to her neck into fabric stiffener. cover styrofoam with plasic wrap. Place angel's skirt over cone to shape skirt. Stiff bodice and wings with plastic wrap to help keep it's shape while drying. Make sure to completely saturate the whole angel except for head. Since the head is stuffed, you do not need to stiffen it. Allow the angel to dry overnight. When completely dry, attach gold thread to top of head to form a loop. This is the hanger.
Created by Julie A. Bolduc of Just Plain Fun April 30 1998 Copyright © 1998 by Julie A. Bolduc f104002
JPF Crochet Club where Crocheting is Just Plain Fun http://www.jpfun.com This pattern is for personal use only and not to be resold.
