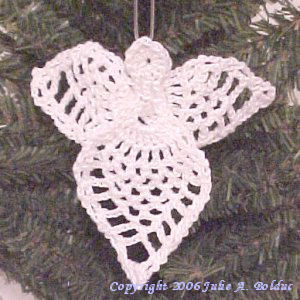
Pineapple Guardian Angel
 Designed By Julie A. Bolduc
This angel ornament is made in 2 pieces then glued together. It works up fairly quickly and would make a great package topper during the holidays.
Materials Needed
Size 5 crochet cotton in white
Size 2 Steel Crochet Hook
Hot Glue and gun
Tapestry Needle for weaving in ends
Yarn Thickness: 5thread
Gauge: 8sc=1"
Finished Size: 4"x4"
Skill Level: Beginner
Instructions
RND 1: Ch4, work 11 dc in 4th ch from hook. Join w/slst to top of ch4.
ROW 1: Now you will work in rows. Ch3. Dc in each of the next 2 dc. Ch3, turn.
ROW 2: Dc in first dc. Ch5. Sk next dc. 2dc in top of ch3. Ch3, turn.
ROW 3: Dc in next dc. Ch1. Dc in next dc, ch1, 7 times. Dc in next dc. Dc in top of ch3. Ch3, turn.
ROW 4: Dc in next dc. Ch3. Sc in next dc, ch3, 7 times. Dc in next dc. Dc in top of ch3. Ch3, turn.
ROW 5: Dc in next dc. Ch3. Sk next ch3 sp. Sc in next ch3 sp, ch3, 6 times. Sk next ch3 sp. Dc in next dc. Dc in top of ch3. Ch3, turn.
ROW 6: Dc in next dc. Ch3. Sk next ch3 sp. Sc in next ch3 sp, ch3, 5 times. Sk next ch3 sp. Dc in next dc. Dc in top of ch3. Ch3, turn.
ROW 7: Dc in next dc. Ch3. Sk next ch3 sp. Sc in next ch3 sp, ch3, 4 times. Sk next ch3 sp. Dc in next dc. Dc in top of ch3. Ch3, turn.
ROW 8: Dc in next dc. Ch3. Sk next ch3 sp. Sc in next ch3 sp, ch3, 3 times. Sk next ch3 sp. Dc in next dc. Dc in top of ch3. Ch3, turn.
ROW 9: Dc in next dc. Ch3. Sk next ch3 sp. Sc in next ch3 sp, ch3, twice. Sk next ch3 sp. Dc in next dc. Dc in top of ch3. Ch3, turn.
ROW 10: Dc in next dc. Ch3. Sk next ch3 sp. Sc in next ch3 sp, ch3. Sk next ch3 sp. Dc in next dc. Dc in top of ch3. Ch3, turn.
ROW 11: Dc in next dc. Ch3. Sk both ch3 sps. Dc in next dc. Dc in top of ch3. Ch3, turn.
ROW 12: Yo, insert hook in next dc, yo pull up a lp, yo pull through 2 lps on hook. Yo, insert hook in next dc, yo pull up a lp, yo pull through 2 lps on hook, yo pull through all lps on hook. Dc in top of ch3. Fasten off and weave ends into back of work.
RND 1 Wings: Ch5. Join w/slst to first ch to form ring. Side 1: Row 1: Ch3. 6dc in ring. Ch, turn.
ROW 2: Dc in next dc, ch1, 5 times. Dc in next dc. Dc in top of ch3. Ch3, turn.
ROW 3: Dc in next dc. Ch3. Sc in next dc, ch3, 4 times. Dc in next dc. Dc in top of ch3. Ch3 turn.
ROW 4: Dc in next dc. Ch3. Sk next ch3 sp. Sc in next ch3 sp, ch3, 3 times. Dc in next dc. Dc in top of ch3. Ch3 turn.
ROW 5: Dc in next dc. Ch3. Sk next ch3 sp. Sc in next ch3 sp, ch3, twice. Dc in next dc. Dc in top of ch3. Ch3 turn.
ROW 6: Dc in next dc. Ch3. Sk next ch3 sp. Sc in next ch3 sp, ch3. Dc in next dc. Dc in top of ch3. Ch3 turn.
ROW 7: Dc in next dc. Ch3. Sk both ch3 sps. Dc in next dc. Dc in top of ch3. Ch3 turn.
ROW 8: Yo, insert hook in next dc, yo pull up a lp, yo pull through 2 lps on hook. Yo, insert hook in next dc, yo pull up a lp, yo pull through 2 lps on hook, yo pull through all lps on hook. Dc in top of ch3. Fasten off and weave ends into back of work.
ROW 1-8: Side 2: Repeat as for first side starting on the other side of the starting ring. Fasten off and weave ends into back of work.
Finishing Assembly: Glue wings to back of neck then attach hanger of choice to top of head. Stiffen if desired.
Design written on Thursday, September 9, 2004. Copyright ©2004 By Julie A. Bolduc p104015
JPF Crochet Club where Crocheting is Just Plain Fun This crochet pattern is for personal use only and is not to be resold.
