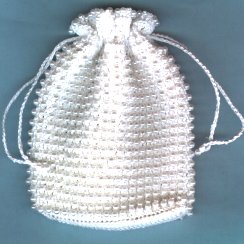
Pearl Beaded Bag

Designed by Julie A Bolduc
This bag could be a wonderful addition to a bride's gown on her wedding day. It can be made in a day or two and is big enough to hold cash, credit cards, tissues and perhaps a tube of lipstick.
Materials Needed
Size 10 Crochet Cotton. Southmaid was used in the example
1 pkg 1000count 4mm pearl beads.
Size 8 steel Boye Crochet hook
Tapestry Needle
Yarn Thickness: 10thread
Gauge: 10sc=1"
Finished Size: 4"x6"
Skill Level: Intermediate
NOTE: You will actually use about 780 of the pearls but it is a good idea to string on at least 800 before you begin.
Instructions
String on to the thread 800 pearls. You will start in rows then work in rounds.
ROW 1: Ch35, sc in 2nd ch from hook and in each ch across. Ch3, turn.
ROW 2: Dc in 2nd sc and in each sc across. Ch1, turn.
ROW 3: Sc in each dc across and in top of ch3. Ch1, DO NOT turn. Now you will work in rounds from here on to the end.
RND 1: 3sc in same st as last sc. 2sc in dc row. 3sc in next sc of first row. Sc in each st of starting chain, work 3sc in corner ch. 2sc in dc row, 3sc in next corner st. Work 1 sc in each sc across to where you began first round. Join w/slst to first sc.
On this next round is where you will start working in the beads. When you draw up the beads, they will be on the back side of the work. When you are done with the bag, the back side of the work will be the outside of the bag. So at some point, you may want to turn the bag inside out to work your stitches to make it easier for you.
To work a bead into a sc which will be referred to a (bdsc), insert hook in next st, draw up a loop, bring up a bead to the hook, wrap the thread, from above the bead, around the hook and draw it through the 2 loops on the hook.
To work a bead into a dc which will be referred to as a (bddc), wrap thread around hook, insert hook in next st, draw up a loop, draw the loop through2 loops on hook, bring up a bead to the hook, wrap thread from above bead, around hook and draw through last 2 lps on hook.
RND 2: Ch1. Bdsc in next st. *Sc in next st. Bdsc in next st. Rep from * around. Join w/slst to ch1.
RND 3-19: Ch3. Bddc in next st. *Dc in next st. Bddc in next st. Rep from * around. Join w/slst to top of ch3.
RND 20-21: Ch3. Dc in each st around. Join w/slst to top of ch3.
RND 22: Ch4, sk next st, dc in next st. Ch1. Sk next st. *Dc in next st, ch1. Sk next st. Rep from * around. Join w/slst to 3rd ch of ch4. Casing Made.
RND 23: Ch3. Dc in each ch1 sp and each dc around. Join w/slst to top of ch3.
RND 24: Ch3. Bddc in next st. *Dc in next st. Bddc in next st. Rep from * around. Join w/slst to top of ch3. Fasten off and weave ends into back of work.
Ties Make 2
Ch 1, bring up a bead. Ch99 more. Fasten off.
When both ties are done, weave the ties through the casing in opposite directions to form a drawstring top. Then secure the ends of each tie by weaving the ends through the bead on each end then back through the chain.
The beads at each end just dress up the ties a bit and make it match the rest of the bag. You might want to put more beads on the ends if you want.
Design written on Wednesday, June 09, 1999. Copyright ©1999 By Julie A. Bolduc p125003

