
Christmas Tree Countdown
 Designed By Julie A. Bolduc
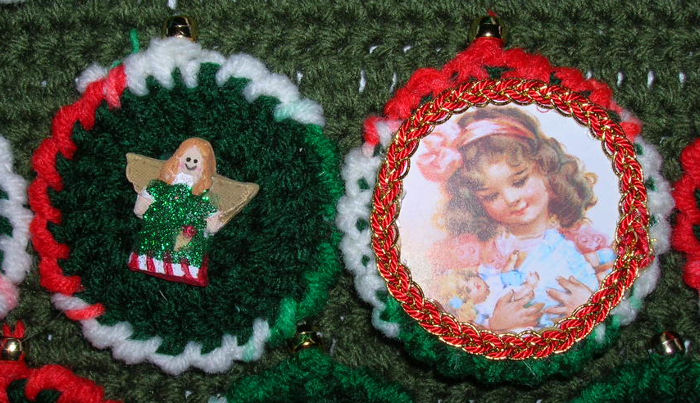
This crocheted Christmas Tree Countdown is made from the bottom up and is supported by dowels on the back side. The tree stand is made after the main part of the tree is stitched. Each ornament is made one at a time and attached to the tree with a bead at the top. Each ornament is has a miniature flat back ornament glued to the front and the back has a circle cut from a recycled Christmas card. Then the cut edges of each circle is covered with a decorative metallic red and gold braid trim. To use this count down, just turn an ornament over each day saving the star for last. If you have left over supplies, you can use them to make more ornaments for your family's Christmas tree! They would also make great little gifts!
Materials Needed3oz Worsted weight acrylic yarn in forest green
3oz Worsted weight acrylic yarn in Thyme green
1oz Worsted weight acrylic yarn in a variegated Christmas yarn
Scrap of worsted weight acrylic yarn in light yellow
Scrap of Worsted weight acrylic yarn in white
Large scrap of Worsted weight acrylic yarn in red
1 dowel, 10"x¼"
1 dowel, 18"x¼"
1 dowel, 12" x¼"
4 pieces Green felt 1¼" x 2½"
Sewing thread to match felt & needle
24 flat back mini ornaments with hangers removed about 1" in size
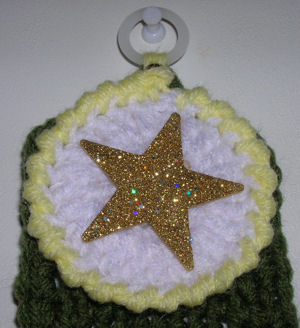
1 flat gold glitter star ornament 2" diameter hanger removed
Old Christmas cards, enough to get 25 circles from.
Small mouth canning jar ring or a circle template 2¼" in diameter
1 bone ring ¾" diameter for hanger at top
Hot Glue gun and several sticks about 12-15 small sticks
6 yards gold and red braid trim ¼" wide 25 gold pony beads
Size I/9 or 6mm aluminum crochet hook
Yarn needle for weaving in ends and stitching ornaments to tree
Yarn Thickness: 4mm
Gauge: 3dc=1"
Finished Size: about 18" x 24"
Skill Level: Intermediate
Instructions Click Image ornaments to enlarge.
BackgroundCasing
ROW 1: Ch43. Sc in 2nd ch from hook and in each ch across. Ch1, turn.
ROW 2: Sc in each sc across. Ch1, turn.
ROW 3: Sc in each of the first 13 sc. Sc around back post of each of the next 16 sc. Sc in each of the last 13 sc. Ch1, turn. The loops of the 16 sc you worked on the back post will be where the tree stand goes.
ROW 4: Sc in each sc across. Ch1, turn.
ROW 5: Fold piece in half lengthwise making sure the loops of the 16 center stitches are on the outside. Working through both layers sc in each st across forming a casing for the dowel. Ch3, turn.
ROW 6: Sk very first sc. Dc in each sc across. Ch1, turn.
ROW 7: Sc in each dc across and in top of ch3. Ch3, turn.
ROW 8: Repeat ROW 6.
ROW 9: Repeat ROW 7.
ROW 10: Sk very first sc. Dc in each sc across. Ch10, turn. (increases made)
ROW 11: Sc in 2nd ch from hook and in each of the next 8 chs. Sc in each dc across and in top of ch3. Sc in bottom 2lps of previous sc 9 times. 9 sc Increases made at the end of this row. You should now have a total of 60 stitches across.
ROW 12: Sk very first sc. Dc in each sc across. Ch1, turn.
ROW 13: Repeat ROW 7.
ROW 14: Repeat ROW 6.
ROW 15: Repeat ROW 7.
ROW 16: Repeat ROW 6.
ROW 17: Repeat ROW 7.
ROW 18: Repeat ROW 6.
ROW 19: Sc in each dc across and in top of ch3. Do not chain, just turn.
ROW 20: Slst in each of the next 4 sc. Ch3. Dc in each of the next 51 sc. Ch1, turn. You have just decreased 4 stitches on each side.
ROW 21: Sc in each st across. Ch3, turn.
ROW 22: Sk very first sc. Dc in each sc across. Ch1, turn.
ROW 23: Repeat ROW 21.
ROW 24: Repeat ROW 22.
ROW 25: Sc in each st across. Do not chain, just turn.
ROW 26: Slst in each of the next 4 sc. Ch3. Dc in each of the next 43 sc. Ch1, turn.
ROW 27: Repeat ROW 21.
ROW 28: Repeat ROW 22.
ROW 29: Repeat ROW 21.
ROW 30: Repeat ROW 22.
ROW 31: Sc in each st across. Do not chain, just turn.
ROW 32: Slst in each of the next 4 sc. Ch3. Dc in each of the next 35 sc. Ch1, turn.
ROW 33: Repeat ROW 21.
ROW 34: Repeat ROW 22.
ROW 35: Repeat ROW 21.
ROW 36: Repeat ROW 22.
ROW 37: Sc in each st across. Do not chain, just turn.
ROW 38: Slst in each of the next 4 sc. Ch3. Dc in each of the next 27 sc. Ch1, turn.
ROW 39: Repeat ROW 21.
ROW 40: Repeat ROW 22.
ROW 41: Repeat ROW 21.
ROW 42: Repeat ROW 22.
ROW 43: Sc in each st across. Do not chain, just turn.
ROW 44: Slst in each of the next 4 sc. Ch3. Dc in each of the next 19 sc. Ch1, turn.
ROW 45: Repeat ROW 21.
ROW 46: Repeat ROW 22.
ROW 47: Repeat ROW 21.
ROW 48: Repeat ROW 22.
ROW 49: Sc in each st across. Do not chain, just turn.
ROW 50: Slst in each of the next 4 sc. Ch3. Dc in each of the next 13 sc. Ch1, turn.
ROW 51: Repeat ROW 21.
ROW 52: Repeat ROW 22.
ROW 53: Repeat ROW 21.
ROW 54: Repeat ROW 22.
ROW 55: Sc in each st across. Fasten off and weave ends into back of work.
Tree Stand
Lay tree in front of you so the casing is near you and the top of the tree is away from you.
ROW 1: Join red to the first of the 16 stitches. Sc in each of the 16 sts across. Ch 3, turn.
ROW 2: Dc in each of the next 15 sc, do not chain, just turn.
ROW 3: Sc in each of the next 14 dc. Ch3, turn.
ROW 4: Dc in each of the next 13 sc, do not chain, just turn.
ROW 5: Sc in each of the next 12 dc. Fasten off and weave ends into back of work.
Perimeter Tree Stand
Join red to left side of row 1 of tree stand. Work 1 sc in each sc and 2 sc in each dc row, a sc in each sc across the bottom and 2 sc in each of the 2 corners. Fasten off and weave ends into work.
Perimeter of Tree
Lay tree in front of you so the stand is at the bottom, right side facing you. Join green yarn to ROW 5 but with a long enough end to stitch the opening of the casing closed. Stitch end of casing closed. Work of row of sc all the way to the other side of tree to the other end of the casing working 2 sc in each dc row and 1 sc in each sc row. Work 2 sc in each outside corner you come to. When you get to the other end of the casing, slip the 12" dowel into the casing then stitch casing closed.
Dowel Pockets on Back side
Make 4 pockets the same with your 4 pieces of green felt. Fold each piece in half short end to short end and using sewing thread and a whip stitch, sew the 2 sides closed leaving the side opposite the folded side open.
Glue the pockets to back side of tree. Glue one at each end at the top of the widest part, making sure the open sides are facing inward, toward the center.
Glue the other 2 pockets on the 3rd outer corners up from the widest point. Glue them the same way you did for the first 2 pockets, so the openings are facing toward the center of the tree. The correct tier should be about 10" wide. You will be putting the dowels in these pockets after you are done putting the ornaments on the tree. Set the background aside.
 Ornaments: Make 24 the same, with green and Christmas Multi Yarn.
RND 1: With forest green, Ch3, 12 dc in 3rd ch from hook. Join w/slst to first dc.
Ornaments: Make 24 the same, with green and Christmas Multi Yarn.
RND 1: With forest green, Ch3, 12 dc in 3rd ch from hook. Join w/slst to first dc.
RND 2: Ch3, dc in same st as slst. 2dc in each dc around. Join w/slst to top of ch3. Fasten off and weave ends into back of work. To close the center tight, weave the starting end through the first round to gather up tight.
RND 3: Join Christmas multi to same st as slst. Ch1. Work a reverse sc in each st around. Join w/slst to Ch1. Fasten off, leave finishing end long, about 6" for attaching to tree later. Weave other end in.
Star:
Repeat as for ornament but use white yarn for first 2 rounds and use yellow yarn for 3rd round.
Assembly
Step 1: With canning jar lid ring or circle template, draw 25 circles from your christmas card making sure you do one with a Nativity Scene on it for the star ornament. If you use the canning jar ring, the inside circle is just the right size. This is your tracing line and cutting line. Cut out all circles.
Step 2: With hot glue, glue all circles to the back side of each ornament and the white circle, making sure the finishing end of yarn, is at the top of each ornament.
Step 3: With hot glue, glue trim to outer edges of each circle to cover the edges. I do not cut the trim off until it is glued into place, then I cut it. that way it will always be the right size. Be patient with this part, it took me a couple of hours to do this. Do this with all 25 ornaments. Make sure your nativity scene is glued to the white ornament.
Step 4: If your mini ornaments have hangers attached, cut them all off. Also cut the hanger off of your star ornament if their is one. Glue all of these ornaments to the front side of each of your tree ornaments. Glue the star to the front side of your white ornament.
Step 5: Lay tree down on your work surface to the pockets are on the back side and you cannot see them. Position all of your ornaments on your tree and arrange them according to how you want them to look. You might want to mark each spot where the top of each ornament is located with a contrasting 2" piece of yarn to remember where they were. These spots are where you will be attaching each ornament.
Step 6: Attach each ornament in this manner. Put yarn end on a needle. Pick up a pony bead and bring it all the way to the top of the ornament. Push needle through spot on tree where you marked it and bring it back up around a stitch and bring it back through the bead. Weave the end in through the last round of the ornament to secure it. Trim end close to ornament. Repeat for each ornament. Put the white ornament at the top. When I attached the top ornament, I also attached the bone ring to to the very top of the tree with the same piece of yarn as the top ornament.
Step 7: Place dowels on back side of tree with each end in a pocket to support the weight of the tree. Enjoy!!
Buyer's Guide
You could get these supplies from any good craft store such as Hobby Lobby, Michael's or Amazon.com
Design written on Friday, November 30, 2007. Copyright ©2007 By Julie A. Bolduc p115025
JPF Crochet Club where Crocheting is Just Plain FunThis crochet pattern is for personal use only and is not to be resold.
Sheetworks Studio Version 2.5 — Free Download! - Two New Categories Added, Graph Paper and Quilt Blocks
All items in our online shop ship free within the US only. I currently offer U.S. shipping only and it is from rural Maine. Delivery can vary from 2–14 days depending on your distance from Maine. Expedited shipping is not available.
Please note: I am now selling all of my paper bead making tools and other items from this web site using Paypal payments.
I have removed all of my paper bead making tools from Amazon. My Kindle crochet pattern books and paper template paperback books continue to be available on Amazon, as they are printed and fulfilled directly by Amazon. A limited number of paper bead making tools remain available on Etsy but I am not linking to those tools from this site.
Random Quick Tip!
Remember What ThreadWhile keeping track of what your ball of thread is when you open a new ball of thread, put the wrapper inside the ball. That way, if you need to buy more of the same stuff, you will know what it is.