Granny Square Boot Centerpiece
 Designed By Julie A. Bolduc
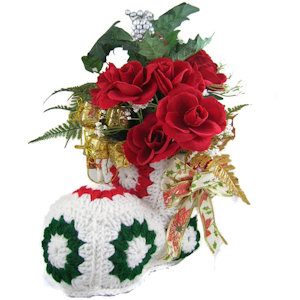
This crocheted boot centerpiece is fast and easy to make. It uses a simple granny square pattern that has a wreath worked into it. I have tucked an empty plastic coffee can inside but you can use anything in it that is the same size.
Materials Needed
2oz Worsted Weight acrylic yarn in White.*
1oz Worsted Weight acrylic yarn in Cherry Red*
1oz Worsted Weight acrylic yarn in Hunter Green*
Size H/8 or 5mm aluminum crochet hook
Empty coffee can
Yarn needle for stitching seams and weaving in ends.
2 Decorative Bows 1 for either side of the upper part of the boot. optional
Silk or fresh flowers.
Yarn Thickness: 4mm
Gauge: 4sc=1"
Finished Size: 9"x6½"x4½" not including flowers
Skill Level: 2**
Special Stitches Used:
Begcl, Beginning Cluster: Ch2, yo, insert hook in same st as indicated, yo, pull up a loop, yo, pull through 2 lps on hook, yo, insert hook in same st, yo, pull up a loop, yo pull through 2 lps on hook, yo, pull through all 3 lps on hook.
Cluster: clYo, insert hook in stitch indicated, yo, pull up a loop, yo, pull through 2lps on hook, yo, insert hook in same st, yo, pull up a loop, yo, pull through 2 lps on hook, yo, insert hook in same st one more time, yo, pull up a loop, yo, pull through 2 lps on hook, yo, pull through all 4 lps on hook.
Instructions
Motif 1: Make 2 exactly the same.
RND 1: Ch3, 12 dc in 3rd ch from hook. Join w/slst to first dc.
RND 2: Begcl in same st as slst. Ch1. *Cl in next dc. Ch1. Rep from * around. Join w/slst to top of begcl.
RND 3: Slst into the next ch1 sp. Ch3, 2dc, ch2, 3 dc in same sp. 3dc in each of the next 2 ch1 sps. *3dc, ch2, 3dc in next ch1 sp. 3dc in each of the next 2 ch1 sps. Rep from * around. Join w/slst to top of ch3. Fasten off leaving an 18" end on one of the squares. Weave all ends except the one that is 18" long, in.
Motif 2: Make 6 with the green wreath and 5 with the red wreath. These are worked almost exactly as the first motif but the 2nd round is a different color. The red and green color will be referred to as color 2.
RND 1: Ch3, 12 dc in 3rd ch from hook. Join w/slst to first dc. Fasten off white.
RND 2: Join color 2 in same st as slst. Begcl in same st as slst. Ch1. *Cl in next dc. Ch1. Rep from * around. Join w/slst to top of begcl. Fasten off and weave all ends into work at this point.
RND 3: Join white in any ch1 space. Ch3, 2dc, ch2, 3 dc in same sp. 3dc in each of the next 2 ch1 sps. *3dc, ch2, 3dc in next ch1 sp. 3dc in each of the next 2 ch1 sps. Rep from * around. Join w/slst to top of ch3. Fasten off leaving an 18" end. Weave the beginning end into back of work.
You should now have a total of 13 squares. 2 white, 5 red, 6 green. All but one of the white squares should have all of their ends woven in except there very last end at the end of the last round. you will use these ends to join the squares together.
- Assembly:
- Lace the 2 white pieces together along one edge only. Weave the rest of the end in. Set aside for now.
- Lace 3 of the red pieces together to form a strip. Weave all ends in. Set aside for now.
- Lace 2 of the red pieces together as you did the white one. Set aside for now.
- Lace the 6 squares together to form a strip but leave the last end undone and do not weave it in. Weave the rest in and place in front of you on a work surface so it is crosswise from left to right.
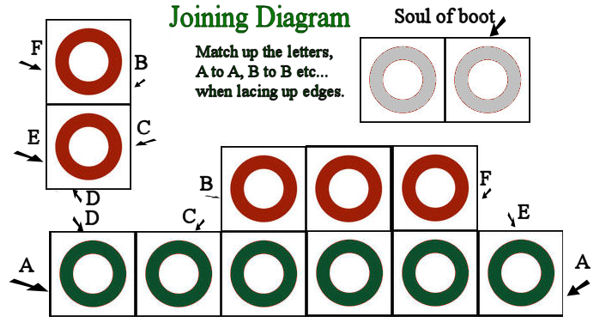
- Lay the 3 square strip above the 6 square strip so that it starts one square in from the right hand side and lace stitch the 3 square strip to the 6 square strip matching up the red squares to the green squares. See diagram for what this should look like. Weave ends of this seam in.
- Lace the 2 ends of the 6 square strip together using the end you did not weave in.
- Pick up the 2 red squares and lace them to the 2 end red squares and 3 of the green squares to form the front of the boot. Start at the top left corner of the red square, work to the bottom corner, then across the 3 green squares then up the other red square. See Picture to see how it should look.
- Soul: Single crochet the white soul to the bottom of the boot. Work so the outside of the boot is facing you and work one sc in each stitch around through both layers lining up the short ends with the front and back of the boot. Weave all ends in.
- Stuff toe of boot with lots of empty plastic shopping bags. Place empty container into top of boot.
- Put desired bouquet of Christmas flowers in empty container. You can use fresh or silk. If you use silk, you might want to put rocks in the bottom to add weight. NOTE About plastic bags. I use plastic bags in the toe so after Christmas, I can take the bags and container out and fold up the boot for storage.
To make your seams flat, use a lacing stitch and stitch through both loops on both pieces. Like you are lacing up a shoe. Make sure when you are lacing the squares together to have the wrong sides facing each other through out.
**Intermediate, for those who have made granny squares before and joined them together into odd configurations.

Design written on Monday, October 27, 2008. Copyright ©2008 By Julie A. Bolduc p115026


