Snowy Garden Doily
 Designed By Julie A. Bolduc
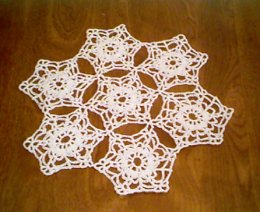
This doily can be completed in an evening and would make a great last minute gift to give someone at any holiday or birthday. The way the doily is put together, is to make the center motif first. Then make 1 motif at a time up to the 4th round, attaching each motif to the doily as you work. I first designed this doily back in 1994 for Workbasket Magazine but they did not publish it so their loss is your gain. Hope you like it. You can also use the motifs in this doily as snowflake ornaments!
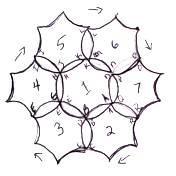
See the diagram for order of attachment.
Materials Needed
Small amount white size 10 Crochet Cotton Southmaid was used in the example
Size 6 steel crochet hook
Spray Starch
Tapestry Needle
Thread Thickness: 10thread
Gauge: 9sc=1"
Finished Size: 9 ¾" across, 1 motif=3"
Skill Level: Beginner
Instructions
First Motif
RND 1: Ch10, join w/slst to first ch to form ring. Ch4. *Dc in ring, ch1. Rep from * 10 times more. Join w/slst to 3rd ch of ch4. You should now have 12sc and 12 ch1 sps.
RND 2: Slst into the first ch1 sp. Sc in this sp. * Work the foll into the next ch1 sp. (3dc, ch2, 3dc) Sc in the next sp. Rep from * around. Join w/slst to first sc.
RND 3: Ch5. *Work the foll in the next ch2 sp. (Sc, ch5, sc) Ch5, sc in next sc. Ch5. Rep from * around. Join w/slst in the first ch of ch5.
RND 4: Ch8. *Work the foll in the next ch5 lp that was made in the ch2 sp of rnd 2. (Dc, ch3, dc) Ch5, dc in the next sc that is bet the next 2 ch 5 lps. Rep from * around. Join w/slst in the 3rd ch of ch8.
RND 5: Ch6. *Work the foll in the next ch3 lp. (Dc, ch2, dc, ch4, dc, ch2, dc) Ch3, dc in the next dc bet ch5 lps. Rep from * around. Join w/slst to the 3rd ch of ch6. Slst into this lp. Fasten off and weave ends into back of work.
Work the next 6 motifs the same way but when you get to the 5th rnd, do the foll in the ch3 lp corners. (Dc, ch2, dc, ch2, slst to the ch4 lp of another motif, ch2, dc, ch2, dc)

Follow diagram for the sequence for putting the doily together. Fasten off after each motif has been joined and weave the ends into the work before going onto the next motif.
Blocking: After the doily is complete, lay a dish towel onto the ironing board to protect the surface from the starch. Lay the doily flat face down on the towel, stretch it into shap. Spray the doily lightly with the starch and with a hot iron, press the doily flat until it is dry. Be careful to keep the iron moving soas to not scorch the doily. Let cool completely before removing the doily from the towel.
Design written on Friday, May 28, 1999. Copyright ©1999-2007 By Julie A. Bolduc p111009

