3" Wide Filet Crochet Edging

Designed By Julie A. Bolduc
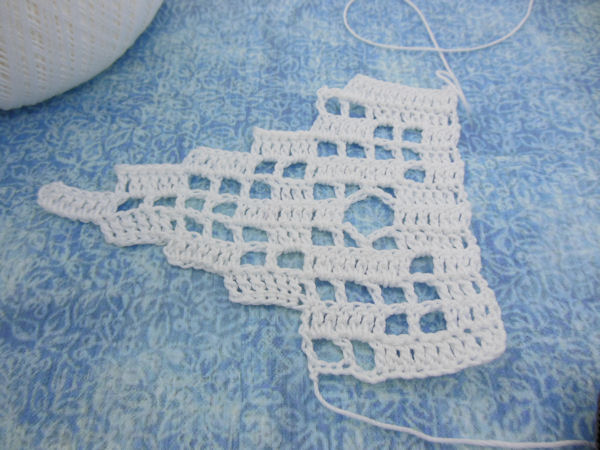
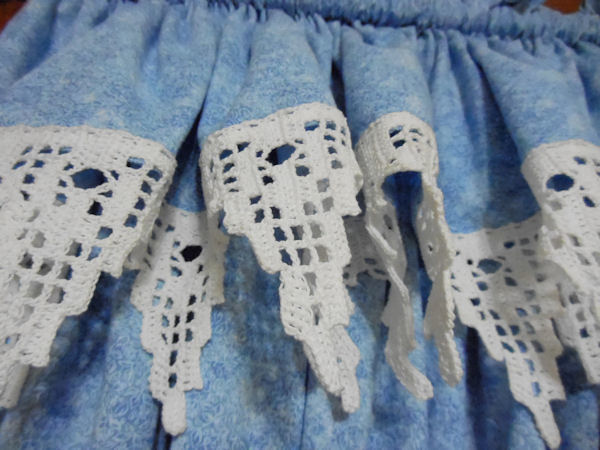
This edging pattern is the one I designed for my Craft Room Curtains. Make sure to make the item that this edging is for first then make the edging to fit. This pattern is a good one to use when learning how to increase and decrease at the ends of rows in filet.
Materials Needed
Size 10 White Crochet Cotton
Size 7 Steel Crochet Hook
Spray Starch to stiffen lightly
Tapestry Needle for weaving in ends
Yarn Thickness: 10thread
Gauge: 10dc = 1"
Finished Size: 3" W x 4" L
Skill Level: Beginner to intermediate in filet

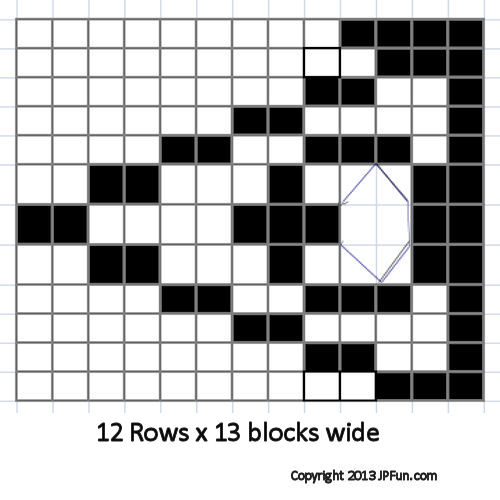
InstructionsUse chart at Guide starting on the right hand side of the chart after making the starting chain.
ROW 1: Ch18. Dc in 4th ch from hook and in each of the next 8 chs. Ch2, sk 2 chs, dc in next ch, twice. Ch3, turn.
ROW 2: 2dc in next ch2 sp, dc in next dc, twice. Ch2, sk 2 dc, dc in next dc, 3 times. Dc in each of the next 2 dc and in top of ch3. Ch3, turn.
ROW 3: Dc in each of the next 3dc. Ch2, dc in next dc, twice. Ch2, sk 2 dc, dc in next dc. Ch2. Sk 2 dc. Dc in top of ch3. Work a tr in the same place as last dc. Work a tr into bottom segment of previous tr 7 times to increase this row by 2 blocks. Ch8, turn.
ROW 4: Dc in 4th ch from hook and in each of the next 4 chs. Dc in next dc. Ch2, sk 2 dc, dc in next dc, twice. 2dc in next ch2 sp, dc in next dc, 3 times. Ch2. Dc in each of the next 3 dc and in the top of ch3. Ch3, turn.
ROW 5: Dc in each of the next 3 dc. 2dc in next ch2 sp. Dc in next dc. Ch3. Sk 2 dc. Sc in next dc. Ch3. Sk 2 dc. Dc in next dc. Ch2. Sk 2 dc. Dc in next dc. 2dc in next ch2 sp. Dc in next dc. Ch2. Dc in next dc, ch2, sk 2 dc, twice. Dc in top of ch3. Work a tr in the same place as last dc. Work a tr into bottom segment of previous tr 7 times to increase this row by 2 blocks. Ch8, turn.
ROW 6: Dc in 4th ch from hook and in each of the next 4 chs. Dc in next dc. Ch2, sk 2 dc, dc in next dc, twice. Ch2, dc in next dc, twice. 2dc in next ch2 sp. Dc in next dc and in each of the next 3 dc. 2dc in next ch2 sp. Dc in next dc. Ch5. Dc in each of the next 7 dc and in the top of ch3. Ch3, turn.
ROW 7: Dc in each of the next 6dc. Ch2, sc in next ch5 sp. Ch2. Dc in next dc. Ch2. Sk 2 dc. Dc in next dc and in each of the next 3 dc. Ch2. Sk 2 dc. Dc in next dc. Ch2, dc in next dc, twice. 2dc in next ch2 sp, dc in next dc, twice. Ch1, turn.
ROW 8: Slst in each of the first 7 dc. Ch3. 2dc in next ch2 sp, dc in next dc, twice. Ch2, dc in next dc. Ch2. Sk 2 dc. Dc in next dc. 2dc in next ch2 sp. Dc in next dc. 2dc in next ch2 sp. Dc in next sc. 2dc in next ch2 sp. Dc in next dc. Ch2. Sk 2 dc. Dc in each of the next 3dc and in the top of ch3. Ch2, turn.
ROW 9: Dc in each of the next 3 dc. Ch2. Dc in next dc. Ch2, sk 2 dc, dc in next dc, 3 times. 2dc in next ch2 sp. Dc in next dc. 2dc in next ch2 sp. Dc in next dc. Ch1, turn.
ROW 10: Slst in each of the first 7 dc. 2dc in next ch2 sp. Dc in next dc. 2dc in next ch 2p. Dc in next dc. Ch2. Dc in next dc. Ch2. Dc in each of the next 3 dc and in top of ch3. Ch3, turn.
ROW 11: Dc in each of the next 3 dc. 2dc in next ch sp, dc in next dc, twice. Ch2. Sk 2 dc. Dc in next dc. Ch2. Sk 2 dc. Dc in top of ch3. Ch1, turn.
ROW 12: Slst in each of the first 2 chs and into the next dc. Ch3. 2dc in next ch2 sp. Dc in each of the next 8 dc and in top of ch3.
Repeat these 12 rows as many times as needed to fit the edge of the item you are making this for. Remember, the finished 12 rows equals about 3" wide. Use and Iron and Niagra Spray starch to help keep it's shape before sewing it on the edge of your project.

Design written on Wednesday, July 17, 2013. Copyright ©2013 By Julie A. Bolduc f123005

