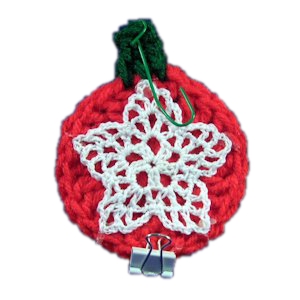
Star Ornament Magnet Recipe Holder
 Designed By Julie A. Bolduc
This magnet is meant to hold your recipe card while you are cooking or baking during the holidays. It is made with worsted weight acrylic yarn, crochet thread and a bull clip for the recipe cards. It is fast and easy to make!
Materials Needed
Scraps of red & green Worsted weight acrylic yarn.
Size 10 crochet cotton in white.
Size H/8 or 5mm aluminum crochet hook
Size 7 steel crochet hook
Tapestry and Yarn needle for weaving in ends
Small Spring type paper clip
Hot Glue and Glue Gun
Ornament hanger
Yarn Thickness: Yarn-4mm, Thread-10thread
Gauge: Yarn-4dc=1", Thread-8sc=1"
Finished Size: 2.5" x 3"
Skill Level: Beginner
Instructions
With red & H hook
RND 1: Ch4. 11dc in 4th ch from hook. Join w/slst to top of ch4.
RND 2: Ch3, dc in same st as slst. 2dc in each st around. Join w/slst to top of ch3. Fasten off red. Weave ends into back of work
Hanger Thing on top of ornament
Join green to same st as slst. Ch2, yo, insert hook in next st, yo, pull lp through 2 lps on hook, twice. Yo, pull through all 3 lps on hook. You should have each of the 3 parts of a cluster in 3 stitches. Fasten off and weave ends into back of work.
Star
RND 1: Ch5. Join w/slst to first ch of ch5. Ch3. Dc in ring. Ch4. 2dc in ring, ch4, 4 times. Join w/slst to top of ch3.
RND 2: Slst in next st and into next ch4 sp. Ch5, dc, ch3, dc, ch2, dc in same sp. Dc, ch2, dc, ch3, dc, ch2, dc in each ch 4 sp around. Join w/slst to 3rd ch of ch5.
RND 3: Ch4. (Dc in next dc. Ch2, dc, ch4, dc in next ch3 sp. Ch2. Dc in next dc. Ch3. Sc in next dc.) *Sc in next dc. Rep bet () once. Rep from * around. Join w/slst to first ch of ch4.
Assembly
Step 1: Hot Glue star to center front of ornament, tacking points in place with a toothpick dipped in the hot glue.
Step 2: Stitch clip to bottom of ornament just under the star with yarn.
Step 3: Cut 3 magnet strips, one 1.25", and two 1" long. Hot glue magnet strips to back putting the longer one in the center and each of the other 2 on the sides of the long one.
Step 4: Attach ornament hanger to very top of ornament.
Design written on Saturday, December 02, 2006. Copyright ©2006 By Julie A. Bolduc f105004

