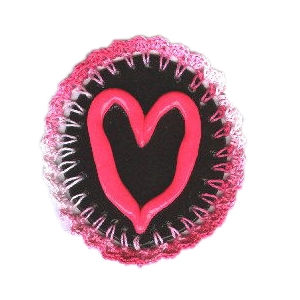
Polymer Heart Fridgie
 Designed By Julie A. Bolduc
This unusual fridgie is made with polymer clay and is edged in crochet. You can use any polymer clay but I used Fimo. You can get the polymer clay at Wal-Mart.
Materials Needed:
Polymer Clay in two colors. I used a blend of colors to get the dark background cause that is what I had. I also used a neon pink color but you could use what you want.
Small amount Size 10 Crochet Cotton color of choice.
A piece of sheet magnet about 1½"x2" oval shape. You cancut this from a larger piece of sheet magnet. You can use tape magnet if you prefer.
Size 8 steel crochet hook.
A few other things you will need.
A glass jar to use as a rolling pin.
Baking Sheet
Yarn Needle
Oven
Mod Podge in Glossy finish
Ceramcoat Varnish with gloss finish
Small Craft paint brush
Yarn Thickness: 10thread
Gauge: 10sc=1"
Finished Size: 3"x3" ¾"
Skill Level: Intermediate

Instructions
If you never worked with a polymer clay before, here are a few things to know.
Warm the clay so it is easy to work with. I usually sit on it for a while. In a plastic bag that is.
Keep away from kids. It is not exactly non toxic.
Do not use wooden utensils when working with this. The clay will work into the pores.
Clean all utensils used thoroughly after you are done with them with hot soap and water. And wash your hands when you are done.
Other than that, have fun!!!
Step 1: You do not need much for this project. All you need is a piece of dark about the size of a large gumball. 1" diameter. For the light color you need one that is about ¾" in diameter.
Step 2: Roll out the dark color on a clean flat surface until it is 1/16th inch thick. Or as thin as you can get it. Form it into an oval shape about 2"x2 ¾" in size. Use a knife for this to cut it out. Or if you have one, you can use one of those Crystal light Drink Mix containers that I used for the JPFCup in the free patterns section. That is what I used. Since it is plastic, I just squeezed the sides in a little to make an oval shape then used it as a cookie cutter.
Step 3: Place onto baking sheet and then with yarn needle, poke holes around the perimeter about ¼" apart and ¼" away from the edges. You will need to make a tiny circle motion to open up each hole to make the hole a little bigger. Make the holes 1/8th inch diameter. The number of holes does not matter.
Step 4: Roll the light colored clay into a long snake about 8" x ¼" thick. Shape into a heart and place in the center of the dark piece tamp it down a bit to meld the pieces together. Play around with it until you like the effect. Have fun. You can actually do another shape if you prefer. It is up to you.
Step 5: Bake the clay on the baking sheet at 250 degrees F. for 30-45 minutes. It should be hard when done. No longer than 45 min. You may need to loosen it with a spatula.
Step 6: Allow to cool completely. Then glaze with a coat each of the mod podge and then the varnish. After it is completely dry, work the crocheted edging.
Crocheted Edging
RND 1: Join yarn in any hole. Sc in same hole. Ch3. *Sc in next hole. Ch3. Rep from * around. Join w/slst to first sc.
RND 2: Slst into the first ch3 sp. work the fol in each ch3 sp around. (2dc, ch2, sc.) Join w/slst to top of ch3. Fasten off and then glue the magnet onto the back
Design written on Wednesday, May 05, 1999. Copyright ©1999 by Julie A. Bolduc. p105010

