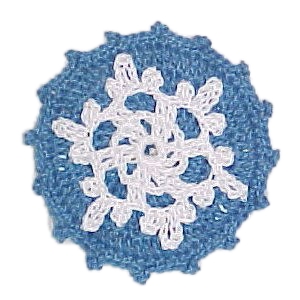
Snowflake Fridgie
 Designed By Julie A. Bolduc
This fridgie is made in 2 parts then the parts are tacked together. You could make a few in an evening and would make a great holiday gift!
Materials Needed
Size 10 crochet cotton in white and blue
Size 7 steel crochet hook
Tapestry Needle for weaving in ends
Sheet magnet about 2"x2" square
Hot Glue and gun
Yarn Thickness: 10thread
Gauge: 10sc = 1"
Finished Size: 2½" diam
Skill Level: Beginner
Instructions
RND Snowflake 1: Ch6, join w/slst to first ch to form ring. Ch3. Dc in ring. Ch2. 2dc in ring, ch2. 5 times. Join w/slst to top of ch3.
RND 2: Ch3. Dc in next dc. (Ch5, slst in 5th ch from hook, ch8, slst in 8th ch from hook, ch5, slst in 5th ch from hook.) *Dc in each of the next 2 dc. Rep bet () once. Rep from * around. Join w/slst to top of ch3. Fasten off and weave ends into back of work. Set snowflake aside.
RND 1 Background: With Blue: Ch4. Join w/slst to first ch to form ring. Ch3. 15 dc in ring. Join w/slst to top of ch3.
RND 2: Ch3. Dc in same st as slst. 2dc in each st around. Join w/slst to top of ch3.
RND 3: Ch3. 2dc in next st. *Dc in next st. 2dc in next st. Rep from * around. Join w/slst to top of ch3.
RND 4: Ch3. Dc in same st as slst. Dc in each of the next 2 sts. *2dc in next st. Dc in each of the next 2 sts. Rep from * around. Join w/slst to top of ch3.
RND 5: Ch1. Sc in next dc. Ch3, slst in 3rd ch from hook. Sc in each of the next 2 sts. *Sc in each of the next 2sts. Ch3, slst in 3rd ch from hook. Sc in each of the next 2 sts. Rep from * around. Join w/slst to ch1. Fasten off and weave ends into back of work.
Finishing Assembly: With white thread. Tack snowflake to background at the tip of every ch3 and ch5 lp around. Cut the corners off of the sheet magnet square so it fits on the back of the blue background to cover up the white stitches. Glue to back of background.
Design written on Thursday, September 9, 2004. Copyright © 2004 By Julie A. Bolduc p105018
