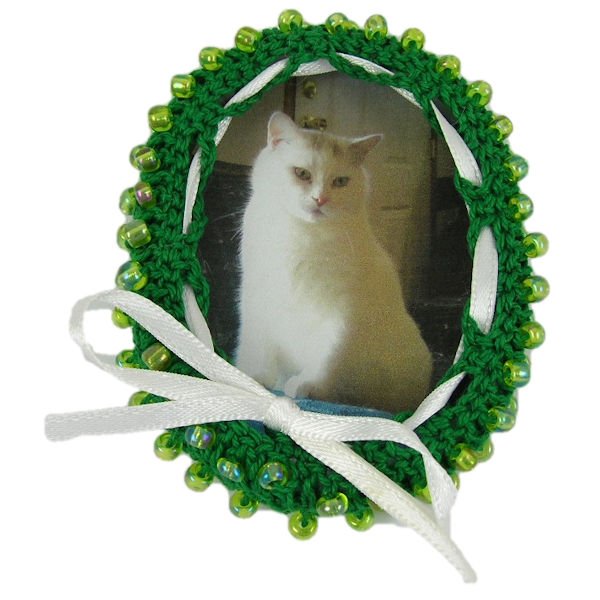
Beaded Oval Frame Fridgie
 Designed By Julie A. Bolduc
This beaded frame uses a recycled lid from an oval Crystal Light container and is fast and easy to make. You can use what ever color combination of beads and thread you like for any occasion! This would also make a great Christmas ornament by just switching out the magnetic tape for an ornament hook. (The cat in the picture is my 18pound cat Boggle who passed away in October of 2018 at the age of 12 years old.)
- Materials Needed:
- Size 10 crochet cotton in green
- 64 E Beads of desired color
- 1 lid from an oval Crystal Light Container
- Size 7 steel crochet hook
- Scrap piece of paper
- Stamp pad
- Magnet Tape
- 24" 1/8" wide white satin ribbon
- Wallet Sized Picture for frame
Yarn Thickness: 10thread
Gauge: 8dc=1"
Finished Size: approx, 2½"x3¼"
Skill Level: Intermediate
Special Stitch
Beaded Double Crochet (beaded dc): Yo, insert hook in st indicated, yo, pull up a loop, yo, pull through 2 loops on hook, bring up a bead, yo, pull through last 2lps on hook.
Instructions
String all beads on to thread.
RND 1: Ch12. 2dc in 4th ch from hook. Dc in each of the next 7 chs. 3dc in last ch. 3dc in same last ch but on the other side to turn corner. Dc in each of the next 7 sts. 3dc in last st. Join w/slst to top of ch3. (26dc)
RND 2: Ch3, dc in same st as slst. 2dc in each of the next 2 dc. Dc in each of the next 7 dc. 2dc in each of the next 6 dc. Dc in each of the next 7 dc. 2dc in each of the next 3 dc. Join w/slst to top of ch3. (38dc)
RND 3: Ch3, dc in same st as slst. Dc in next dc. 2dc in next dc, dc in next dc, twice. Dc in each of the next 7 dc. 2dc in next dc, dc in next dc, 6 times. Dc in each of the next 7 dc. 2dc in next dc, dc in next dc, 3 times. Join w/slst to top of ch3. (50dc)
RND 4: Ch3, dc in same st as slst. Dc in each of the next 2 dc. 2dc in next dc, dc in each of the next 2 dc, twice. 2dc in next dc. Dc in each of the next 6 dc. 2dc in next dc, dc in each of the next 2 dc, 6 times. 2dc in next dc. Dc in each of the next 6 dc. 2dc in next dc, dc in each of the next 2 dc, 3 times. Join w/slst to top of ch3. (64dc)
RND 5: Ch1, sc in same st as slst and in each dc around. Join w/slst to first sc.
RND 6: Ch3. Working in back lp only for this round. Beaded dc in next st. *Dc in next st. Beaded dc n next st. Rep from * around. Join w/slst to top of ch3. (64dc)
RND 7: Ch1, pull up a bead, ch2. Dc in next st. *Beaded dc n next st. Dc in next st. Rep from * around. Join w/slst to top of ch3. (64dc)
RND 8: Ch1, sc in same st as slst. Sc in next st. Ch2. Sk 2 sts. *Sc in each of the next 2 sts. Ch2. Sk 2 sts. Rep from * around. Join w/slst to first sc. Fasten off and weave all ends into back of work. Weave ribbon through last round.
Assembly:
Step 1: Use stamp pad & press top of lid into pad and press onto piece of paper to make a template.
Step 2: Cut out template making sure to cut on the inside of the lines
Step 3: Use template and trace onto picture for inside of frame.
Step 4: Put picture inside of lid.
Step 5: Place lid inside crochet work pulling edges up over rim of lid.
Step 6: Gather up ribbon and tie into a bow. Trim ends of ribbon.
Design written on Friday, March 11, 2011. Copyright ©2011 By Julie A. Bolduc p105022

