
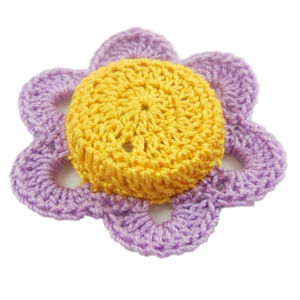
Pretty Posy Fridgie
 Designed By Julie A. Bolduc
This pretty flower fridgie is made with a recycled water bottle cap and cardboard and is fast and easy to make. You could make these for your local Bazaar or give them as gifts!
Materials Needed
Size 10 Crochet Cotton in Golden Yellow
Size 10 Crochet Cotton in Lavender
1 clean water bottle cap, 1" x ¼"
3 Small pieces of rigid cardboard from a pad of paper. ½" x ½" each
1 round button magnet, ¾" in diameter
Strong White Glue
Tapestry Needle for Weaving in ends
Yarn Thickness: 10thread
Gauge: 3rd round should be 1" in diameter.
Finished Size: 2¼" diameter
Skill Level: Beginner to Intermediate
Get the Bottle Cap Ready
Step 2: Place a dab of glue on the cardboard, then take the paper off of the adhesive backed button and push the button into the glue on the cardboard making sure it is centered in the bottle cap. Set aside the prepared bottle cap and let it dry overnight. Meanwhile, work on the crocheted part. TIP: If your magnet button has an adhesive sticky back, you are still going to want to glue the button magnet in place. The adhesive the manufacturer uses is not tacky enough.
Make the Flower
RND 1: With Golden Yellow Ch4, join w/slst to first ch to form ring. Ch2. 12 dc in ring. Join w/slst to first dc.
RND 2: Ch3. Dc in same st as slst. 2dc in each dc around. Join w/slst to top of ch3.
RND 3: Ch1, sc in same st as slst. Sc in next dc. *2sc in next dc. Sc in next dc. Rep from * around. Join w/slst to ch1.
RND 4: Ch2, dc in same st as slst. Dc in each sc around. Join w/slst to first dc.
RND 5: Ch1. Sc in each dc around. Join w/slst to ch1. Fasten off Golden Yellow.
RND 6: Ch1. Sc in each of the next 4 sc. Ch5. Sk 1 sc. *Sc in each of the next 5 sc. Ch5. Sk 1 sc. Rep from * around. Join w/slst to ch1.
RND 7: Ch1. Slst in next sc. *Sc in next sc. 11dc in next ch5 sp. Sk 2 sc. Rep from * around. Sk the ch1 and the next slst. Join w/slst to next sc. Fasten off and weave all ends into back of work.
Final Assembly
Step 1: Spread glue all over the outside of the bottle cap so it is completely covered. Only on the outside. Let it set about 30 seconds just so the glue can settle into the ridges around the perimeter of the cap.
Step 2: Place the crocheted flower over the cap so the cap is inside the back of the flower and so the magnet is facing out. Press the stitches into the glue as needed. Allow to dry overnight before using.
This is one of those projects where you would want to get a bunch of bottle caps prepared and while they are drying you could make several of the crocheted flowers in many different color combinations. These would make a great craft fair item for kids to buy for their parents.
Design written on Monday, July 23, 2012. Copyright ©2012 By Julie A. Bolduc p105024