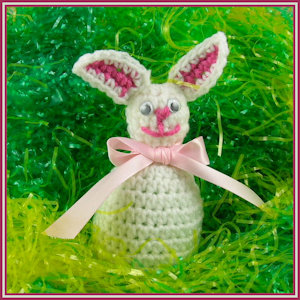
Funny Bunny Easter Egg Cozy
 Designed By Julie A. Bolduc
This easter Egg Cozy is made for Duck Sized plastic eggs that you fill with goodies for Easter. It is fast and easy to make and you could make a few in an evening!
Materials Needed
Sport Weight Acrylic Yarn in white
Scrap dark pink sport weight acrylic yarn
1 Plastic Easter Egg, duck egg size
2 wiggle Eyes 6mm diam
E6000 Glue or Super Glue Gel
3 Cotton Balls
1 white pompom ½" diam for tail
18" of ½" wide Satin Ribbon in color of choice.
Size US G/6 or 4mm aluminum crochet hook
Small yarn needle for weaving in ends and stitching nose and mouth.
Yarn Thickness: 3mm
Gauge: 5hdc=1"
Finished Size: 2½"w x6" high
Skill Level: Beginner to Intermediate
Special Stitch: Half Double Decrease (hdcdec): Yo, insert hook in stitch indicated, yo, pull up a loop, insert hook in next stitch, yo, pull up a lp, yo, pull through all 4 lps on hook.
Instructions
RND 1: With white: Ch3. 8hdc in 3rd ch from hook. Join w/slst to first hdc. (8hdc)
RND 2: Ch2. 2hdc in same st as slst. 2hdc in each st around. Join w/slst to first hdc. (16hdc)
RND 3: Ch2. Hdc in same st as slst and in each st around. Join w/slst to first hdc. (16hdc)
RND 4: Repeat RND 3.
RND 5: Ch2. Hdcdec in same st as slst. Work 7 more hdcdec around. (8sts)
RND 6: Ch2. 2hdc in same st as slst. 2hdc in each st around. Join w/slst to first hdc. (16hdc)
RND 7: Ch2. 2hdc in same st as slst. Hdc in next st. *2hdc in next st. Hdc in next st. Rep from * around. Join w/slst to first hdc. (24hdc)
RND 8: Ch2. Hdc in same st as slst and in each st around. Join w/slst to first hdc. (24hdc)
RND 9: Ch2. 2Hdc in same st as slst. Hdc in each of the next 2 sts. *2hdc in next st. Hdc in each of the next 2 sts. Rep from * around. Join w/slst to first hdc. (32hdc)
RND 10-13: Ch2. Hdc in same st as slst and in each st around. Join w/slst to first hdc. (32hdc)
RND 14: Ch2. Hdcdec in sames st as slst. Hdc in each of the next 2 sts. *1hdcdec. Hdc in each of the next 2 sts. Rep from * around. Join w/slst to first hdcdec. (24sts)
RND 15: Ch2. Hdcdec in same st as slst. Hdc in each of the next 2 sts. *1hdcdec. Hdc in each of the next 2 sts. Rep from * around. Join w/slst to first hdcdec. (18sts) Fasten off and weave ends into back of work. Set Body aside for now.
Ears: Make 2 the same.
RND 1: With Pink. Ch6. Slst in 2nd ch from hook and in each of the next 4 chs. Fasten off.
RND 2: Join white to same st as last sc on the bottom. Ch1, sc in same st . Sc in each of the next 5 sts. Ch2, to turn corner. Sc in each of the 5 sc across. 2sc around post of last sc of RND 1. 1sc in same st as joining. Join w/slst to first sc of RND 2. Fasten off leaving one white end about 12" long for stitching ears to top of head. Weave the other 3 ends into back of work.
Assembly:
Step 1: Stuff head with up to 3 cotton balls so the head is firm.
Step 2: Slip egg into bottom of work small end first. This will make it easier to finish the bunny.
Step 3: Stitch ears to top of head.
Step 4: Embroider nose and mouth onto front of face.
Step 5: Glue wiggle eyes in place with either a gel type of Super Glue or E6000. I used Loctite Super Glue.
Step 6: Now take egg back out of body, fill with goodies and put back into body.
Step 7: Glue pompom to back for tail
Step 8: Tie ribbon around neck and tie into a bow. Trim ends of ribbon if needed.
Design written on Sunday, March 27, 2011. Copyright ©2011 By Julie A. Bolduc f116009

