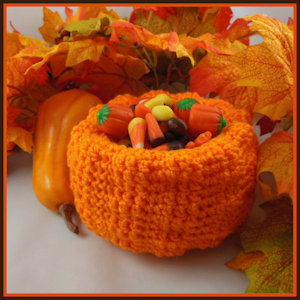
Little Pumpkin Candy Dish
 Designed By Julie A. Bolduc
This little candy dish uses one of those little plastic fruit cups from those multipack fruit cups that pineapple tidbits, diced peaches and other single serve fruits come in. It is fun and fairly easy to make and would very festive on any Halloween food table.
Materials Needed
Red Heart Sport Weight acrylic yarn in color number 0254 Pumpkin
Size F/5 or 3.75mm aluminum crochet hook
1 empty, 4oz, clean, plastic fruit cup container- Dole
Polyester Fiber Fill
Yarn Needle for weaving in ends and finishing
Yarn Thickness:3mm
Gauge: 6sc = 1"
Finished Size: 3" x 5"
Skill Level: Intermediate
Special Stitch Instructions: Working a cluster over the next 3 dc. (Yo, insert hook in next st, yo, pull up a loop, yo, pull through 2 loops on hook.) Repeat bet () three times total. Yo, pull through all 4 loops on hook. For this pattern, this will result in a decrease from 3 stitches down to 1 stitch.
Instructions
Starting with inside section. This is the part that the plastic cup fits into.
RND 1: Ch4, join w/slst to first ch to for ring. Ch2, 12dc in ring. Join w/slst to first dc. (12dc)
RND 2: Ch2, 2dc in same st as slst and in each dc around. Join w/slst to first dc. (24dc)
RND 3: Ch2, 2dc in same st as slst. Dc in next dc. *2dc in next dc. Dc in next dc. Rep from * around. Join w/slst to first dc. (36dc)
RND 4-7: Ch2, dc in same st as slst and in each dc around. Join w/slst to first dc. (36dc)
RND 8: Ch1. Sc around back post of each dc around. Join w/slst to first sc. (36sc) This forms the ridge.
RND 9: Ch1, sc in same st as slst. 3dc in next dc. Sc in next dc. *Sc in next dc. 3dc in next dc. Sc in next dc. Rep from * around. Join w/slst to first sc. (60sts)
RND 10-20: Ch1, sc in same st as slst. Dc in each of the next 3 dc. Sc in next sc. *Sc in next sc. Dc in each of the next 3 dc. Sc in next sc. Rep from * around. Join w/slst to first sc. (60sts)
RND 21: Ch1, sc in same st as slst. Work a cluster over the next 3 dc. Sc in next sc. *Sc in next sc. Work a cluster over the next 3 dc. Sc in next sc. Rep from * around. Join w/slst to first sc. (36sts)
RND 22: Ch2, dc in same st as slst and in each st around. Join w/slst to first dc. (36dc)
RND 23: Ch2, yo, insert hook in same st as slst, yo, pull up a loop, yo, pull through 2 lps on hook, insert hook in next st, yo, pull up a loop, yo, pull through all 3 lps on hook. *Yo, insert hook in next st, yo, pull up a loop, yo, pull through 2 loops on hook, insert hook in next st, yo, pull up a loop, yo, pull through 3 lps on hook. Rep from * around. Join w/slst to first decrease. (18sts) Fasten off and weave ends into back of work.
Bottom Piece
RND 1: Ch4, join w/slst to first ch to for ring. Ch2, 12dc in ring. Join w/slst to first dc. (12dc)
RND 2: Ch2, 2dc in same st as slst. Dc in next dc. *2dc in next dc. Dc in next dc. Rep from * around. Join w/slst to first dc. (18dc). Fasten off leaving an 18" tail for stitching to bottom of Pumpkin.

Assembly
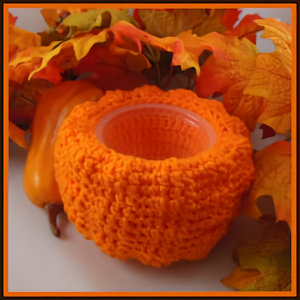
Step 1: Slip container into inside of pumpkin so it fits just under the rim. You want the container to be removable so it can be washed. See picture for reference.
Step 2: Turn pumpkin over so the hole and inside the pumpkin is facing up. Stuff the pumpkin to desired affect, between the covered cup and the outside wall.
Step 3: Stitch the bottom circle to the last round of the pumpkin using a whip stitch. Do not cut yarn yet, there is one more step.
Step 4: Turn pumpkin right side up and take cup out for now. To stabilize the crochet work and to help keep its shape, pass your needle up through the bottom to the inside bottom, up and down to secure the bottom of the inside of the pumpkin to the outside bottom of the pumpkin. The inside bottom of the cup area does not need to touch the outside bottom but just be about 3/4" over the outside bottom. I did a running stitch around the outside of the 2nd round of the inside cup area which matches up with the outside bottom piece. This step is not absolutely necessary but it does keep the pumpkin in shape better in the washer and dryer if you decide to wash it.
Step 5: Put plastic cup back inside cup area of pumpkin and fill with Halloween candies! Enjoy!
Design written on Wednesday, September 26, 2012. Copyright ©2012 By Julie A. Bolduc f116011

