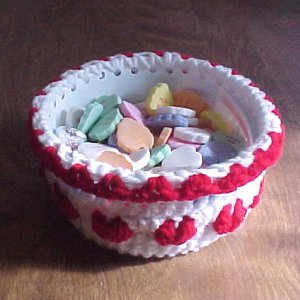
Valentine Candy Dish
 Designed By Julie A. Bolduc
This candy dish is fast and fun to make. It uses an empty whipped topping container as it's form. This project is a good way to use up red scraps of yarn and recycle those whipped topping containers you may have kicking around. You can fill this will shredded pink or white crepe paper and valentine goodies to give as a gift for your sweetheart!
Materials Needed
White worsted weight acrylic yarn.
Red worsted weight acrylic yarn.
Size H/8 aluminum crochet hook
Clean & Empty 8oz whipped topping container
Paper Punch
Yarn Thickness: 4mm
Gauge: 4dc=1"
Finished Size: 3"Hx6"diam
Skill Level: Intermediate
Starting Cluster (scl): Ch3. Yo, insert hook in same st, yo, pull up a lp, yo pull through 2 lps on hook, twice. Yo, pull through all lps on hook.
Cluster (cl): Yo, insert hook in same st, yo, pull up a lp, yo pull through 2 lps on hook, 3 times. Yo, pull through all lps on hook.
Instructions
With paper punch, punch 32 holes evenly spaced around rim of container. Set Aside.
RND 1: With white. Ch4, join w/slst to first ch to form ring. Ch3. 15dc in ring. Join w/slst to top of ch3.
RND 2: Ch3. Dc in same st as slst. 2dc in each st around. Join w/slst to top of ch3.
RND 3: Ch3. 2dc in next st. *Dc in next st. 2dc in next st. Rep from * around. Join w/slst to top of ch3.
RND 4: Ch3. Dc in next st. 2dc in next st. *Dc in each of the next 2 st. 2dc in next st. Rep from * around. Join w/slst to top of ch3.
RND 5: Ch3. Dc in each st around. Join w/slst to top of ch3.
RND 6: Ch3. Dc in each of the next 2 sts. Ch1. Sk next st. *Dc in each of the next 3 sts. Ch1. Sk next st. Rep from * around. Join w/slst to top of ch3. Fasten off.
RND 7: Work this round in the skipped stitches only in front of the ch1 sps. Join red to any skipped st. Scl in same st. Ch3. Cl in same st. Ch3. *Cl, ch3, cl in next skipped st. Ch3. Rep from * around. Join w/slst to top of scl. Fasten off red.
RND 8: Join white in same st as slst on rnd 6. Ch3. Dc in each of the next 2 dc. Dc in ch1 sp of rnd 6 over the ch3 sp of rnd 7. *Dc in each of the next 3 dc. Dc in ch1 sp of rnd 6 over the ch3 sp of rnd 7. Rep from * around. Join w/slst to top of ch3.
RND 9 & 10: Ch3. Dc in each dc around. Join w/slst to top of ch3.
RND 11: Join work to dish by working the following into the holes of the dish while catching each dc around as you work each st. Ch1. Sc in first hole & next dc. Sc in each of the next 2 holes and in each of the next 2 dc. *2sc in next hole but 1sc in each of the next 2 dc. Sc in each of the next 2 holes and in each of the next 2 dc. Rep from * around. Join w/slst to ch1. Fasten off white. Turn work around so you will be working in the opposite way.
RND 12: Join red to any stitch. Ch4, dc in same st as joining. Sk next st. *Dc, ch1, dc in next st. Sk next st. Rep from * around. Join w/slst to 3rd ch of ch4. Fold down rnd 12 to the outside to form a "rim".
Design written on Thursday, February 14, 2002. Copyright ©2001 By Julie A. Bolduc p116001

