Simple Square Easter Basket
 Designed By Julie A. Bolduc
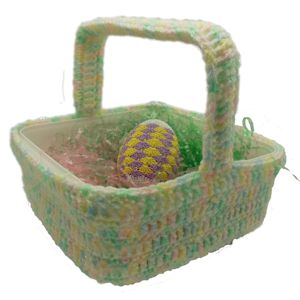
This Easter basket is made with a square container from some frozen Mini Eclairs or Mini Cream puffs! It is fun to make and can be made in a day or 2 depending on how fast you crochet. You can also either glue the crochet to the rim of the container or not. I didn't so that I could remove the container to clean it. The handle is made from the rim of the lid.
Materials Needed
Worsted weight acrylic yarn. Red Heart Super Saver Color: 0345 Baby Print Was used.
1 empty clean Square Mini Eclair or Mini Cream Puff plastic container
Clear packing tape
Size H/8 or 5mm aluminum crochet hook
Yarn needle for weaving in ends
Yarn Thickness: 4mm
Gauge: 4dc=1"
Finished Size: 7½" x 7½" x 7"
Skill Level: Beginner to Intermediate
Instructions
Crochet Basket Part
RND 1: Ch6. Join w/slst to first ch to form ring. Ch2, 24dc in ring. Join w/slst to first dc.
RND 2: Ch1, 2sc in same st as slst. Sc in each of the next 5 dc. *3sc in next dc. Sc in each of the next 5 dc. Rep from * around. Join w/slst to ch1.
RND 3: Slst to the next sc. Ch3, dc, ch2, 2dc in same st as slst. (Sk next st. Dc in each of the next 5 sc. Sk next st. ) *2dc, ch2, 2dc in next sc. Rep bet () once. Rep from * around. Join w/slst to top of ch3.
RND 4: Ch1. Sc in same st as slst. Sc in next st. (3sc in next ch2 sp. Sc in each of the next 7 sts.) *Sc in each of the next 2 sts. Rep bet () once. Rep from * around. Join w/slst to ch1.
RND 5: Ch3. Dc in each of the next 2 sts. (2dc, ch2, 2dc in next sc. Dc in each of the next 8 sts.) *Dc in each of the next 3sc. Rep bet () once. Rep from * around. Join w/slst to top of ch3.
RND 6: Ch1. Sc in same st as slst and in each of the next 4sts. (3sc in next ch2 sp. Sc in each of the next 10 sts.) *Sc in each of the next 5 sts. Rep bet () once. Rep from * around. Join w/slst to first sc.
RND 7: Ch3. Dc in each of the next 5dc. (2dc, ch2, 2dc in next sc. Dc in each of the next 11sts.) *Dc in each of the next 6 dc. Rep bet () once. Rep from * around. Join w/slst to top of ch3.
RND 8: Ch1. Sc in same st as slst and in each of the next 7 sts. (3sc in next ch2 sp. Sc in each of the next 13 sts.) *Sc in each of the next 8 sts. Rep bet () once. Rep from * around. Join w/slst to first sc.
RND 9: Ch2, dc in same st as slst and in each sc around. Join w/slst to first dc.
RND 10: Ch1, sc in same st as slst and in each dc around. Join w/slst to first sc.
RND 11-18: Rep RNDs 9 and 10 4 times more. At the end of RND 18. Fasten off and weave ends into back of work.

Prepare the Handle & Set Aside
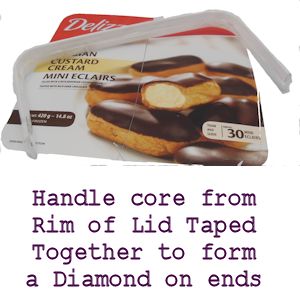
Step 1: Cut the V Shaped Ridge from the lid of the container with an exacto knife or Box cutter. Make sure, when you are done, you have a V shaped profile on the edge. You are cutting on the top side of the lid right where the lid goes up to shape the upside down V.
Step 2: Once you have cut off the rim, cut the rim in half. The lid is 7½" wide so you will cut the rim in half 3¾ from the side. You will need these two pieces to form the handle.
Step 3: Using the clear packing tape, tape the 2 rim pieces together to form a hollow diamond shaped long tube that is bent at a 90 degree angle at each end. This forms the large squared handle's core. Set the handle aside for now.
Stitching HandleStep 1: Make 2 pieces the same: Ch63. Dc in 4th ch from hook and in each ch across. Fasten off and weave ends into back of work.
Step 2:Assembly:
Join the pieces together back sides facing each other by working one sc in each st across going through both layers. This forms one side of a long tube.
Step 3:Pick up the prepared handle core and starting at the right hand side, slip your crochet work onto the side of the plastic handle and join the yarn onto the other side working through both layers at the same time. A tip is to start your work a few inches from the end of the handle so the work will not fall off of the end. Continue stitching the side closed working with the handle in the tube as you go. When you get near the end, you can adjust the crochet work to fit on the handle.
Step 4: Stitch both ends closed.
Step 5: Find the center of opposite sides of your crochet bottom. Center the end of each side of the handle on these spots. Using an overhand stitch, stitch the handle to the base. Slip the plastic square container into your crocheted base.
Step 6: Stuff with Easter Grass and Goodies!
Design written on Wednesday, April 16, 2014. Copyright ©2014 By Julie A. Bolduc p116028


