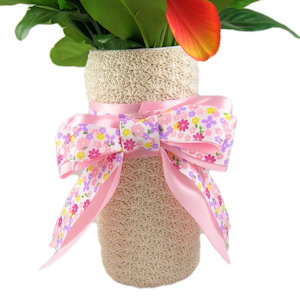
Shell Stitch Vase
 Designed By Julie A. Bolduc
This vase is made with a recycled plastic container of non dairy creamer with the plastic label removed. It is fairly easy to make and would make a great vase for a Mother's Day Bouquet of flowers!
- Materials Needed:
- Aunt Lydia's Classic Crochet size 10 crochet cotton in Natural
- 1 empty clean 10.2oz Coffee Mate Coffee Creamer container with label and cover removed.
- 1 piece 10" long 1" wide floral print grosgrain ribbon
- 1 piece 10" long 1.5" wide single faced satin ribbon, in pink
- 1 piece 36" long 1" wide floral print grosgrain ribbon
- 1 piece 36" long 1.5" wide single faced satin ribbon in pink
- Hot Glue and Glue gun
- Size 7 steel crochet hook
- Tapestry needle for weaving in ends
- Yarn Thickness: 10thread
- Gauge: 8dc=1"
- Finished Size: 3"x6.75"high
- Skill Level: Intermediate
Instructions
RND 1: Ch5, join w/slst to first ch to form ring. Ch2, 18dc in ring. Join w/slst to first dc. (18dc)
RND 2: Ch3, dc in same st as slst. 2dc in each dc around. Join w/slst to top of ch3. (36dc)
RND 3: Ch3, dc in same st as slst. Dc in next dc. *2dc in next dc. Dc in next dc. Rep from * around. Join w/slst to top of ch3. (54dc)
RND 4: Ch3, dc in same st as slst. Dc in each of the next 2 dc. *2dc in next dc. Dc in each of the next 2 dc. Rep from * around. Join w/slst to top of ch3. (72dc)
RND 5: Ch1, sc in same st as slst. Sk 2 dc. 5dc in next dc. Sk 2 dc. *Sc in next dc. Sk 2 dc. 5dc in next dc. Sk 2 dc. Rep from * around. Join w/slst to first sc.
RND 6: Ch3, 4dc in same st as slst. Sk 2 dc. Sc in next dc. Sk 2 dc. *5dc in next sc. Sk 2 dc. Sc in next dc. Sk 2 dc. Rep from * around. Join w/slst to top of ch3.
RND 7: Slst in each of the next 2 dc. Ch1. Sc in same st as last slst. Sk 2 dc. 5dc in next sc. Sk 2 dc. *Sc in next dc. Sk 2 dc. 5dc in next sc. Sk 2 dc. Rep from * around. Join w/slst to first sc.
RND 8-43: Rep RNDs 6 &7 consecutively.
RND 44: Ch3. Hdc in next dc. Sc in each of the next 3 dc. Hdc in next dc. *Dc in next sc. Hdc in next dc. Sc in each of the next 3 dc. Hdc in next dc. Rep from * around. Join w/slst to top of ch3. Fasten off and weave ends into back of work. Slip work onto bottom of container. It is going to be a very very tight fit. Make sure the top of your crochet work just fits to the top of the rim covering up the threads of the cap area.
Ribbon:
Step 1: Hot glue 1.5" wide ribbon around the narrowest part of the covered container.
Step 2: Hot glue 1" wide ribbon centered on top of the 1.5" wide ribbon.
Step 3: Tie 36" ribbon into a fancy bow. I used a tool called a Bowdabra to make my layered bow but you can do what ever you want for a bow.
Step 4: Glue your finished bow to the spot on your ribbons on the container where the ends meet.
If you are filling this with silk flowers, you can add weight to the vase by putting some small rocks in the bottom of the vase.
Design written on Sunday, May 01, 2011. Copyright ©2011 By Julie A. Bolduc f114011

