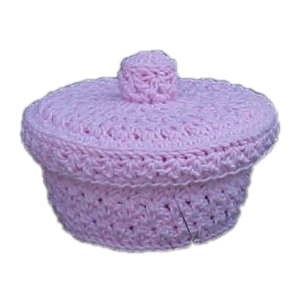
Covered Boutique Box
 Designed By Julie A. Bolduc
This boutique box is made with a recycled whipped topping container and it's lid. It can be completed in an evening or two and would make a great last minute gift to give to any lady or girl for their vanity. If you make it with holiday colors, then it can be used as a container to hold goodies.
Materials Needed
1 8oz empty and clean whipped topping container with lid
2 balls worsted weight cotton yarn I used Peaches & Creme in pink from a large cone.
.25" paper punch
Size H/8 or 5mm aluminum crochet hook
Tiny amount polyester stuffing
Yarn Needle
Yarn Thickness 3mm
Gauge 5sc=1"
Finished Size: 8" diameter 5" high
Skill Level: Intermediate

Instructions: Bottom
RND 1: Ch3. Work 12dc in 3rd ch from hook. Join w/slst to first dc.
RND 2: Ch1. Sc in same st as slst. Work 2sc in each st around. Join w/slst to ch1.
RND 3: Ch3. Dc in same st as slst. Dc in next st. *2dc in next st. Dc in next st. Rep from * around. Join w/slst to top of ch3.
RND 4: Ch1. Sc in same st as slst. 1sc in each of the next 2 sts. *2sc in next st. Sc in each of the next 2 sts. Rep from * around. Join w/slst to ch1.
RND 5: Ch3. Dc in same st as slst. Dc in each of the next 3 sts. *2dc in next st. Dc in each of the next 3 sts. Rep from * around. Join w/slst to top of ch3.
Sides
back single crochet (bsc): For this next round only and for the knob. You will insert your hook in the back of the stitches just under the top loops then bring it around the stitch then insert from the front to the back. Yo, pull loop through, yo pull through both loops on hook to complete a sc. This is not a back post dc or a back post sc because you are not working around the actual post of the dc but around the top of the stitch just under the loops. I will refer to this as a back single crochet. (bsc) For this pattern only. This forms the bottom ridge and starts the work up the sides of the bowl.
front single crochet (fsc): Work the same as the bsc but work from the front of the stitches instead of the back.
RND 5: Ch1. Work 1bsc in each st around. Join w/slst to first bsc.
RND 6: Work on the bsc round just made. Treat each bsc as a sc. Ch3. Dc in same st as slst. Sk next st. *Sc in next st. Ch2. Dc in same st as last st. Sk next st. Rep from * around. Join w/slst to the base of the ch3. You will see 2 lps just before the ch3, this is where to make the slst.
RND 7: Slst in first ch of ch3. 2sc in ch3 sp. Work 2sc in each ch2 sp around. Join w/slst to first sc.
RND 8: Ch3. Dc in same st as slst. Sk next st. *Sc in next st. Ch2. Dc in same st as last stitch. Sk next st. Rep from * around. Join w/slst to the 2lps just before the ch3.
RND 9: Rep rnd 7.
RND 10: Rep rnd 8.
RND 11: Rep rnd 7. At this point, you should have 60 stitches around.
At this point. Take a break from crocheting to prepare the plastic container.
Punch 32 holes evenly spaced around. Just under the lip of the container. Give your hands a short rest. They may be sore from the punching.
You may have noticed that you ended with 60 stitches but I told you to make 32 holes. Well, that is just the way it turned out when I punched the holes in the container. So I have adjusted the next row so it will look right.
RND 12: Join the last rnd to the plastic container in the following way. Line up the last rnd with the holes, wrong side facing the outside of the container. Use a sc through the stitch and the hole in the container. Sc 1 stitch of the last rnd in the first hole. [Then work 1 sc in each of the next 2 stitches in the next hole.] Rep bet [] 14 times more. Work 2sc in the next stitch in the next hole. Rep bet [] for each of the rest of the empty holes. When you get back to where you began, work 1 more sc in the stitch and hole you started in. Join w/slst to the first sc. Fasten off and weave ends into work.
Lid Top: knob
RND 1: Ch3. Work 12dc in 3rd ch from hook. Join w/slst to first dc.
RND 2: Ch1. Work 1bsc in each st around. Join w/slst to first bsc.
RND 3: Work on the bsc round just made. Treat each bsc as a sc. Ch3. Dc in same st as slst. Sk next st. *Sc in next st. Ch2. Dc in same st as last st. Sk next st. Rep from * around. Join w/slst to the base of the ch3. You will see 2 lps just before the ch3, this is where to make the slst.
RND 4: Slst in first ch of ch3. 2sc in ch3 sp. Work 2sc in each ch2 sp around. Join w/slst to first sc.
Lid Top:
RND 5: Ch1. Work 1 fsc in each st around. Join w/slst to first fsc.
RND 6: Work on the fsc round just made. Treat each fsc as a sc. Ch3. Dc in same st as slst. Sk next st. *Sc in next st. Ch2. Dc in same st as last st. Sk next st. Rep from * around. Join w/slst to the base of the ch3. You will see 2 lps just before the ch3, this is where to make the slst.
RND 7: Slst in first ch of ch3. 2sc in ch3 sp. Ch1. *2sc in next ch2 sp. Ch1. Rep from * around. Join w/slst to first sc.
RND 8: Ch3. Dc in same st as slst. Sk next st. *Sc in next st. Ch2. Dc in same st as last stitch. Sk next st. Rep from * around. Join w/slst to the 2lps just before the ch3.
RND 9: Rep rnd 7.
RND 10: Rep rnd 8.
RND 11: Rep rnd 7. Fasten off and weave ends into back of work. Stuff knob with polyester stuffing.
Lid Bottom
RND 1: Ch3. Work 12dc in 3rd ch from hook. Join w/slst to first dc.
RND 2: Ch3. Dc in same st as slst. *Sc in next st. Ch2. Dc in same st as last st. Rep from * around. Join w/slst to the 2lps just before the ch3.
RND 3: Slst in first ch of ch3. 2sc in ch3 sp. Ch1. *2sc in next ch2 sp. Ch1. Rep from * around. Join w/slst to first sc.
RND 4: Ch3. Dc in same st as slst. Sk next st. *Sc in next st. Ch2. Dc in same st as last stitch. Sk next st. Rep from * around. Join w/slst to the 2lps just before the ch3.
RND 5: Rep rnd 3.
RND 6: Rep rnd 4.
RND 7: Rep rnd 3. Fasten off Weave ends into back of work.
Assembly:
Cut the ridge off of the plastic container cover. Set aside.
Lip of Lid
RND 1: Line up the two pieces of the lid so they are wrong sides facing each other. Crochet the two pieces together with a sc in each st around. Before you close it though, insert the plastic cover then close it. Do not fasten off at this point.
RND 2: Work a bsc in each sc around. Join w/slst to first bsc.
RND 3: Ch3. Dc in same st as slst. *Sk next St. Sc in next st. Ch2. Dc in same st as last st. Rep from * around. Join w/slst to the 2lps just before the ch3.
RND 4: Slst in the first ch of ch3. Sc in ch3 sp. 2sc in each ch2 sp around. Join w/slst to first sc. Fasten off and weave all ends into back of work.
Design written on Saturday, September 09, 2000. Copyright ©2000 By Julie A. Bolduc p114007

