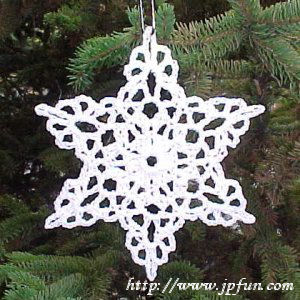
Pretty Snowflake
 Designed By Julie A. Bolduc
This lacy snowflake is fast and easy to make and you could make several in an evening! It is just the right size for filling those large open spaces on your tree. You could also use it as a package topper just like any other snowflake you can make.
Materials Needed
Small amount white cotton crochet thread size 10. Southmaid was used in the example
Size 7 steel crochet hook
Fabric Stiffener
Straight pins
Foam Board
Waxed Paper
A paper towel
Tapestry Needle
Ornament hanger
Gauge: 10sc=1"
Finished Size: 4" diameter
Skill Level: Beginner
RND 1: Ch6, join w/slst to first ch to form ring. Ch3. 2dc in ring. Ch6, join w/slst to 6th ch from hook. *3dc in ring. Ch6, join w/slst to 6th ch from hook. Rep from * 4 times more. You should now have 6 ch6 loops around.
RND 2: Slst into the next dc. Ch3. 2dc, ch5, 2dc in next ch6 lp. *Sk next dc. Dc in next dc. Sk next dc. 2dc, ch5, 2dc in next ch6 lp. Rep from * around. Join w/slst to top of ch3.
RND 3: Ch3. Sk next 2 dc. Dc, ch3, dc, ch5, dc, ch3, dc in next ch5 sp. Sk next 2 dc. *Dc in next dc. Sk next 2 dc. Dc, ch3, dc, ch5, dc, ch3, dc in next ch5 sp. Sk next 2 dc. Rep from * around. Join w/slst to top of ch3.
RND 4: Ch3. Sc in next ch3 sp. Dc, ch3, dc, ch3, dc, ch5, dc, ch3, dc, ch3, dc in next ch5 sp. Sc in next ch3 sp. Ch3. Sk next dc. *Sc in next dc. Sc in next ch3 sp. Dc, ch3, dc, ch3, dc, ch5, dc, ch3, dc, ch3, dc in next ch5 sp. Sc in next ch3 sp. Ch3. Sk next dc. Rep from * around. Join w/slst to first base of ch3. Fasten off. Weave all ends into work. Stiffen with fabric stiffener. Attach hanger to one of the points.
- To Stiffen Snowflake:
- Pin waxed paper to foam board to protect it.
- Pour 1-2 tbsp fabric stiffener into a small bowl, I used a custard cup.
- Dip snowflake into fabric stiffener and completely soak it till it's dripping wet.
- Pat excess stiffener off with paper towel, do not wring the snowflake.
- Lay the snowflake onto the waxed paper covered board and stretch and pin it into shape.
- Allow to dry overnight! Be patient for best results.
- When dry, remove from board and attach hanger.
Hint: If you plan to make a bunch of snowflakes, crochet them all first, then use a large foam board and use a larger amount of stiffener. In other words, stiffen them all at once.
Design written on Saturday, February 12, 2000. Copyright ©2000 By Julie A. Bolduc f103016

