
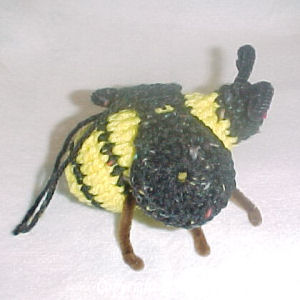
Mr Bumble Bee Ornament
 Designed By Julie A. Bolduc
This ornament, even though it looks like a toy, is not a toy. It is a decoration or ornament for spring or summer decorating. It would look great stuck onto a plant poke or hung up in a window. His happy face should bring a smile to anyone who sees him.
- Materials Needed
- Scrap of worsted weight acrylic yarn in yellow
- Scrap of worsted weight acrylic yarn in black or black fleck
- 6" scrap of worsted weight acrylic yarn in red
- Polyester Fiber fill
- 2 Wiggle eyes ¼" in diameter
- 2 brown pipe cleaners 12" long
- 1 black pipe cleaner 12" long
- Hot Glue and gun
- Size G/6 or 4.5mm aluminum crochet hook
- Tapestry Needle
- Yarn Thickness: 4mm
- Gauge: 4dc = 1"
- Finished Size: 4½ x 4½
- Skill Level: Intermediate
Instructions
RND 1: With Yellow. Ch 4. 11dc in 4th ch from hook. Join w/slst to top of ch4. Drop yellow but do not fasten off. Join black.
RND 2: Ch1. Sc in same st as slst. 2sc in each st around. Join w/slst to ch1. Drop black and pick up yellow.
RND 3: Ch3. Dc in each st around. Join w/slst to top of ch3. Drop yellow and pick up black.
RND 4: Ch1. Sc in each st around. Join w/slst to ch1. Drop black and pick up yellow.
RND 5: Rep round 3.
RND 6: Ch1. Sc in next st. *Pull up a lp in each of the next 2 sts, yo pull through all 3 lps on hook. (decrease [dec] made) Sc in each of the next 3 sts. Rep from * around. Join w/slst to ch1. Drop black and pick up yellow.
RND 7: Rep rnd 3.
RND 8: Ch1. Sc in each of the next 2 sts. Dec 1, sc in each of the next 3 sts, 3 times. Sc in last st. Join w/slst to ch1. Drop black. Pick up yellow.
RND 9: Rep rnd 3. Fasten off yellow and pick up black.
RND 10: Ch1. Sc in next st. Dec 1, sc in each of the next 2sts, 3 times. Dec 1. Sc in last st. Join w/slst to ch1. Do not drop black.
RND 11-13: Ch1. Sc in each st around. Join w/slst to ch1. At the end of round 13, stuff body. Fasten off black but leaving a 12" end. Using the end, work a running stitch through the last round and gather up to close, then poke the needle through round 10 and work a running stitch through that round to form a fat neck then weave rest of end into the black part to secure in place. Trim rest of end.
Wings: Make 2 the same RND 1: Ch4. Join w/slst to first ch to form ring. Ch3. 15dc in ring. Join w/slst to top of ch3.
RND 2: Ch1. Sc in same st as slst. Work 2 sc in each of the next 11 dc. Ch1. Sc in side of last sc made. Sc in each of the next 4 dc. Sc in ch1. Do not ch1. Turn. Now you will work in rows.
ROW 1: Sc in each of the next 5 sc. Do not ch1. Turn.
ROW 2: Sc in each of the next 4 sc. Do not ch1. Turn.
ROW 31: Sc in each of the next 3 sc. Ch1. Fasten off. Leave finising end about 8" long. Weave other end into work.
Assembly
STEP 1: Stitch wings to back in position desired.
STEP 2: Cut black pipe cleaner into a 4" piece. Poke through top of head and curl both ends to form antennae.
STEP 3: Glue wiggle eyes to face just under where the antennae come out.
STEP 4: Use scrap of red yarn to stitch a smile onto the face. Use a back stitch.
STEP 5-7: Cut the 2 brown pipe cleaners in half. Poke 3 of them through the body from one side to the other to form legs. Bend the ends of each pipe cleaner ¼ from the end to form feet then bend the cleaners down to finish the legs.
STEP 8: Attach hanger to top or poke onto a skewer to form a plant poke.
Design written on Thursday, January 20, 2005. Copyright ©2004 By Julie A. Bolduc p103035
Sheetworks Studio Version 2.5 — Free Download! - Two New Categories Added, Graph Paper and Quilt Blocks
All items in our online shop ship free within the US only. I currently offer U.S. shipping only and it is from rural Maine. Delivery can vary from 2–14 days depending on your distance from Maine. Expedited shipping is not available.
Please note: I am now selling all of my paper bead making tools and other items from this web site using Paypal payments.
I have removed all of my paper bead making tools from Amazon. My Kindle crochet pattern books and paper template paperback books continue to be available on Amazon, as they are printed and fulfilled directly by Amazon. A limited number of paper bead making tools remain available on Etsy but I am not linking to those tools from this site.
Random Quick Tip!
Inexspensive Gift BoxesSave those cereal and cracker boxes and use them as gift boxes. Just flatten them and once in a while, decorate one for Christmas or birthdays. Apply Gesso or white primer, or craft paint and decorate to your heart's content. Let your imagination go wild. When you are done decorating, and ready to use for a gift, use double stick tape to fasten the bottom of the box and put your gift inside, loosely wrapped with tissue paper. Then seal the other side with more double stick tape and either wrap as other gifts or just put a name tag on the festive gift box as it is.