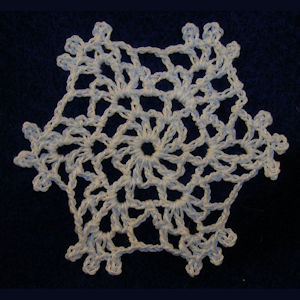
Winter Bliss Snowflake
 Designed By Julie A. Bolduc
This fast and easy snowflake is just another flake to add to your flurry of snowflake patterns. Enjoy!
Materials Needed
Size 10 crochet cotton in white. Southmaid was used in the example
Size 7 steel crochet hook
Tapestry Needle for weaving in ends
3oz Paper cup
Fabric Stiffener of Choice
Rust proof pins
Plastic wrap covered foam board
Yarn Thickness: 10thread
Gauge: 8sc = 1"
Finished Size: 3" diam
Skill Level: Beginner
Instructions
RND 1: Ch6. Join w/slst to first ch to form ring. Ch5. Dc in ring, ch2, 11 times. Join w/slst to 3rd ch of ch5.
RND 2: Slst into the first ch2 sp. Ch6, dc in same sp. Ch3. Sk next ch2 sp. *Dc, ch3, dc in next sp. Ch3. Sk next ch2 sp. Rep from * around. Join w/slst to 3rd ch of ch6.
RND 3: Slst into the first ch3 sp. Ch5, dc, ch5, dc, ch2, dc in same sp. Ch3. Sc in next ch3 sp. Ch3. *Dc, ch2, dc, ch5, dc, ch2, dc in next ch3 sp. Ch3. Sc in next ch3 sp. Ch3. Rep from * around. Join w/slst to 3rd ch of ch5.
RND 4: Ch5. Sk next dc. (Dc, ch5, slst in 5th ch from hook, 3 times in next ch5 sp. Dc in same sp.) Ch2. Sk next dc. Dc in next dc. Ch3. *Dc in next dc. Ch2. Sk next dc. Rep bet () once. Ch2. Sk next dc. Dc in next dc. Ch3. Rep from * around. Join w/slst to 3rd ch of ch5. Fasten off & weave ends into back of work.
Finishing
STEP 1: Pour about 1-2 tbsp of stiffener into paper cup. Dip snowflake into fabric stiffener.
STEP 2:Lay out snowflake onto wrapped foam board and stretch & pin into desired shape. Allow to dry overnight. You might need to dab off excess glue with a paper towel. You can sprinkle irridescent glitter on the snowflake while it is very wet.
STEP 3: When completely dry, remove from foam board and attach an ornament hanger to one of the center points.
Design written on Wednesday, December 06, 2006. Copyright ©2006 By Julie A. Bolduc p103043

