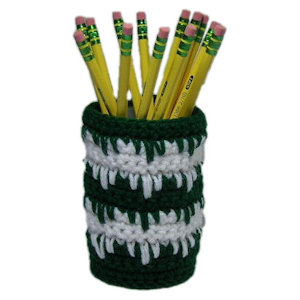
Good Vibrations Pencil Cup
 Designed By Julie A. Bolduc
This crochet pattern of a pencil cup is made with 2 different colors of yarn done mainly in the long single crochet and regular single crochet. It is fast and easy to make.
Materials Needed
Large scraps of worsted weight acrylic yarn in 2 contrasting colors of choice.
Size H/8 or 5mm aluminum crochet hook.
Empty container, without lid, Crystal Light drink mix
Yarn needle for weaving in ends
Yarn Thickness: 4mm
Gauge: 4dc = 1"
Finished Size: 3.5" x 5"
Skill Level: Beginner to intermediate
Special Stitch Used: Long sc (long sc) Insert the hook in a stitch indicated of one of the rows straight down below, yarn over, pull up a long loop, yarn over, pull through 2 loops on hook (long sc made). When working these stitches, you will be working over one stitch at a time.
Special Note about this pattern: This pattern starts out as a traditional round type of pattern but then when you reach RND 3, you will start to turn your work around at the beginning of each round after joining the previous round. I wanted to acheive the traditional sc fabric look with this pencil cup.
Instructions
RND 1: With main dark color. Ch5. Join w/slst to first ch to form ring. Ch3. 15 dc in ring. Join w/slst to top of ch3. (16dc)
RND 2: Ch3. Dc in same st as slst. 2dc in each dc around. Join w/slst to top of ch3. Ch1, turn.(32dc)
RND 3: Now work the other way. Working around post only just under both loops, sc in each dc around. Join w/slst to first sc. Ch1, turn.
RND 4-7: Work through both loops from here on out. Sc in each sc around. Join w/slst to first sc. Ch1, turn. Fasten off dark color.
RND 8: Join light contrasting color in same st as slst, where you left off. Ch1. Long sc down 1 row. Long sc down 2 rows. Long sc down 1 row. *Sc in next sc. Long sc down 1 row. Long sc down 2 rows. Long sc down 1 row. Rep from * around. Join w/slst to ch1. Ch1, turn.
RND 9-11: Sc in each st around. Join w/slst to first sc. Ch1, turn. At the end of RND 11, fasten off light color.
RND 12: Join dark color and repeat RND 8.
RND 13-15: Repeat RNDs 9-11.
RND 16: Join light color and repeat RND 8.
RND 17-19: Repeat RNDs 9-11.
RND 20: Join dark color and repeat RND 8.
RND 21: Sc in each sc around. Join w/slst to first sc.
RND 22: Slst in each st around. Fasten off and weave all ends into back of work.
Slip onto empty container. You might want to hot glue RND 22 to rim of container. I choose not to so I can take it off and throw it in the washer.
Design written written on Sunday, January 07, 2007. Copyright ©2007 By Julie A. Bolduc p117006

