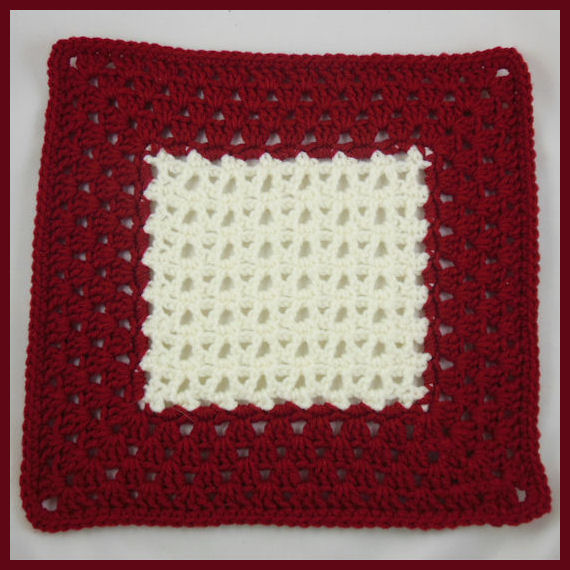
Plantation Pillowghan Square

Designed by Julie A Bolduc
This pillowghan square starts off as rows, such as a plantation would be planted, then ends up in rounds like the road around a plantation! It is fun and easy to make and would make a great take along project. Imagine making this with scraps of yarn using 2 colors per square.
Materials Needed
Worsted weight acrylic yarn in 2 contrasting colors
Size H/8 or 5mm aluminum crochet hook
Yarn Needle for weaving in ends
Yarn Thickness: 4mm
Gauge: 4dc = 1"
Finished Size: 12" x 12"
Skill Level: Beginner to Intermediate
Instructions
ROW 1: With light color or soft white. Ch31. Sc in 2nd ch from hook and in the next ch. *Ch2, sk 2ch, sc in each of the next 2 chs. Rep from * across to end. Ch3, turn.
ROW 2: Sk first sc. Dc in next sc. *Dc in next sc, ch2, dc in next sc. Rep from * 5 times more. Dc in each of the last 2 sc. Ch1, turn
ROW 3: Sc in each of the first 2dc. *Ch2. 2sc in next ch2 sp. Rep from * 5 times more. Ch2. Sk next dc. Dc in next dc & in top of ch3. Ch1, turn.
ROW 4-15: Repeat ROWs 2 & 3 Consecutively. At the end of Row 15. Fasten off light color.
Now you will work in the round.
RND 1: Lay work in front of you so the starting point is on the bottom left corner. Join dark color, or maroon in upper left corner. Sc, ch2, sc in same corner. 3sc in each of the next 7 large spaces on left side and in each large space down the left side. Sc, ch2, sc in next corner. 3sc in each of the 7 large spaces across the bottom. Sc, ch2, sc in next corner. 3sc in each of the next 7 large space up the right side. Sc, ch2, sc in next corner. 3sc in each of the next 7 large spaces across top. Join w/slst to first sc.
RND 2: Sl st in next sc and into the next ch2 corner sp. Ch3, 2dc, ch2, 3dc in same sp. (Sk 2 sc, 3dc in next sc 7 times.) *3dc, ch2, 3dc in next ch2 corner sp. Rep bet () once. Rep from * around. Join w/slst to top of ch3.
RND 3: Slst in each of the next 2 dc and into the next ch2 corner sp. Ch3, 2dc, ch2, 3dc in same sp. (3dc in each of the 8 spaces between each 3dc group across to the next corner.) *3dc, ch2, 3dc in next ch2 corner sp. Rep bet () once. Rep from * around. Join w/slst to top of ch3.
RND 4: Slst in each of the next 2 dc and into the next ch2 corner sp. Ch3, 2dc, ch2, 3dc in same sp. (3dc in each of the 9 spaces between each 3dc group across to the next corner.) *3dc, ch2, 3dc in next ch2 corner sp. Rep bet () once. Rep from * around. Join w/slst to top of ch3.
RND 5: Slst in each of the next 2 dc and into the next ch2 corner sp. Ch3, 2dc, ch2, 3dc in same sp. (3dc in each of the 10 spaces between each 3dc group across to the next corner.) *3dc, ch2, 3dc in next ch2 corner sp. Rep bet () once. Rep from * around. Join w/slst to top of ch3.
RND 6: Ch1, sc in same st as slst and in each of the next 2 dc. 2sc, ch1, 2sc in next ch2 corner sp. (Sc in each of the next 36 dc.) *2sc, ch1, 2sc in next ch2 corner sp. Rep bet () once. Rep from * around. Join w/slst to first sc. Fasten off and weave ends into back of work.
NOTE: This pattern is NOT on the 600 Pattern CD or in the "JPF Crochet Club Afghans Pillows and Pillowghan Squares Collection" eBook.
Design written on Sunday, August 26, 2012. Copyright ©2012 By Julie A. Bolduc p121009

