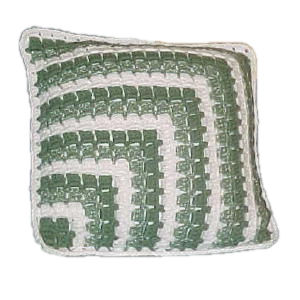
Progressive Stitch Pillow

Designed by Julie A Bolduc
This pillow is made using the same pattern stitch as the Progressive Pattern Stitch Afghan I designed a few years ago for Project Linus. I figured it was time I started designing other patterns that use that fun and easy to do pattern stitch.
Materials Needed
Worsted weight acrylic yarn in the following colors.
Red Heart Super Saver #0632 Medium Sage
Red Heart Super Saver #311 White.
Red Heart Fiesta #6631 Lt. Sage
Size I Aluminum Crochet Hook
16" square pillow Form
Yarn Needle for weaving in ends
Yarn Thickness: 4mm
Gauge: 4dc = 1"
Finished Size: 16"x16"
Skill Level: Beginner to Intermediate
This pattern starts in one corner and it grows from this corner. You will be working in rows but starting with a ring. Each row will turn a corner.
Note: Each of the 3dc groups will be known as a shell and will be abbreviated as sh.
Instructions Make 2 the same.
With Medium Sage
ROW 1: Ch5, join w/slst to first ch to form ring. Ch 3, work 3 dc in ring. Ch3, sc in ring. Ch3, turn.
ROW 2: Here you will work on the side of the 3dc group you made. Then across the top to the first ch3. Work 3dc in ch3 sp shell (sh) made. Ch3, Sc in same sp. Ch3, sk sh, sc in next ch3 sp. Ch3, turn.
ROW 3: Sh, ch1, in each ch3 sp across, ch3, sc in same ch3 sp as last sp, (to go around the corner), ch3, sk shell, sc in last ch3 sp. Fasten off Medium Sage. Join white in same st as slst st, Ch3, turn.
ROW 4: Sh, ch1, in each ch3 sp across. Ch3, sc in same ch3 sp as last sp, (to go around the corner), ch3, sk sh, sc in ch1 sp, ch3, sc in last ch3 sp. Ch3, turn.
ROW 5: Sh, ch1, in each ch3 sp across, ch3, sc in same ch3 sp as last sp, (to go around the corner), sk sh, *ch3, sc in ch1 sp. Rep from * across. Fasten off white. Join Lt. Sage, in same st as slst. Ch3, turn.
ROW 6: Sh, ch1, in each ch3 sp across. Ch3. Sc in same ch3 sp as last sp, (to go around the corner), Sk sh, *ch3, sc in next ch1 sp. Rep from * across. ch3, turn.
ROW 7: Rep row 5.Fasten off Lt. Sage. Join Medium Sage in same st as slst.
ROW 8: Rep row 6.
ROW 9: Rep row 5. Fasten off Medium Sage. Join White. Ch3, turn.
ROW 10: Rep row 6.
ROW 11: Rep row 5. Fasten off White. Join Lt. Sage. Ch3, turn.
ROW 12: Rep row 6.
ROW 13: Rep row 5. Fasten off Lt. Sage. Join Medium Sage. Ch3, turn.
ROW 14: Rep row 6.
ROW 15: Rep row 5. Fasten off Medium Sage. Join White. Ch3, turn.
ROWs 16-33: Rep rows 10-15 three more times. Do not join white at the end of row 33. Weave all ends into work, making sure to match the colors you are weaving into.
Assembly
Line up the starting ring so they are matched up. Make sure the ch3 spaces and the shells are all lined up.
With white, you will start at the corner where you have all shells across. (Top right corner. Opposite the starting ring corner.) Ch3, sc in next ch1 sp working through both pieces. (Ch3, sc in next ch1 sp all the way across to the next corner.) Turn corner and sc in next ch3 sp on left side. Ch3, 3dc in same sp. (Ch1. 3dc in next ch3 sp. across to next corner). Ch3, turn corner. 3dc in next ch3 sp. (Ch1, 3dc in each ch3 sp across to next corner.) Stuff pillow form inside. 3dc in next ch3 sp. (Ch1, 3dc in next ch3 sp across to next corner where you started this round.) Ch3. 3dc, ch1 in each white ch3 sp across. Join w/slst to top of ch3. Fasten off white and weave all ends into work.
Design written on Friday, March 28, 2003. Copyright ©2003 By Julie A. Bolduc p119002

