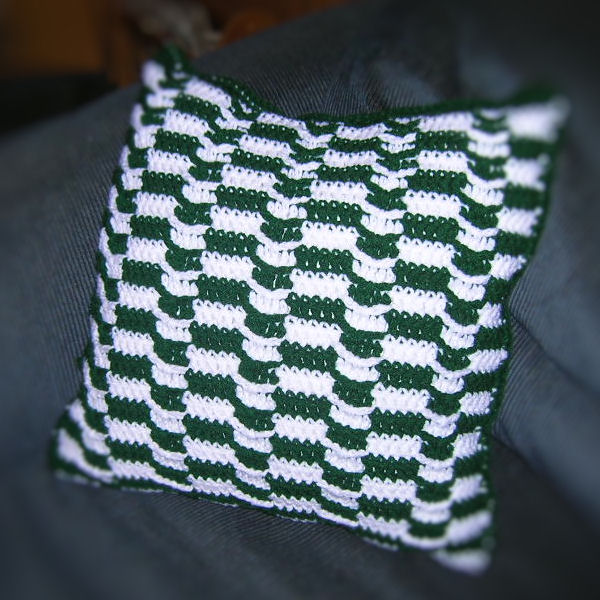
Ladder Links Pillow

Designed by Julie A Bolduc
This pillow is made with 2 colors of yarn that are carried up one side of the pillow as you work and the ch5 loops are caught in the stitches as you work across the rows. It is fun and easy to make and would make a great addition to any decor.
Materials Needed
6oz Worsted weight acrylic yarn in white
6oz Worsted weight acrylic yarn in hunter green
Size H/8 or 5mm aluminum crochet hook
1 16" square pillow form
Yarn needle for weaving in ends.
Yarn Thickness: 4mm
Gauge: 4dc=1"
Finished Size: 16"x16"
Skill Level: Intermediate
Instructions Make 2 pieces the same.
ROW 1: With green. Ch56. Sc in 2nd ch from hook and in each ch across. Ch3, turn.
ROW 2: Sk very first sc. Dc in each of the next 4 sc. Ch5. Sk next 5 sc. *Dc in each of the next 5 sc. Ch5. Sk next 5 sc. Rep from * 3 times more. Dc in each of the next 4 sc. Work a dc in last sc but drop green and join white before pulling through the last 2 lps on hook to change color. Ch1, turn.
ROW 3: Sc in each of the first 5 dc. Dc in each of the next 5 sc in front of the next ch5 sp. *Sc in each of the next 5 dc. Sc in each of the next 5 sc in front of the next ch5 sp. Rep from * 3 times more. Sc in each of the next 4 dc and in top of ch3. Ch3, turn.
ROW 4: Sk the very first sc. Dc in each of the next 4 sc. Ch5. Sk next 5 dc. *Dc in each of the next 5 sc. Ch5. Sk next 5 dc. Rep from * 3 times more. Dc in each of the next 4 sc. Work a dc in last sc but drop white and pick up green before pulling through the last 2 lps on hook to change color. Ch1, turn.
ROW 5: Sc in each of the first 5 dc. Dc in each of the next 2 dc in front of the ch5 sp. Work a dc in front of the same ch5 sp catching the ch5 sp of the previous row in the stitch. Dc in each of the next 2 dc in front of the ch5 sp. *Sc in each of the next 5 dc. Work a dc in front of the same ch5 sp catching the ch5 sp of the previous row in the stitch. Dc in each of the next 2 dc in front of the ch5 sp. Rep from * 3 times more. Sc in each of the next 4 dc and in top of ch3. Ch3, turn.
ROW 6: Sk the very first sc. Dc in each of the next 4 sc. Ch5. Sk next 5 dc. *Dc in each of the next 5 sc. Ch5. Sk next 5 dc. Rep from * 3 times more. Dc in each of the next 4 sc. Work a dc in last sc but drop green and pick up white before pulling through the last 2 lps on hook to change color. Ch1, turn.
ROW 7: Sc in each of the first 5 dc. Dc in each of the next 2 dc in front of the ch5 sp. Work a dc in front of the same ch5 sp catching the ch5 sp of the previous row in the stitch. Dc in each of the next 2 dc in front of the ch5 sp. *Sc in each of the next 5 dc. Work a dc in front of the same ch5 sp catching the ch5 sp of the previous row in the stitch. Dc in each of the next 2 dc in front of the ch5 sp. Rep from * 3 times more. Sc in each of the next 4 dc and in top of ch3. Ch3, turn.
ROW 8: Rep ROW 4.
ROW 9: Rep ROW 5.
ROW 10: Rep ROW 6.
ROW 11: Rep ROW 7.
ROW 12-44: Rep rows 8-11 consecutively. You will end this section with repeating row 4.
ROW 45: Sc in each of the first 5 dc. *Sc in each of the next 2 dc. Sc in next dc catching the ch5 sp in the stitch. Sc in each of the next 7 dc. Rep from * across ending with a sc in top of ch3. Fasten off and weave ends into back of work.
Assembly: Lay both pieces together, wrong sides facing each other. The top of the pillow is the last row you made. Join green to the top left corner of the pillow working through both layers. Ch1. Sc in the sc row and work 2 sc in each dc row down the left side. Ch2 to go around the corner. sc in each sc across the bottom. Ch2 to go around next corner. Sc in each sc row and work 2 sc in each dc row up the right hand side. Ch2 to go around the corner. Sc in each of the next 5 stitches. Slip pillow form in. Sc in each of the next 2 sts. *Sc in next st catching the ch5 sps on both sides in this stitch. Sc in each of the next 9 stitches. Rep from * 3 times more. Sc in next st catching the ch5 sps on both sides in this stitch. Sc in each of the next 7 stitches. Ch2 to go around the corner and join w/slst to ch1. Fasten off and weave ends into back of work.
Design written on Friday, February 20, 2009. Copyright ©2008 By Julie A. Bolduc p119007

