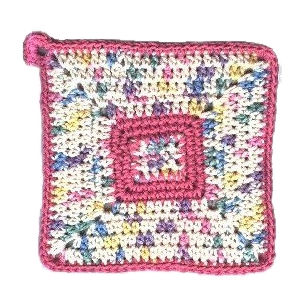
JPFun Potholder
 Designed By Julie A. Bolduc
This potholder is just a simple pattern that can easily be made in a couple or 3 hours. It is meant to be a basic pattern that actually can be used. I recommend lining it between the layers with wool felt for added protection.
- Materials Needed:
- 2.5oz worsted weight cotton in varigated pastels (mc)
- Small amount contrasting color. (cc)
- Size US-H/8 or 5mm aluminum crochet hook
- Yarn Needle
- Gauge: 4dc=1"
- Yarn Thickness: 3mm
- Finished Size: 8"x8½"
- Skill Level: Beginner
Instructions
ROW 1: With mc. Ch6. Sc in 2nd ch from hook and in each ch across. Ch1, turn
ROW 2-5: Sc in first sc and in each sc across. Ch1 turn. At the end of Row 5, fasten off mc.
Now you will work in rounds. For the first rnd only, On the top and bottom, you will be working over the outer stitches not in them. On the sides, you will work around the post of each stitch. These places will be referred to as sps.
Make two the same.
RND 1: Join cc in top left corner. Ch1, sc, ch2, sc in same corner sp. Sc in each of the next 2 sps. Sc, ch2, sc in next corner sp. Sc in each of the next 3 sps. Sc, ch2, sc in next corner sp. Sc in each of the next 2 sps. Sc, ch2, sc in next corner sp. Sc in each of the last 3 sps. Join w/slst to first sc.
RND 2: Ch1. Sc in next sc. Sc, ch2, sc in next ch2 corner sp. Sc in each of the next 4 sc. (Sc, ch2, sc in next ch2 corner sp.) Sc in each of the next 5 sc. Rep bet (). Sc in each of the next 4 sc. Rep bet (). Sc in each of the last 4 sc. Join w/slst to first sc.
RND 3: Ch1. Sc in each of the next 2 sts. (Sc, ch2, sc in next ch2 corner sp.) *Sc in each st across. Rep bet (). Rep from * around. Sc in each of the last sts. Join w/slst to first sc. Fasten off cc. At this point you should have 9 sts on the long sides and 8 sc on the short sides. Including the sc in the corner sps.
RND 4: Join mc in any ch2 corner sp. Ch5, hdc in same ch2 corner sp. *Work 1hdc in each st across. Hdc, ch2, hdc in next ch2 corner sp. rep from * around but then hdc in each st across to the end. Join w/slst to 3rd ch of ch5.
RND 5: Ch1. Sc in each st around but work 2sc, ch2, 2sc in each ch2 corner sp. Join w/slst first sc.
RND 6-8: Ch2. Hdc in each st around but work 2hdc, ch2, 2hdc in each ch2 corner sp. Join w/slst to top of ch2. Fasten off and weave all ends into work.
Make another one the same way so you will have two.
Assembly
Put both pieces together wrong sides facing each other . Join CC in any ch2 corner sp going through both layers. Ch6, sc in same ch2 corner sp. Sc in each st around working 3 sc in each corner. When you get back to the beginning, work 8 sc in the ch6 loop. Slst to the last ch of loop. Fasten off and weave ends into the hanger you just made.
Design written on Thursday, May 06, 1999. Copyright ©1999 By Julie A. Bolduc


