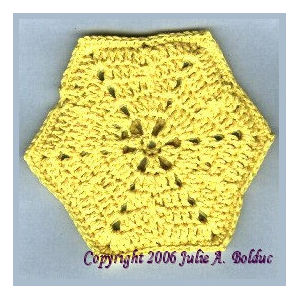
CD ROM Honey Comb Trivet
 Designed by Julie A. Bolduc
I know the idea of using a CDRom for a pattern is not my idea but I loved the idea so much that I decided I should design our own pattern for the Club. Hope you like this one. I did test it for durability against heat and I did place a boiling hot pot on it and let it sit there until the pot was cool and it stood up very well to the heat. I am not sure if I would trust a pot much higher than 350 degrees F. Though.
Materials Needed:
Southmaid8 Crochet Cotton or Size 3 Cotton.
Size E/4US or 3.5mm aluminum crochet hook
1 old CD or DVD ROM
Small Yarn Needle
Gauge: 6dc=1"
Yarn Thickness: 2mm
Finished Size: 5½"diameter
Skill Level: Intermediate
NOTE: This is done a little differently. I worked the back side first then put the cd over the wrong side of it centering the hole over the first round then worked on the front while the CD was on it. It is tricky to do but it can be done.
Instructions
Back
RND 1: Ch2, work 6sc in 2nd ch from hook. Join w/slst to first sc.
RND 2: Work in front loops only on this round. Ch3, dc in same st as slst. Ch2. *2dc in next st. Ch2. Rep from * around. Join w/slst to top of ch3.
RND 3: Work in both loops from here on through to the end. Ch3, dc in same st as slst. 2dc in next dc. Dc, ch2, dc in next ch2 sp. *2dc in each of the next 2 dc. Dc, ch1, dc in next ch2 sp. Rep from * around. Join w/slst top of ch3.
RND 4: Ch5. *Sk next 2 dc. Dc in next 2dc. Dc, ch2, dc in next ch2 sp. Dc in each of the next 2 dc. Ch2. Rep from * around but when you get back to where you started, dc in last dc and join w/slst to 3rd ch of ch5.
RND 5: Ch3. *Dc in next skipped dc in front of ch2 sp. Dc in next skipped dc behind same ch2 sp. Dc in each of the next 3dc. Dc, ch2, dc in next ch2 sp. Dc in each of the next 3 dc. Rep from * around but when you get back to the beginning, dc in the last 2 dc then join w/slst to top of ch3.
RND 6: Ch3. *Fpdc in next 2dc that are worked in the skipped stitches of rnd 4. Dc in each of the next 4 dc. 2dc, ch2, 2dc in next ch2 sp. Dc in each of the next 4 dc. Rep from * around but join w/slst to top of ch3 when you get back to the beginning. Fasten off and Weave end into work.
Front
Lay the crocheted piece down in front of you wrong side facing up. Lay the CD on top of it centering the hole over the 1st rnd. Join yarn on any free lp that you left free at the beginning of rnd 1. Now work rnds 2-5 in the same way as the back while keeping the CD in place.
Then to join the back to the front, work rnd 6 in the following way. You will be joining the front to back only in the ch2 sps.
RND 6: Ch3. *Fpdc in next 2dc that are worked in the skipped stitches of rnd 4. Dc in each of the next 4 dc. 2dc, sc in ch2 sp of same point on back piece, 2dc in next ch2 sp. Dc in each of the next 4 dc. Rep from * around but join w/slst to top of ch3 when you get back to the beginning.
RND 7: Now crochet the front to the back to close the DC into the work. Going through all 4 lps. Ch1. Sk next 2 sts of both pieces. *Sc in each of the next 6 sts. Sc, ch2, sc in next sp where you joined in the prev rnd. Sc in each of the next 6 sts. Sk next 2 sts. Rep from * around. Join w/slst to first sc. Fasten off and weave all ends into work.
Design written on Wednesday, May 05, 1999. Copyright ©1999 by Julie A. Bolduc p102012

