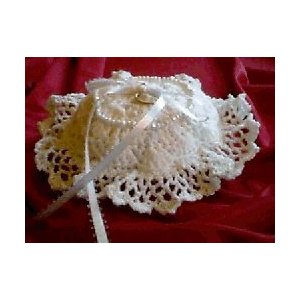
Ring Bearer's Pillow

Designed By Julie A. Bolduc
This little pillow is made for that bride's special day but after the festivities are over and her new life begins. She can use this little pillow as a pincushion and it will help her remember that special day.
Materials Needed:
Southmaid8 in white
size F aluminum crochet hook
4 mm pearl beads to be sewn on
White size 10 crochet thread
White sewing thread
Size 7 steel crochet hook.
Yarn needle
Sewing needle.
Yarn Thickness: 2mm
Gauge: 4dc=1"
Finished Size: 3½"x3"
Skill Level: Beginner
Instructions
Top
RND 1: Ch6, join with slst to first ch to form ring. Ch3, work 11 dc in ring. 12dcs total. Join w/slst to top of ch3.
RND 2: Ch1, *3dc in next st. Sc in next st. Rep from * around. Join w/slst to first ch.
RND 3: Ch3, work 4 dc in same st as slst. Sk 1 st. Sc in 2nd dc in 3dc shell. *5 dc in next sc. Sc in 2nd dc in 3dc shell. Rep from * around. Join w/slst to top of ch3.
RND 4: Ch3, dc in next st, 3dc in next st. *Dc in next 5 sts. 3dc in next st. Rep from * 5times more. Dc in last 3 sts. Join w/slst to top of ch3.
RND 5: Slst to the 2nd dc in the first 3dc shell. Ch3, 4dc in same st as ch3. Sk next st. sc in next st. *Sk 1 st, 5 dc in next st. Sk 1 st, sc in next st. Rep from * around. Join w/ sl st to top of ch3. Tie off.
Use size 10 thread and tapestry needle to sew "E"beads to the top of the pillow working on the top of row 4. To do this:
Step 1. Weave the thread end into work to secure the thread.
Step 2. The pull the thread up through the top of rnd 4. 3. String on 4 beads.
Step 4. Then insert the needle back down through along the top of rnd 4 right at the end of the line of beads so the beads lie next to each other (touching) in a row. As in the picture.
Step 5. Then bring the needle back up two beads back and bring thread back through the last two beads that were strung on the thread.
Step 6. Repeat steps 3-5 consecutively until you have completely made a hexagonal shape around the front of the pillow with no spaces in between the beads. Secure the thread in the back of the work by weaving the thread through several threads and piercing the threads as well.
Back
Rep RND 1-5. but do not put the beads on.
Assembly
Line up both pieces wrong sides facing each other.
Tie size 10 thread onto both pieces. Work the following into each stitch around. Stuff the pillow before closing completely.
RND 1: *Ch 5, sc in next st. Rep from * around. Join w/slst to first ch of ch5.
RND 2: Slst in the first 2 chs, sc in first ch5 lp. Ch5, *sc in next ch5 lp. Ch 5. Rep from * around. Join w/slst to first sc.
RND 3-5: Rep RND 2.
RND 6: Slst in the first 2 chs of the first ch 5 lp. Sc in lp. *Work the fol in the next ch 5 lp. (dc, ch1, dc, ch1, dc, ch3, slst in 3rd ch from hook, dc, ch1, dc, ch1, dc). Sc in next lp. Rep from * around but slst in the first sc at the end. Fasten off and weave ends into work.
After you are done making the pillow, to attach the rings to the top of the pillow, thread the ribbon through the stitches on the top in the center of the beads and place the rings on each ribbon and tie them into a bow.
Design Written in June 1998 Copyright © 1998 by Julie A. Bolduc p106003

