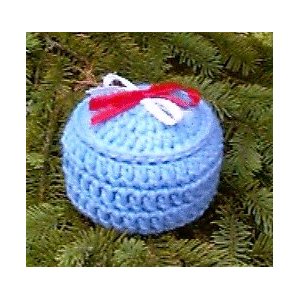
Tuna Fish Can Pinucushion

Designed By Julie A. Bolduc
This pincushion is made with a tuna can and can be embellished any way you wish. The instructions are basically how to make the the covering for the can. Use your imagination with embellishments.
Materials Needed:
Small amount worsted weight yarn acrylic. Any brand. I used a scrap I had.
Size H aluminum crochet hook
Polyester Fiber Fill
Empty clean tuna can small size
embellishments
Yarn Needle
Yarn Thickness: 4mm
Gauge: 3hdc per inch 1 hdc row=¾"
Finished Size: 3" high 3½" diameter
Skill Level: Beginner
Instructions
RND 1: Ch4, join w/slst to first ch to form ring. Ch2, work 12 hdc in ring. Join w/slst to first hdc.
RND 2: Ch2, hdc in same st as slst. Work 2 hdc in each st around. Join w/slst to top of ch2.
RND 3: Ch2, hdc in same st as slst. *2 hdc in next st. Hdc in next st. Rep from * around. Join w/slst to top of ch2.
RND 4: Ch1, sc in each st around. Join w/slst to ch1.
RND 5: Work in front lps only. Slst in each st around. Join w/slst to first slst.
RND 6: Work in back lps only of rnd4. Ch2, hdc in next st and in each st around. Join w/s/st to top of ch2.
RND 7 & 8: Ch 2, hdc in each st around. Join w/slst to top of ch2.
RND 9: Ch1, sc in each st around. Join w/slst to ch1. Stuff Can very full so that it is overflowing. Slip can into crochet work so that the starting ring is covering the stuffing. And the open end of the crochet work is on the bottom of the can.
How to dec. Yo, insert hook in next st. Draw up a loop and draw lp through 2 lps on hook, insert hook in next st, draw up a lp and draw lp through all lps on hook.
RND 10: Ch2, Dec in each st around. Join w/slst to top of first dec.
RND 11: Rep RND 10.
RND 12: Sc in each st around. Fasten off and weave ends into work.
Now embellish as you wish. I used 2 pieces of ¼" wide picot edged satin ribbon and inserted them on the top going in opposite directions to form a + and tied the ends together to make two bows one on top of the other. Hope you understand this.
Design Written in June 1998 Copyright © 1998 by Julie A. Bolduc p106004

