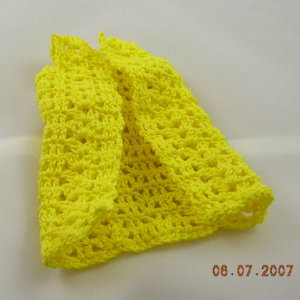
Fashion Doll Swim Suit Cover Up
 Designed By Julie A. Bolduc
This crocheted cover up for a fashion doll is easy to make and could be made in an evening or 2. You might want to use a softer thread like DMC Traditions for better draping.
Materials Needed
Size 10 crochet cotton of desired color.
Size 7 steel crochet hook
Tapestry needle for weaving in ends.
Yarn Thickness: 10thread
Gauge: 8sc = 1"
Finished Size: Fits an 11.5" fashion doll
Skill Level: Beginner to intermediate

Special Stitch Used: Shell. 2dc, ch2, 2dc in stitch indicated. When you work a shell in a shell, you will put the shell in the ch 2 space.
Vst also used: Dc, ch1, dc in sp indicated. When you work a Vst in a Vst, work the vst in the ch1 sp of the vst indicated.
Instructions
ROW 1: Ch52. Sc in 2nd ch from hook and in each ch across. Ch3, turn. (51sc)
ROW 2: Sk very first sc. Dc in each of the next 2 sc. (Shell next sc. Sk 2 sc. Dc in each of the next 2 sc.) Rep bet () 2 times more. Dc in each of the next 3dc. Rep bet () 3 times more. Dc in last sc. Ch3, turn.
ROW 3: Sk very first dc. (Dc in each of the next 2 dc. Sk next 2 dc. Shell in shell. Sk next 2dc.) Rep bet () 2 times more. Dc in each of the next 2 dc. Sk next dc. Vst in next dc. Sk next dc. Rep bet () 3 times. Dc in each of the next 2dc. Dc in top of ch3. Ch3, turn.
ROWs: 4-15: Sk very first dc. (Dc in each of the next 2 dc. Sk next 2 dc. Shell in shell. Sk next 2 dc.) Rep bet () 2 times more. Dc in each of the next 2 dc. Sk next dc. Vst in vst. Sk next dc. Rep bet () 3 times. Dc in each of the next 2dc. Dc in top of ch3. Ch3, turn.
Arm Hole and neck shaping
Right Shoulder
ROW 16: Sk very first dc. Dc in each of the next 2 dc. Shell in shell. Sk next 2 dc. Dc in each of the next 2 dc. Ch3, turn.
ROW 17: Sk very first dc. Dc in next dc. Shell in shell. Sk next 2 dc. Dc in each of the next 2 dc. Dc in top of ch3. Ch3, turn.
ROW 18: Sk very first dc. Dc in each of the next 2 dc. Shell in shell. Sk next 2 dc. Dc in next dc and in top of ch3. Fasten off and weave ends into work. Leave the finishing end long enough to stitch shoulder seam.
Back of neck area
Lay work in front of you so the shoulder you just made is in the upper right corner.
ROW 16: Join thread in 2nd shell in the ch2 sp from this shoulder. Ch3, 3dc in same sp. Sk 2 dc. Dc in next 2 dc. Sk next dc. Vst in next vst. Sk next dc. Dc in each of the next 2 dc. 4dc in ch2 sp of next shell. Ch3, turn.
ROW 17: Sk first dc. Dc in each of the next 5 dc. Vst in next vst. Sk next dc. Dc in each of the next 5 dc. Dc in top of ch3. Ch3, turn.
ROW 18: Sk first dc. Dc in each of the next 2 dc. Ch2. Dc in each of the next 2 dc. Ch2. Sc in next dc. Sk next dc. Sc in next vst. Sk next dc. Sc in next dc. Ch2. Dc in each of the next 2 dc. Ch2. Dc in each of the next 2 dc. Dc in top of ch3. Fasten off and weave ends into back of work. Leave the finishing end long enough to stitch shoulder seam.
Left ShoulderSk 8 dc from ch2 sp where there are 4 dc on row 15.
ROW 16: Join thread to next dc. Ch3. Dc in next dc. Shell in next shell. Sk 2 dc. Dc in each of the next 2 dc. Dc in top of ch3. Ch3, turn.
RND 17: Sk first dc. Dc in each of the next 2 dc. Shell in next shell. Sk 2 dc. Dc in next dc. Dc in top of ch3. Ch3, turn.
RND 18: Sk first dc. Dc in next dc. Shell in shell. Sk 2 dc. Dc in each of the next 2 dc. Dc in top of ch3. Fasten off and weave both ends into work.
Finishing
Stitch should seams closed using the tapestry needle and the ends you did not weave in. Use an over hand stitch to go from the outside of the shoulders to the ch2 space. Weave ends in.
You can add a ¼" satin ribbon if you want to make a belt to go with it.
Design written on Thursday, June 07, 2007. Copyright ©2007 By Julie A. Bolduc p113014

