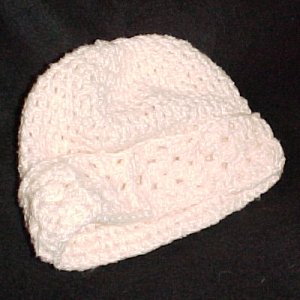
Granny Cuff Hat

Designed by Julie A Bolduc
The cuff and the crown part of the hat are made separately then stitched together. It is a fun hat that is very warm and snuggly to wear.
Materials Needed
Red Heart Plush Yarn color#9103 cream
Size H/8 or 5mm aluminum crochet hook
Yarn needle for weaving in ends
Yarn Thickness: 4mm
Gauge: 4dc = 1"
Finished Size: Fits Woman's head.
Skill Level: Intermediate
Instructions
RND 1: Cuff Motif 1: Ch4. Join w/slst to first ch to form ring. Ch3, 2dc in ring. Ch2. 3dc in ring, ch2, 3 times. Join w/slst to top of ch3.
RND 2: Slst in each of the next 2dc and in the next ch2 sp. Ch3, 2dc, ch2, 3dc in same sp. Ch1. *3dc, ch2, 3dc in next ch2 sp. Ch1. Rep from * around. Join w/slst to top of ch3. Fasten off and set aside.
Motif 2-7:
RND 1: Rep rnd 1 of motif 1.
RND 2: Slst in each of the next 2dc and into the next ch2 sp. Ch3, 2dc in same sp. Ch1. Pick up previous square, slst in ch2 sp. Ch1. 3dc back on current square in same ch2 sp. Slst in next ch1 sp on previous square. 3dc, ch1, slst in next ch2 sp of previous square, ch1, 3dc on current square in same ch2 sp. Ch1. 3dc, ch2, 3dc in next ch2 sp on current square. Ch1. 3dc, ch2, 3dc in next ch2 sp. Ch1. Join w/slst to top of ch3. Fasten off.
Motif 8:
RND 1: Rep rnd 1 of motif 1.
RND 2: Slst in each of the next 2dc and into the next ch2 sp. Ch3, 2dc in same sp. Ch1. Pick up previous square. Slst in ch2 sp. Ch1. 3dc back on current square in the same ch2 sp. Slst in next ch1 sp on previous square. 3dc, ch1 in next ch2 sp on current square. Ch1. Slst in next ch2 sp of previous square. Ch1, 3dc in same ch2 sp on current square. Ch1. 3dc, ch1 in next ch2 sp. Pick up first motif. You are now going to join the first motif to the current motif. Slst in matching ch2 sp on first motif. Ch1. 3dc in same ch2 sp as current square. Slst in next ch1 sp of motif 1. 3dc in next ch2 sp of motif 8. Ch1. Slst in ch2 sp of motif 1. Ch1. 3dc in same ch2 sp of motif 8. Ch1. Join w/slst to top of ch3. Fasten off & weave ends into back of work. Set cuff aside.
Crown:
RND 1 Ch6. Join w/slst to first ch to form ring. Ch3. 15 dc in ring. Join w/slst to top of ch3. (16 sts)
RND 2: Work between each dc around from here on out. Slst into next sp bet dc. Ch3, dc in same sp. 2dc in each sp around. Join w/slst to top of ch3. (32 sts)
RND 3: Slst into the next sp. Ch3, dc in same sp. Dc in each of the next 3 sps. *2dc in next sp. Dc in each of the next 3 sps. Rep from * around. Join w/slst to top of ch3. (40sts)
RND 4: Slst into the next sp. Ch3, dc in same sp. Dc in each of the next 4 sps. *2dc in next sp. Dc in each of the next 4 sps. Rep from * around. Join w/slst to top of ch3. (48sts)
RND 5: Slst into the next sp. Ch3, dc in same sp. Dc in each of the next 5 sps. *2dc in next sp. Dc in each of the next 5 sps. Rep from * around. Join w/slst to top of ch3.(56sts)
RND 6-16: Slst into the next sp. Ch3, dc in each sp around. Join w/slst to top of ch3. Do not fasten off.
Finishing Joining Crown To Cuff:
Pick up cuff and line it up to the crown so that one edge is lined up with the last round of the crown. Make sure the right side of both the crown and cuff are facing out. Line the stitch where you are at with any ch2 sp on the right hand side of any square. Work 1 sc in ch2 sp and sp bet dc on crown. *Sc in next sp bet dc on cuff and through next sp on crown at the same time. Rep from * around. Join w/slst to first sc. Fasten off and weave ends into back of work.
NOTE: Notice each square has 7 spaces from 1 ch2 sp on the right side to the ch2 sp on the left side of the square. It goes like this, Ch2 sp, 2sps bet the next 3 dc. Next ch1 sp. 2sps bet the next 3 dc. Next ch2 sp. There are 56 spaces on the crown. Divide this by 7 and you have 8 squares! 7 spaces on each square to match up with each space on the crown.
Design written on Saturday, December 4, 2004. Copyright ©2004 By Julie A. Bolduc p124014

