
Paper Bead Tree Top Star
Designed By Julie A. Bolduc
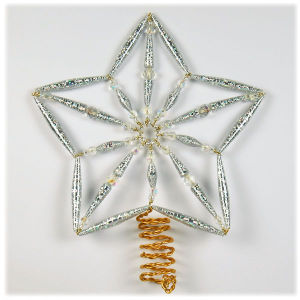
This beaded tree top star is made with a combination of prism paper and glass faceted beads. It can be made with card stock as well. It is designed to fit on the top of a 3 or 4 foot tree.
- Materials Needed Per Star
- 2 Sheets Prism Paper, 8-1/2" x 11"*
- Cutting Templates Provided: 2 Sheets total
- Bead Glazing Supplies of choice
- 20 Round Clear Beads size 6/0 Seed Beads or 4mm round - Miyuki 6/0 Seed Beads, Crystal AB were used in this star
- 20 Round Faceted Beads, 6mm round Iridescent or Clear AB, Glass or Crystal
- 5 Round Faceted Beads, 10mm Iridescent or Clear AB, Glass or Crystal
- 20 Gauge Craft Wire in Gold or Silver color, 5 pieces, 6" long, 5 pieces, 7" long
- 24 Gauge Craft Wire in Gold or Silver color, 1 piece, 12" long
- 16 Gauge Craft Wire in Gold or Silver color, 58inches, 4.9ft or 1.5m**
- Tools Needed
- Size 5/64" or Number 1 Long Split Pin Paper Bead Roller
- Size 5/64" or Number 1 Short Paper Bead Roller, slotted or split pin
- Wire Cutters
- Round Nose Pliers
- Flat Nose Pliers
- Paper Cutting Tools
- Mini Binder Clips or Paper Clips for sorting your strips and keeping them together.
- Bead Glazing Tools
- Ring Mandrel or 1" diameter dowel of some sort
Finished Size: About 7" x 6"
Skill Level: Advanced
Instructions
 Making Your Beads
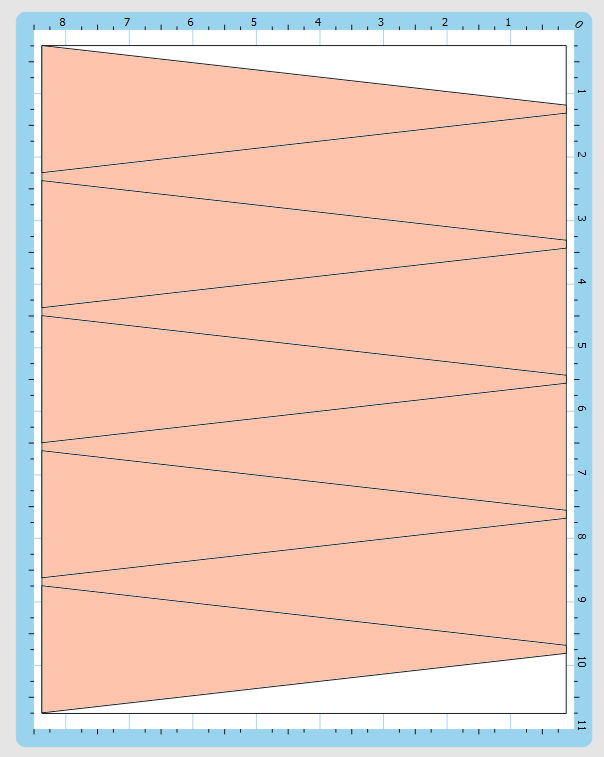
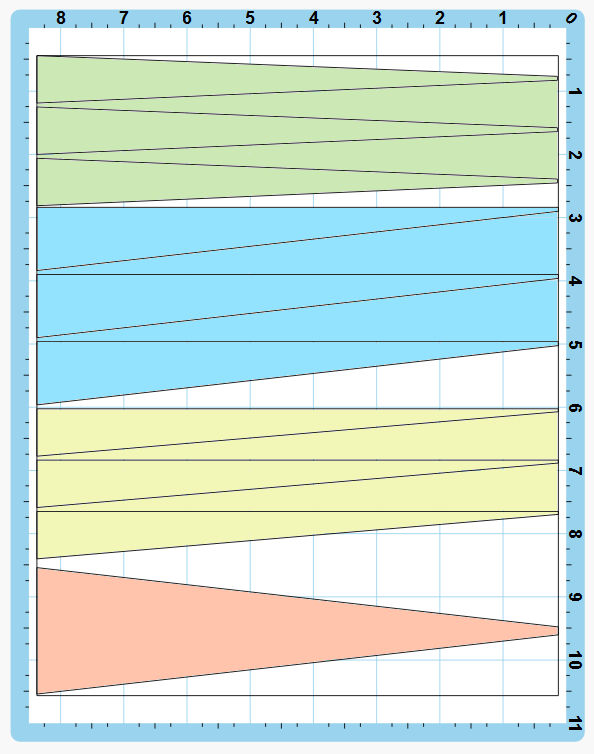
Step 1: Print out your template and cut your strips out following the cutting map. Sort out the pieces you need, place a binder or paper clip on the like pieces alltogether to keep them organized while you roll them. Set aside the extra strips for use in other projects. Don't get them mixed up in your star's strips.
Step 2: Roll up your 2" wide end strips first. Use the long paper bead roller for these strips. Set them aside.
Step 3: Roll up the 5 bicone or centered tapered strips making sure to keep the narrow end centered to the wide end. Set these aside. These should be 3/4" long.
Step 4: Roll up the 5 right angle triangle strips, that are 3/4" at the wide end, into cone shaped beads.
Step 5: Roll up the 5 right angle triangle strips, that are 1" at the wide end, into cone shaped beads.
Step 6: Prepare your beads for glazing how ever you like to glaze your beads. Since I string and dip mine, this is when I would string them to prepare them for dipping.
Step 7: Glaze your beads how ever you want to glaze them. Allow them to dry completely.
Assembling Your Star!You will need to know how to make a wrapped loop. You will only need to do 2 wraps of your wire to secure your loop with this project.
Step 8: When your beads are completely dry put them in piles according to size and type on your work surface. A towel or bead mat works great for sorting out all of your beads so they don't roll around. Set out all of your beads including the beads that are not made of paper.
Step 9: Make your 5 large center spokes in the following way. Take a 7" long piece of 20 gauge wire, make a wrapped loop at one end making the loop as small as you can make it at the very tip of your round nose pliers. Add your beads in the following order. 1 Size 6/0 Seed Bead, 1 size 6mm Faceted bead, 1 size 3/4" cone bead with the point facing the beads already on the wire, 1 size 10mm faceted bead, 1 size 1" cone bead with the flat side facing the 10mm bead, 1 size 6mm bead and 1 size 6/0 seed bead. Finish this spoke with a wrapped loop making the loop as small as you can, the same way you did with the first wrapped loop. Trim any extra wire close to the wrap.
Step 10: Make your 5 smaller spokes the following way. Use the 4" long 20 gauge wire pieces. Tiny Wrapped loop, 1 size 6/0 seed bead, 1 size 6mm faceted bead, 1 bicone bead, 1 size 6mm faceted bead, 1 size 6/0 seed bead, tiny wrapped loop. On the very last wrapped loop of your last spoke, make your loop a little bigger by wrapping it around the center part of your needle nose pliers. You want to make it big enough to pass two 16gauge wires through it. Set this one aside and keep it separate from the others. You can wrap a piece of painters tape around it so you know which one it is and also mark this loop somehow with a piece of yarn or string.
Step 11: Assemble your spokes on the center hub. Cut a 12" piece of 24gauge wire. Thread this wire through 10 size 6/0 seed beads and through the tiny loops on the spokes in the following order. Seed bead, short spoke, long spoke, 5 times. Make sure the 3/4" cones are toward the center of the hub and the short spoke that has the larger loop is the first one you add to the hub. Also make sure you don't pass the wire through the larger loop. The larger loop is for the 16guage wire which is used in the next step. Leave one end of your wire longer than the other. Try to secure the shorter end by folding it back over the top of the beads and loops for now while you complete the hub. This will be cut off when finished. Then with the help of your flat nose pliers, pass the rest of the wire back through all of the loops and beads the same way a 2nd time and pull the wire to close the loop. If you have enough wire, pass it through one more time to really secure your work. You may need to run the wire through one bead and loop at a time. When you get back to the beginning, cut any extra wire off including the wire you folded back on top of your work.
Step 12: Lay the center of your star on your work surface and lay out your spokes flat so you have the short spoke with the larger loop on the bottom. This is the bottom center of the star where the 16 gauge wire will pass through twice in opposite directions before forming the tree coil.
Step 13: Straighten out your 16gauge wire. Fold it in half.
Step 14: Place one of the 2inch paper bead on one side and slide it up to the fold.
Step 15: Slide the top center long spoke on the opposite wire of the wire you just put the 2" long bead on and slide it up to the bead in the center.
Step 16: Place a 2nd 2inch paper bead on the side where you just slide the first spoke onto and slide it up to the spoke to lock the spoke in place. Tighten the 2 beads to the center spoke on the 16gauge wire.
Step 17: Slide the 2 ends of the 16 gauge wire through the tiny loops of the 2 short spokes that are next in the hub and bring the loops both up to the 2" long paper beads that are there.
Step 18: Add a 2 inch long paper bead to each side of your wire sliding them up to the loops of the short spokes that are there.
Step 19: Slide each of the 2 ends of your wire through the next long spoke on each side of your star. Push it tight against the long bead and bend the wire a little to lock in the spoke.
Step 20: Add a 2 inch long paper bead to each side of your wire sliding them up to the loops of the long spokes.
Step 21: Slide the 2 ends of the 16 gauge wire through the tiny loops of the next 2 short spokes. Bring the loops up to the long paper beads you just added. Make them tight.
Step 22: Add a 2 inch long paper bead to each end of the 16gauge wire sliding them up to the short spokes you just slid up.
Step 23: Slide the 2 ends of the 16gauge wire through the tiny loops of the next 2 long spokes bending the wire a little to lock in the loops.
Step 24: Add a 2 inch long paper bead to each end of the 16 gauge wire sliding them up to the tiny loops of the long spokes you just slid up.
Now comes the tricky part.Step 25: Slide the 2 ends of the 16gauge wire through the larger loop of the bottom spoke going in opposite directions and pull both ends tight to close any gaps.
Step 26: Twist the 2 long ends of the 16 gauge wire together to form one long tightly twisted 2ply wire tail. This is going to be the coil that slides over the top of the tree.
Step 27: Using some sort of dowel or ring mandrel, wrap the twisted wire around the form to form a coil big enough to slide over the center top of your Christmas Tree.
Step 28: Adjust and flatten star as needed to achieve the shape you want.
Shopping Guide:* Colorbok Day at the Beach Summer Fun Prism Paper was used. There are 10 sheets per pack 2 each of gold, pink, blue, orange and silver. I am using the 2 sheets of silver in this project.
**I bought my wire at Wal-Mart. It was a $1.00 hank that was 4.9feet long. I used the whole thing for this star.
Note about Faceted Beads: I am using beads from an old broken necklace my grandmother had. The beads were various sizes so I sorted them out. I did not buy the beads. I had them on hand.
Design written on September 8, 2015. Copyright ©2015 By Julie A. Bolduc f201003
All items in our online shop ship free within the US only. I currently offer U.S. shipping only and it is from rural Maine. Delivery can vary from 2–14 days depending on your distance from Maine. Expedited shipping is not available.
Please note: I am now selling all of my paper bead making tools and other items from this web site using Paypal payments.
I have removed all of my paper bead making tools from Amazon. My Kindle crochet pattern books and paper template paperback books continue to be available on Amazon, as they are printed and fulfilled directly by Amazon. A limited number of paper bead making tools remain available on Etsy but I am not linking to those tools from this site.
Random Quick Tip!
Preventing Ink Bleed on Bead SheetsWhen you are not sure if the ink on your bead sheets will run, you can treat your paper with 3 thin coats of Krylon's Workable Fixative. Then cut them into strips.