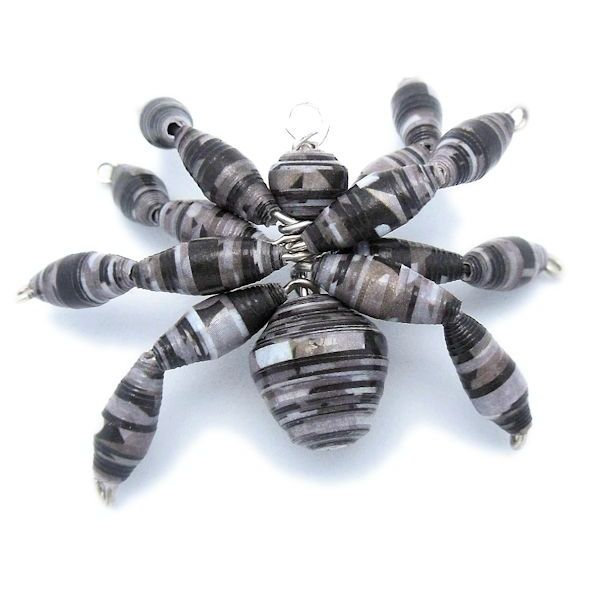
Halloween Paper Bead Spider

Designed By Julie A. Bolduc
This spider is completely made with wire and paper beads! It is fun to make and would surely add that bit of creepiness to a halloween costume! You can either put this on a chain to make it a pendant necklace or add a pinback to the underside to make it a pin or you can glue a magnet to the underside and use it as a refrigerator magnet! The free PDF file includes the template.
- Materials NeededTo make 2 spiders
- 1 Piece 8 1/2" x 11" recycled copy paper
- 1 Piece 8 1/2" x 11" black based print scrapbook paper
- Special cutting template provided for this project
- Size 1/16" short paper bead roller
- White glue or glue stick for securing the ends of the rolled strips.
- Some way to cut your paper into the strips needed
- Favorite Glaze for glazing paper beads
- Length of silver chain and the clasp of choice to make this spider a pendant.
- 8 pieces 20 gauge wire 3" long in a silver color
- 2 head pins 2" long
- Needle nose pliers, wire cutters and chain nose pliers.
Finished Size: 2" x 1 3/4"
Skill Level: Intermediate to advanced
Instructions Step 1: Print out the provided template. Set your printer to print in portrait format, 0 margins and borderless if your printer is able to do so. The template is designed to cut out enough strips to make 2 spiders. If you want to make 4 spiders and not waste the template, you can roll the strips from the template itself and color them with a black permanent marker after rolling them and before glazing them. That is what I did. The spider in the picture is made with a scrapbook paper that had a black background and shades of gray hydranga type flowers.
Step 2: Layer the template with your scrapbook paper and clip them together, along one edge, with mini binder clips. Start cutting on the side with the long strips first. Then it will be easier to cut the templates for the legs when you get to them. This time the templates are shadded a light gray so you know what are the actual pieces and what is waste. Don't forget to put the waste pieces into the recycle bin. Or you can roll them up to make more fun odd beads!
- These are the pieces you will need, for one spider, if you don't want to cut up the template.
- 1 abdomen Piece 11" long, 5/8" at the wide end, 3/8" at the narrow end
- 1 Abdomen piece 11" long, 3/8" at the wide end, 1/4" at the narrow end
- 1 Abdomen piece 11" long, 1/4" at the wide end, 1/16" at the narrow end.
- 1 Head piece 11" long, 1/4" at the wide end, 1/16"e at the narrow end.
- 16 leg pieces, 5 1/2" long, 1/2" at the wide end, 1/16" at the narrow end.
Step 3: Roll your beads as you normally would. The abdomens require 3 strips and they are marked as such with the numbers. They are numbered in the order in which you roll them up. 1, 2 and 3. Roll the abdomen so you end up with a fat end and longish narrow end. Each leg takes one strip and the head takes one strip.
Step 4: Glaze the beads the way you normally do.
Step 5: Assembly: Make the legs first. You will need 4 beads for each leg section. Make the tiniest simple loop possible at the end of one of your pieces of 3" wire. Put 2 beads on this wire. Make another tiny loop at the end of the 2 beads, which will be the center of the wire, do not cut your wire. The rest of the wire will make the other side of this leg set. Put on 2 more beads. Make one more tiny simple loop at the end of this leg. You may have to trim off a little of the excess wire. I only had to trim off about an 1/8" piece. To make the simple loops as small as possible, wrap the wire around the narrowest part of your needlenose pliers. Repeat this step until you have made 4 leg segments.
Step 5: Put the large abdomen bead onto your head pin making sure the fat end is at the long part of the pin and narrow end is at the head of the pin.
Step 6: Put the leg segments on so they are all going in the same direction. Squeeze them to the abdomen bead as tight as you can. Put the head on next and also push that as tight to the legs as possible. Here you want to make a wrapped loop so it will keep it's shape. To make the wrapped loop, make a small loop about 1/16" away from the head bead and wrap the excess wire around the 1/16" space in the wire.
You are done with your pendant! Now do with it what you want!Design written on Thursday, October 2, 2014. Copyright ©2014 By Julie A. Bolduc f207000

