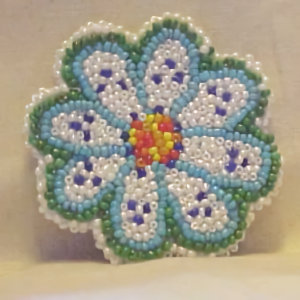
Beaded Flower Fridgie
Designed by Julie A. Bolduc
This magnet is fun to make and is made with seed beads, stitched onto a piece of felt and backed a piece of sheet magnet. You can use whatever colors you like to match whatever you want!
- Materials Needed
- 4"x4" white piece of white cotton and white felt.
- White cotton sewing thread
- Seed Bead beading needle
- Assorted Seed Beads NOTE: I used a package of assorted seed beads for all but the pearlized section of the flower.
- 1 package pearlized seed beads or one tablespoonful.
- No I did not count them.
- Jewelit Glue or other very tacky Glue
- Magnet sheet cut to a 1.25" circle
- Tracing Paper
- Pencil
- Blue Crayon
- Blunt yarn needle
Finished Size: 2.5" diameter

Instructions
STEP 1: Trace image onto tracing paper. This is the way I did it. I taped the tracing paper to the computer screen and traced the pattern onto the paper. The image does show through enough to be able to make a rough outline. My printer was out of ink when I designed this pattern. Or you can use a light box or a window after printing out this page onto a piece of paper.
STEP 2: Transfer the design to Fabric. You won't believe the way I did this. Using the crayon, turn the tracing over so that the pencil lines are on the back facing down. Then with the crayon, trace over your lines again. Press somewhat hard. Then turn the tracing back over and center it on your white fabric. Then with the blunt end needle, trace over the pencil lines again so that the crayon lines get transferred to the fabric. Don't worry, the crayon will not show after you are done beading. You will end up with a faint guide to follow on your fabric.
STEP 3: Lay the fabric on top of the felt and line them up so the edges are even. Be sure the lines are facing up so you can see them. You may want to baste the two layers together here but I didn't.
STEP 4: Start Beading. Starting in the center, use various shades of yellow and orange and sew about 17 beads to the center so they are touching each other. Sew them on randomly. To sew them, cut a length of thread about 18" long and thread your beading needle. Knot one end of the thread. Poke your needle up through the center of the center circle on your fabric from the back. Then put on a bead and then secure it to the top by poking the needle back down through almost in the same place. Just barely the same place. Then repeat this until your center circle is completely filled.
STEP 5: The outline of the petals. Here I used the different shades of the light blue seed beads. They do vary in hue somewhat but that is what gives this flower it's charm The fact that it is not perfect.
Follow the petal lines to sew the beads on. Poke the needle up through from the back, just on the edge of the circle, between any two of the petals. String on enough blue beads to go all the way around the petal, like in the picture, then poke the needle back down through where the next petal begins. Secure the thread to the back with a tiny stitch.
Then poke the needle back up through about .25" from where made your knot out side of the loop made by the beads. Follow the petal line for needle placement.
Then poke the needle back down through the same place but inside the loop made by the beads. This will tack the beads in place. Repeat this until the loop of beads is secured to the fabric. You will work about 6 stitches. Do this with each petal all the way around the flower.
STEP 6: Inside the petals. Following what is in the picture, sew the pearlized seed beads and dark blue beads to the inside of each petal. Basically the same way you did for the center.
STEP 7: Sew the green seed beads on the outside edge of the blue beads. One at a time.
STEP 8: Trim the excess fabric away from the green seed beads being careful not to cut any of the threads off.
STEP 9: Sew an edging of pearl seed beads to the perimeter to cover the raw edges and give it a nice finished edge.
Start anywhere on the edge. Poke the needle up through the center so that you are between the green and blue beads. The green beads will act like an anchor. String on 3 pearl beads then work an over hand stitch and bring your needle back up through from the back about 2 beads away from where you came up before. Repeat this all the way around the perimeter.
STEP 10: Glue your magnet sheet to the back. If you do not have magnet sheets, you might want to cut a circle from a plastic lid from a coffee can to fit and sand it a bit on both sides so that the glue will stick to it. Then glue this onto the back for stability then glue a magnet tape strip about 1" long to the plastic. You might want two pieces side by side for more coverage.
By the way, I used a scrap piece of magnet sheet from a magnetic promotional calendar I had kicking around. Recycle!!!
Design written on Saturday, August 07, 1999. Copyright © 1999 By Julie A. Bolduc f126003

