
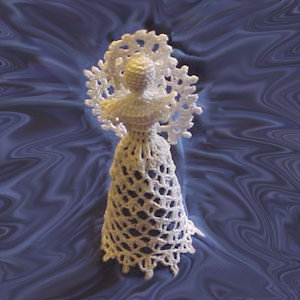
Lacy Shell Tree Top Angel
 Designed By Julie A. Bolduc
This pretty tree top angel is perfect for a tree which is not very tall. About 6' high would be about right for this angel. It is made in 3 pieces which are assembled with glue. If you have a very big tree, you can attache a hanger to the head and use the angel as an ornament.
Materials Needed
Size 10 crochet cotton in white.
Size 7 steel crochet hook
Tapestry Needle
White glue and water for stiffening.
straight pins
styrofoam cone for a mold for the skirt
styrofoam board for drying halo and wings
plastic wrap
Yarn Thickness: 10thread
Gauge 10sc=1"
Finished Size: 7" high
Skill Level: Intermediate
Special Stitches:
Picot (pic) Ch3, slst in 3rd ch from hook.
Single Crochet Decrease (Sdec) Insert hook in next st, draw up a lp, insert hook in next st, draw up a lp, yo draw through all 3 lps on hook.
Double Crochet Decrease (ddec) Yo, insert hook in next st, draw up a lp, insert hook in next st, draw up a lp, yo, draw through 2 lps on hook, yo, draw through 2 more lps on hook.
Instructions
Head
RND 1: Ch2. Work 6sc in 2nd ch from hook. Join w/slst to first sc.
RND 2: Ch1 (counts as 1 sc). Sc in same st as slst. 2sc in each sc around. Join w/slst to ch1. (12sc.)
RND 3: Ch1. Sc in same st as slst. Sc in next st. *2sc in next st. Sc in next st. Rep from * around. Join w/slst to ch1. (18sc)
RND 4-7: Ch1. Sc in each sc around. Join w/slst to ch1.
RND 8: Ch1. Sc in next sc. *Sdec 1. Sc in each of the next 2sc. Rep from * around. Join w/slst to ch1. (14 sc.)
RND 9: Ch1. Sc in next sc. *Sdec 1. Sc in each of the next 2 sc. Rep from * around. Join w/slst to ch1. (11 sc.)
RND 10: Ch1. Sc in next sc. *Sdec 1. Sc in each of the next 2 sc. Rep from * around. You will end with 1 sc in last st. Join w/slst to ch1. (8 sc.)
Neck
RND 11: Stuff head. Ch1. Sc in next sc. *Sdec 1. Sc in each of the next 2 sc. Rep from * around. Join w/slst to ch1. (6 sc.)
RND 12: Ch3. 2dc in same st as slst. 3dc in each sc around. Join w/slst to top of ch3. (18 dc.)
RND 13: Ch3. Dc in each of the next 2 dc. 2dc in each of the next 3 dc. Dc in each of the next 6 dc. 2dc in each of the next 3 dc. Dc in each of the next 3 dc. Join w/slst to top of ch3.
RND 14: Ch3. Dc in each of the next 2 dc. 2dc in next dc. (Ch3. 2dc in next dc. Five Times) Dc in each of the next 6 dc. 2dc in next dc. (Ch3. 2dc in next dc. Five times) Dc in each of the next 3 dc. Join w/slst to top of ch3.
Waist
RND 15: Ch3. Dc in each of the next 3 dc. Sk next dc and the next 5 ch3 lps. Sk the next dc. Dc in each of the next 8 dc. sk next dc and the next 5 ch3 lps. Sk next dc. Dc in each of the next 4 dc. Join w/slst to top of ch3. This forms the waist of the angel and the lps that you skipped, make the open sleeves.
RND 16: Ch3. Dc in each of the next 2 dc. Ddec 1. Dc in each of the next 6 dc. Ddec 1. Dc in each of the next 3 dc. Join w/slst to top of ch3. (14 dc)
RND 17: Ch3. Dc in next dc. Ddec 1. Dc in each of the next 5 dc. Ddec 1. Dc in each of the next 2 dc. Join w/slst to top of ch3. (12 dc.)
Skirt
RND 18: Ch4. Tr in next dc. Ch2. *Tr in each of the next 2 dc. Ch2. Rep from * around. Join w/slst to top of ch4.
RND 19: Slst into the first ch1 sp. Ch3, dc, ch2, dc in same sp. 2dc, ch2, 2dc in each ch1 sp around. Join w/slst to top of ch3.
RND 20: Slst in next dc and into the next ch2 sp. Sc in same sp. Ch5. *Sc in next ch2 sp. Ch5. Rep from * around. Join w/slst to first sc.
RND 21: Slst in each of the next 2 chs. (Slst, ch3, dc, ch2, 2dc in next ch.) ((2dc, ch2, 2dc in 3rd ch of the next ch5 sp.)) Rep bet (()) around. Join w/slst to top of ch3.
RND 22: Slst in next dc and into the next ch2 sp. Sc in same sp. Ch5. *Sc in next ch2 sp. Ch5. Rep from * around. Join w/slst to first sc.
RND 23-28: Rep rnds 21 & 22 consecutively.
RND 29: Slst in each of the next 2 chs. (Slst, ch6, dc, ch5, dc, ch3, dc in next ch.) ((Dc, ch3, dc, ch5, dc, ch3, dc in 3rd ch of the next ch5 sp.)) Rep bet (()) around. Join w/slst to top of ch3. Fasten off and weave ends into work. You are done crocheting the main part of the angel.
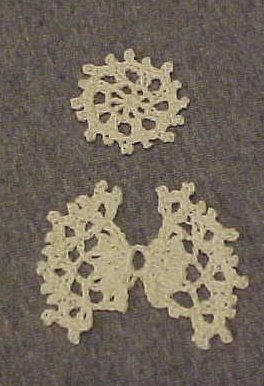
Wings:
Center:
Each side of the wings is made separately on a center ring.
Ch8, join w/slst to first ch to form ring.
ROW 1: Ch3. 7dc in ring. Ch3, turn. (8dc.)
ROW 2: Dc, ch2, 2dc in top of very first dc. Normally you would skip this dc if you were working on a sampler square. *Sk next dc. 2dc, ch2, 2dc in next dc. Rep from * across. Leave the top of ch3 alone. Ch1, turn.
ROW 3: Slst in each of the first 2 sc. Sc in next ch2 sp. (Ch5. Sc in next ch5 sp. three times) Slst into the next dc and in top of ch3. Ch1, turn.
ROW 4: Slst into the next sc. Ch3, dc, ch2, 2dc in same st as slst. (2dc, ch2, 2dc in 3rd ch of the next ch5 sp.) Rep bet () 2 times more. Ch1, turn.
ROW 5: Sc in next dc. 1pic. Sc in next dc. (Sc, 1pic, sc in next ch2 sp. Sc in next dc. 1pic. Sc in each of the next 2 dc. 1 pic. Sc in next dc. three times) Sc, 1pic, sc in next ch2 sp. Sc in next dc. 1pic. Sc in top of ch3. Fasten off. Weave ends into work.
Other Side:
Join thread to starting ring right next to the 8th dc of row 1 of the first side. Then Repeat rows 1-5.
Halo:
RND 1: Ch4. Join w/slst to first ch to form ring. Ch5. *Dc in ring. Ch2. Rep from * 6 times more. Join w/slst to 3rd ch of ch5.
RND 2: Slst into the first ch2 sp. Ch3, dc in same sp. Ch3. *2dc in next ch2 sp. Ch3. Rep from * around. Join w/slst to top of ch3.
RND 3: Ch1. 1pic. Sc in next dc. Sc, 1pic sc in next ch3 sp. *Sc in next dc. 1pic. Sc in next dc. Sc, 1pic sc in next ch3 sp. Rep from * around. Join w/slst to ch1. Fasten off and weave ends into back of work.
Finishing
Stiffen all pieces with 1part water to 3 parts glue. Use cone covered with plastic wrap to shap skirt. I stuck a broken plastic spoon handle into the top of the cone to stand up the body of the angel. Allow all pieces to dry completely then glue the wings to the back and the halo to the back of the head.
Design written on Friday, November 10, 2000. Copyright ©2000 By Julie A. Bolduc p104008
JPF Crochet Club where Crocheting is Just Plain Fun This crochet pattern is for personal use only and is not to be resold.All items in our online shop ship free within the US only. I currently offer U.S. shipping only and it is from rural Maine. Delivery can vary from 2–14 days depending on your distance from Maine. Expedited shipping is not available.
Please note: I am now selling all of my paper bead making tools and other items from this web site using Paypal payments.
I have removed all of my paper bead making tools from Amazon. My Kindle crochet pattern books and paper template paperback books continue to be available on Amazon, as they are printed and fulfilled directly by Amazon. A limited number of paper bead making tools remain available on Etsy but I am not linking to those tools from this site.
Random Quick Tip!
Cutting Mat Not Sticky Enough?If the cutting mat you use with your electronic cutting machine no longer is sticky, you can use painter's tape to keep the paper or cardstock you are cutting on the mat. Just put pieces of tape on all four sides and 4 corners about a couple of inches long each. I am doing this each time I need to cut more shapes for my English Paper Piecing project. These are for the shapes I cannot cut with my Accuqilt dies.