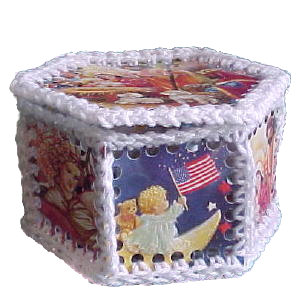
Hexagon Lidded Christmas Card Box
 Designed By Julie A. Bolduc
This pattern is a result of a request by a visitor to my site and since the pattern is so much like others I have seen, I am giving this pattern away for free. This is a great way to recycle holiday or any type of greeting cards you get. Consider making one for someone's birthday out of old birthday cards! Or if you get Easter Cards, make one without a lid to hold Easter Eggs. You can also use card stock you print on your computer or rubber stamps on. The idea though is to recycle greeting cards with this project.
Materials Needed
16 cards 4 ½" x 6"
Stick Glue or all purpose white glue
Small amount white worsted weight glitter yarn
Paper punch ¼" round hole
Scissors or cutting mat and rotary cutter
Pencil or pen
Size G/6 aluminum crochet hook
Tapestry Needle
Yarn Thickness: 4mm
Gauge: 4sc=1"
Finished Size: 3 ¾"h x 5 ½"w
Skill Level: Intermediate
Instructions
Cut Cards
STEP 1: Cut the backs off of all the cards. Keep 2 of them to make your templates. From one of them, cut a perfect 2 5/8" x 2 5/8" square. Set aside. From the other one, cut a hexagon which is 4 ½" from flat side to flat side and 5 ¼" from point to point. The sides should be the same size as the sides of the square.
STEP 2: Use paper punch to evenly punch out 7 holes on each side of the square and hexagon. The easy way to do this is to punch a hole at each corner then punch 5 holes between each hole on each corner. You can, if you want, just punch the holes on one side of each and use this to transfer markings on the cards later. That is what I did.

STEP 3: Trace out 12 squares and 4 hexagons from the fronts of the cards. Cut out all squares and hexagons. Glue the squares & hexagons together, wrong sides facing each other, so you have 2 hexagons and 6 squares. On the hexagons, make sure the image is going opposite ways. One upside down and one right side up. On the squares, make sure the images are all going in the same direction. Allow to dry at least 15 minutes before punching holes.
Don't do what I did, see in the photo, the picture is upside down? I put both cards the same way without even thinking of how it would look.
STEP 4: Use your template to mark all spots where you are to punch the holes. Punch out all holes. Your hands will get tired and sore so make sure you stop after each square and hexagon to stretch your hands.
Crochet Pieces Together
Work squares first.
Sides: Make sure all sqares are going the same way. You will be making a straight string of squares. (At 1 corner hole of two pieces, sc in each hole to the next corner. Fasten off.) Pick up next square and repeat bet (). Do this until all 6 cards are joined in one long string. Then join the first square to the last square in the same way. Make sure the images of the cards you want to see on the outside are facing the outside. Do not weave ends in yet.
Pick up bottom. Choose which side you want to see when you look into the box. Make sure this side is facing the inside. Then join yarn to the bottom of the sides of the box by working 1 sc in each hole around. but work a ch1 at each corner. When you get back to the beginning, ch1 & join to the first st. Fasten off. With your tapestry needle, weave all bottom yarn ends into the stitches on the bottom under side of the box.
Lid: Do not join to box yet. Decide which side of the last hexagon you want to see on the top of the box. Then join yarn to the top left corner. Ch2. (*Sc in next hole, ch1) Rep bet () 5 times more. Sc in same hole as last hole. Ch1. Rep from * around to last corner. Leave last 5 holes unworked. Set side lid.
Crochet top rim of box: Look inside box to see where the top is. Join yarn to upper right corner outside the box, work 1 sc in each hole around working a ch1 at each corner, . Leave the last 5 holes unworked. Fasten off.
Join Lid to box: Join lid to box on the unworked holes. Begin at right corner and sc in each hole to the left corner. Fasten off & weave all ends into inside of box.
Special Note: I had a heck of a time to find my paper punches. For some reason, even though I have two of them, I could not find them, so I had to go to Wal-Mart to get a new one. 50 miles away! Now of course, I will probably find them when I am not looking for them.Design written on Friday, July 04, 2003. Copyright ©2003 By Julie A. Bolduc f115002

