
Picot Edged Coaster
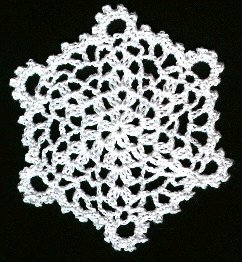
Designed By Julie A. Bolduc
This lovely little doily would be great combined with others like it perhaps seven put together to form a table mat. Or it can work all by itself as a coaster if backed with a piece of felt. You could also stiffen it attach a hanger as use it as a snowflake ornament.
Click here to download the PDF version.
Materials Needed:
Small Amount White size 10 crochet cotton
South Maid was used in the example.
Size 7 Steel crochet hook
tapestry needle
Yarn Thickness: 10thread
Gauge: 7dc per inch
Finished Size: 3½" diameter
Skill Level: Beginner
Instructions
RND 1: Ch4, join w/slst to first ch to form ring. Slst into ring. Ch3, dc in ring Ch3, *2dc in ring. Ch3. Rep from * 4 times more. Join with slst to top of ch3.
RND 2: Sls st intofirst ch3 sp. Ch3. Dc, ch3, 2dc in same sp. Ch1. *2dc, ch3, 2dc in next ch3 sp. Ch1, rep from * around. Join w/slst to top of ch3.
RND 3: Slst into first ch3 sp. Ch3, dc, ch3, 2 dc in first ch3 sp. Ch3. *Sc in ch1 sp. Ch3. 2dc, ch3, 2dc in next ch3 sp. Ch3. Rep from * around. Join w/slst to top of ch3.
RND 4: Slst into first ch3 sp. Ch3, dc, ch3, 2dc in first ch3 sp. (Ch3, sc in ch3 sp)twice. Ch3. *2dc, ch3, 2dc in next ch3 sp. (Ch3, sc in ch3 sp)twice. Ch3. Rep from * around. Join w/slst to top of ch3.
RND 5: Slst into first ch3 sp. *Sc in first ch3 sp. Ch5, sc in same ch3 sp. Ch5, sc in next ch3 sp. Ch5, sk next ch3 sp, sc in next ch3 sp. Ch5. Rep from * around. Join w/slst top firs sc.
RND 6: Slst into first ch5 sp. *Sc in ch5 sp. Ch8 sc in same sp. Ch1, sc in next ch5 sp. Ch3. Dc, ch3, dc in next ch5 sp. Ch3, sc in next ch5 sp. Ch1. Rep from * around. Join w/slst to first sc.
RND 7: Sc in ch8 lp. (Ch3, slst in 3rd ch from hk. Pic made). Rep from beg 4 times more, sc in same ch8 lp. So now you have 5 picots in the ch8 lp divided by scs. Sc in ch1 sp. (sc, pic, sc) in each of the next 3 ch3 sps. Sc in ch1 sp. Repeat from beg around. Join w/slst to first sc. Fasten off and weave ends into work with tapestry needle.
Design Written in April 1998 Copyright© 1998 by Julie A. Bolduc p108003
All items in our online shop ship free within the US only. I currently offer U.S. shipping only and it is from rural Maine. Delivery can vary from 2–14 days depending on your distance from Maine. Expedited shipping is not available.
Please note: I am now selling all of my paper bead making tools and other items from this web site using Paypal payments.
I have removed all of my paper bead making tools from Amazon. My Kindle crochet pattern books and paper template paperback books continue to be available on Amazon, as they are printed and fulfilled directly by Amazon. If you would like to shop my Etsy Store, follow the link in the header above.
Random Quick Tip!
No Crochet Beaded GarlandUse colorful Christmas yarn and assorted beads to make a garland. No need to crochet for this one. You will need a needle with a large enough eye so that you can get the yarn through it and also small enough to go through the beads you want to use. Then to work the beads on so that they will stay on but not be all bunched together, cut your yarn so you have about 30 feet. The tie a bead on one end and put the needle on the other. Then string on another bead, but pass the needle through it twice the same way, then knot the yarn close to the bead so it will stay where you want it. then repeat this with as many beads as you can fit on your yarn. Make each bead about 3/4" to 1" apart. You can use a wide variety of beads this way and get a very beautiful effect depending on what you use for yarn. A metallic yarn with plain beads would be very pretty.