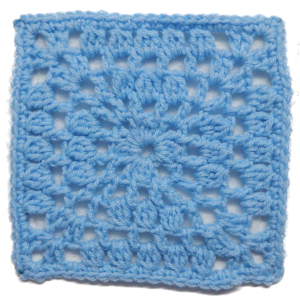
Century's End Granny Square

Designed by Julie A. Bolduc
This square is slightly bigger than the squares I usually make but you can decrease the size by using a smaller hook. I know technically that the year 2000 is the actual last year of the 20th century but since this is the last year of the century that begins with a 1, and this is the last square I am designing this year, I decided to call this square Century's End.
Materials Needed
Small amount Red Heart Fleck yarn worsted weight acrylic any color will do.
Size H aluminum crochet hook
Yarn Needle
Yarn Thickness 4mm
Gauge: 4sc=1"
Finished Size: 7"x7"
Skill Level: Beginner
Special Stitch used
Cluster Stitch (cl):
Yo insert hook in st indicated, pull up a lp, yo draw yarn through two lps on hook. Rep from beg a total of 3 times. Yo and draw yarn through all 4 lps on hook. Ch1 to close.
Instructions
RND 1: Ch5, join w/slst to first ch to form ring. Ch5, dc in ring. Cl in ring. *Dc, ch2, dc in ring. Cl in ring. Rep from * 2 times more. Join w/slst to 3rd ch of ch 5.
RND 2: Slst into the first ch2 sp. Ch5, dc in same sp. Ch2. Dc in next sp before next cl. Ch1. Dc in next sp after cl. Ch2. *Dc, ch2, dc in next ch2 corner sp. Ch2. Dc in next sp before next cl. Ch1. Dc in next sp after cl. Ch2. Rep from * around. Join w/slst to 3rd ch of ch5.
RND 3: Slst into the first ch2 corner sp. Ch5, dc in same sp. Ch2. Cl in next ch2 sp. Ch1. Cl in next ch1 sp. Ch1. Cl in next ch2 sp. Ch2. *Dc, ch2, dc in next ch2 corner sp. Ch2. Cl in next ch2 sp. Ch1. Cl in next ch1 sp. Ch1. Cl in next ch2 sp. Ch2. Rep from * around. Join w/slst to 3rd ch of ch5.
RND 4: Slst into the first ch2 corner sp. Ch5, dc in same sp. Ch2. Dc in next ch2 sp. Ch2. Dc in next sp after next cl, ch2, three times. *Dc, ch2, dc in next ch2 corner sp. Ch2. Dc in next ch2 sp. Ch2. Dc in ext sp after next cl, ch2, three times. Rep from * around. Join w/slst to 3rd ch of ch5.
RND 5: Slst into the first ch2 corner sp. Ch3, dc, ch2, 2dc in same sp. Ch2. Cl in next ch2 sp. Ch2. Cl in next ch2 sp. Ch1, cl in next ch2 sp twice. Ch2. Cl in next ch2 sp. Ch2. *2dc, ch2, 2dc in next ch2 corner sp. Ch2. Cl in next ch2 sp. Ch2. Cl in next ch2 sp. Ch1, cl in next ch2 sp twice. Ch2. Cl in next ch2 sp. Ch2. Rep from * around. Join w/slst to top of ch3.
NOTE: If you look at the top of one of the clusters on the last row, you will see two tiny spaces. You will be working stitches in both of these spaces. The instruction will read, sc in both spaces at the top of next cl. Do not confuse this with sc in next ch2 sp. They are two separate things.RND 6: Ch1. [Sc in next dc. 2sc, ch2, 2sc in next ch2 corner sp. Sc in each of the next 2 dc. 2sc in next ch2 sp. Sc in both spaces at the top of the next cl. 2sc in next ch2 sp. (Sc in both spaces at the top of the next cl. 1sc in next ch1 sp. twice) Sc in both spaces at the top of the next cl. 2sc in next ch2 sp. Sc in both spaces at the top of the next cl. 2sc in next ch2 sp. ] *Sc in each of the next 2 dc. 2sc, ch2, 2sc in next ch2 corner sp. Rep bet []. Rep from * around. join w/slst to ch1. Fasten of and weave ends into back of work.
Design written on Friday, December 10, 1999. Copyright ©1999 By Julie A. Bolduc p101016

