Decorative Easter Egg Holder
 Designed By Julie A. Bolduc
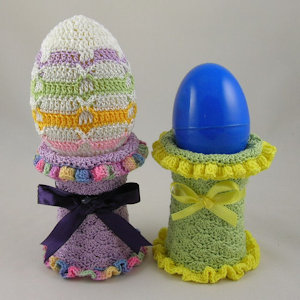
This Easter Egg holder would make a great table decoration for each place setting. You can put a pretty decorated plastic fill-able egg on it filled with Easter goodies for each of your guests. You can place little place cards in front of each one and set it on the center of their plate so your guest can find where they are to sit.
- Materials Needed
- Size 10 crochet cotton in main color*
- Size 10 crochet cotton scrap in contrasting color*
- 1 Clean empty K-Cup with filter removed
- 1 Clean empty Crystal Light dry drink mix, little tub.
- 1/3 cup small pebbles about 3/8" in size
- Plastic lid from coffee can or some other sheet plastic.
- E6000 Glue
- Hot Melt Glue Gun and 1 long Glue Stick
- Tapestry Needle
- Ribbon, either ¼" or ½" in color of choice about 14" long
- Yarn Thickness: 10thread
- Gauge: 8dc=1"
- Finished Size: 3"hx 2¾"at the base
- Skill Level: Advanced
Weighted pedestal Base
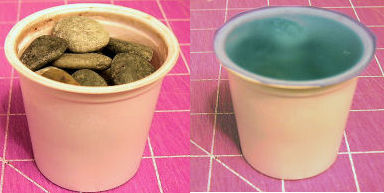
Step 1: Using the K-Cup as a template, trace a circle on your sheet plastic and cut out along the line.
Step 2: Fill the K-Cup to the top with pebbles.
Step 3: With the pebbles in the K-Cup, glue the plastic circle to the top of the K-Cup with the E6000 glue.
Step 4: Using tape as a clamp, tape the plastic circle down to the K-Cup and allow the glue to dry overnight.
Step 5: While glue is drying, crochet all of your other parts.
Step 6: When glue is completely dry, and before final assembly, trim plastic circle close to the rim of the K-Cup if needed.
Crocheted Parts:
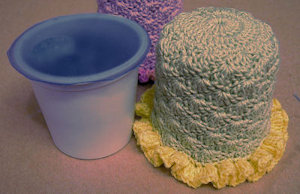 pedestal Base Top
RND 1: With main color, ch 5, join w/slst to first ch to form ring. Ch2, 18dc in ring. Join w/slst to first dc.
RND 2: Ch3, dc in same st as slst. 2dc in each st around. Join w/slst to top of ch3.
RND 3: Ch1, sc in same st as slst. 2sc in next st. *Sc in next st. 2sc in next st. Rep from * around. Join w/slst to first sc.
RND 4: Ch1. Sc in same st as slst. Sk 2 sts. 5dc in next st. Sk 2 sts. *Sc in next st. Sk 2 sts. 5dc in next st. Sk 2 sts. Rep from * around. Join w/slst to first sc.
RND 5: Ch3, 4dc in same st as slst. Sk 2 dc. Sc in next dc. Sk 2 dc. *5dc in next sc. Sk 2 dc. Sc in next dc. Sk 2 dc. Rep from * around. Join w/slst to top of ch3.
RND 6: Slst into each of the next 2 dc. Ch1, sc in same st as last slst. Sk 2 dc. 5dc in next sc. Sk 2 dc. *Sc in next dc. Sk 2 dc. 5dc in next sc. Sk 2 dc. Rep from * around. Join w/slst to first sc.
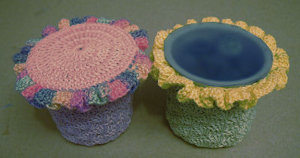 RND 7: Rep RND 5.
RND 8: Rep RND 6.
RND 9: Rep RND 5.
RND 10: Rep RND 6.
RND 11: Rep RND 5.
RND 12: Rep RND 6.
RND 13: Rep RND 5. Fasten off Main Color.
RND 14: Join contrasting color to same st as slst. Ch1. Sc in same st as slst and in each st around. Join w/slst to first sc.
RND 15: Working in front lp only for this last round, Ch3, 3dc in same st as slst. 4dc in each front loop around. Join w/slst to top of ch3.
pedestal Base Bottom: With Main color,
RND 1: With main color, ch 5, join w/slst to first ch to form ring. Ch2, 18dc in ring. Join w/slst to first dc.
RND 2: Ch3, dc in same st as slst. 2dc in each st around. Join w/slst to top of ch3 (36dc).
RND 3: Ch3, dc in same st as slst. Dc in next st. *2Dc in next st. Dc in next st. Rep from * around. Join w/slst to top of ch3. (54dc)
RND 4: Ch1. Sc in same st as slst and in each st around. Join w/slst to first sc. Fasten off leaving an end about 18" long. Weave the other end in.
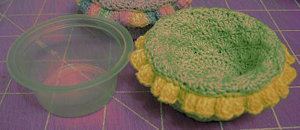 Inside Upper Bowl:
RNDs 1-9: Repeat RNDs 1-9 of pedestal Base.
RND 10: Repeat RND 14 of pedestal Base
RND 11: Repeat RND 15 of pedestal Base. Fasten off and weave all ends in.
Outside Upper Bowl
RND 1-8: Repeat RNDs 1-8 of pedestal Base. Fasten off leaving an end about 18" long. Weave the other end in.
Final Assembly:
pedestal Base Assembly
Step 1: Place prepared K-Cup inside crochet work so the ruffles are at the wide end.
Step 2: Place crocheted circle on top of plastic circle, right side facing you.
Step 3: Whip Stitch crocheted circle to unworked loops of ruffled round, working 1 whip stitch per stitch.
Step 4: Weave end into work. Set aside
Top Bowl Assembly
Step 1: Place ruffled bowl inside plain bowl so the wrong sides are facing each other.
Step 2: Whip stitch plain bowl to ruffled bowl on the unworked loops about half way around.
Step 3: Slip the plastic tub inside work and continue whip stitching the rest of the way.
Step 4: Weave end into work.
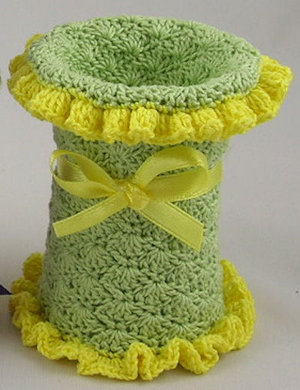 Putting it all together
Step 1:Hot glue bowl to pedestal
Step 2:Put a dab of hot glue on the seam where the bowl meets the base and place one end of ribbon on the glue & wrap ribbon around holder along the seam.
Step 3: Put a dab of hot glue on top of the ribbon end you just glued in place and push down on the other end of the ribbon to glue into place. Trim the excess ribbon.
Step 4: Tie remaining ribbon into a small bow, adjust ends and make loops as small as you want them. Trim the ends of the ribbon as desired.
Step 5: Glue bow to place where the ribbon ends meet.
Step 6: Place decorative Easter Egg on top of Easter Egg Holder! Enjoy!
*I used DMC Traditions in lavender and Light Sage Green, Make sure you have almost a full ball of thread.
The scraps were Southmaid in yellow and I do not know the brand name of the pastel multicolored thread I used with the lavendar.
This Decorative Easter Egg holder is meant to be used for decorative purposes only and is not to be used for real eggs unless you remove the hard boiled egg from the holder before cracking for eating.
Design written on Saturday, April 23, 2011. Copyright ©2011 By Julie A. Bolduc p116021

