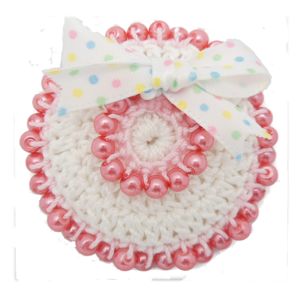
Beaded Circle Pin

Designed By Julie A. Bolduc
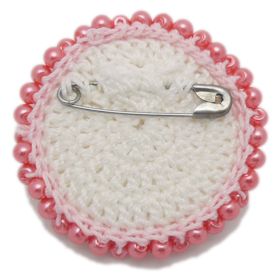
This beaded circle pin is made with a recycled large coat button and is finished off with a safety pin stitched to the back. It is fairly fast and easy to make and would make a good bazaar or craft fair item.
Materials Needed
Size 10 crochet cotton in white and a scrap of pink
48 - 4mm round pearl beads
1 piece of satin ribbon, ¼ wide, to make little bow
1 old button with holes, 1 3/8" in diameter, fairly flat **
A needle that fits through the beads that you can get the thread through*
1 safety pin 1" long
Size 7 steel crochet hook
Gel type super glue, Gorilla brand was used
Yarn Thickness: 10thread
Gauge: 8dc = 1"
Finished Size: 1 7/8" diameter
Skill Level: Beginner to Intermediate
Special Stitch: beaded sc Insert hook in next stitch indicated, pull up a bead, finish the sc locking the bead into the stitch.
Instructions
Back Side
RND 1: With white, ch4, join w/slst to first ch to form ring. Ch2. 12dc in ring. Join w/slst to first dc. (12dc)
RND 2: Ch3, dc in same st as slst. 2Dc in each dc around. Join w/slst to top of ch3. (24dc)
RND 3: Ch3, dc in same st as slst. Dc in next st. *2dc in next st. Dc in next st. Rep from * around. Join w/slst to top of ch3. Fasten off and weave all ends into back of work.
Front Side
RND 1: Repeat RND 1 of back side.
RND 2: Working in back loops only for this round only, repeat RND 2 of back side.
RND 3: Rep RND 3 of back side. Fasten off and weave ends into back of work.
Beads on FrontString 12 beads onto contrasting or pink thread.
Join contrasting or pink thread on first front loop. Work 1 beaded sc in each front loop around. Leave a gap as big as a bead when you get back to the beginning. Fasten off and weave ends into back side of work.
Final Assembly: String on 36 beads onto the pink thread used for the center beads on the front to join the front to the back.
Place the two sides together, wrong sides facing each other and the back side facing you. Join pink through both layers, to the first sc. Work one beaded sc in each stitch around going through both layers at the same time. Be sure to slip the button inside with the flat side facing the back, before closing.

Attach Safety Pin To Back
Slip the safety pin between stitches on the back side near the top and make sure to pull the pin so the solid part, past the coil end is behind the stitches. Secure it some more with the white thread working from one end of the pin to the coiled end, making sure to put a couple of stitches through the coiled end to lock it in place.
NOTE: *I used a piece of beading wire bent in half to make my needle.
**The button you use could be a big as 1½" in diameter. The circles should fit.
Design written on Saturday, December 28, 2013. Copyright ©2023 by Julie A Bolduc p107041

