
Lacy Ball Ornament
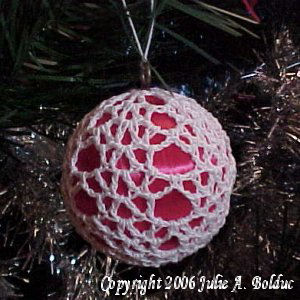 Designed By Julie A. Bolduc
I know it is not Christmas any more but why not make this now and get started early on next year's holiday season! This ball ornament is fairly simple to make and is all one piece. You can complete it in an evening! Actually you could make 2 or 3 in an evening!
Materials Needed
Small amount crochet cotton size 10. Southmaid in white was used in the example.
2½" diameter satin covered ball ornament. Red was used in the example.
Size 7 steel crochet hook
Tapestry Needle
Yarn Thickness:
Thread Thickness: 10thread
Gauge: 10sc=1"
Finished Size: 2½" diameter
Skill Level: Beginner to Intermediate
Instructions(starting at top)
RND 1: Ch12, join w/slst to first ch to form ring. Ch5, dc in same ch as slst. Ch5. *Sk next ch. Dc, ch2, dc in next ch. Ch5. Rep from * around. Join w/slst to 3rd ch of ch5.
RND 2: Slst into the first ch2 sp. Ch5. Dc in same sp. Dc, ch5, dc in next ch5 sp. *Dc, ch2, dc in next ch2 sp. Dc, ch5, dc in next ch5 sp. Rep from * around. Join w/slst to 3rd ch of ch5.
RND 3: Slst into the first ch2 sp. Ch5. Dc in same sp. Dc, ch3, sc, ch3, dc in next ch5 sp. *Dc, ch2, dc in next ch2 sp. Dc, ch3, sc, ch3, dc in next ch5 sp. Rep from * around. Join w/slst to 3rd ch of ch5.
RND 4: Slst into the first ch2 sp. Ch5. Dc in same sp. Dc in next ch3 sp. Ch5. Dc in next ch3 sp. *Dc, ch2, dc in next ch2 sp. Dc in next ch3 sp. Ch5. Dc in next ch3 sp. Rep from * around. Join w/slst to 3rd ch of ch5.
RND 5: Rep rnd 3.
Yarn Thickness:Slip ball into work. Make sure the hanger at the top of the ball is through the starting ring.
RND 6: Slst into the first ch2 sp. Ch5. Dc in same sp. Dc in next ch3 sp. Ch4. Dc in next ch3 sp. *Dc, ch2, dc in next ch2 sp. Dc in next ch3 sp. Ch4. Dc in next ch3 sp. Rep from * around. Join w/slst to 3rd ch of ch5.
RND 7: Slst into the first ch2 sp. Ch5. Dc in same sp. Dc, ch3, sc, ch3, dc in next ch4 sp. *Dc, ch2, dc in next ch2 sp. Dc, ch3, sc, ch3, dc in next ch4 sp. Rep from * around. Join w/slst to 3rd ch of ch5.
RND 8: Slst into the first ch2 sp. Ch5. Dc in same sp. Dc in next ch3 sp. Ch3. Dc in next ch3 sp. *Dc, ch2, dc in next ch2 sp. Dc in next ch3 sp. Ch3. Dc in next ch3 sp. Rep from * around. Join w/slst to 3rd ch of ch5.
RND 9: Slst into the first ch2 sp. Ch5. Dc in same sp. Dc, ch2, dc in next ch3 sp. *Dc, ch2, dc in next ch2 sp. Dc, ch2, dc in next ch3 sp. Rep from * around. Join w/slst to 3rd ch of ch5.
RND 10: Slst into the first ch2 sp. Ch5. Dc in same sp. Sk next ch2 sp. *Dc, ch2, dc in next ch2 sp. Sk next ch2 sp. Rep from * around. Join w/slst to 3rd ch of ch5. Fasten off, weave end through all stitches on the last round and gather up tight to close ring. Weave ends through work to secure.
Design written on Wednesday, January 03, 2001. Copyright ©2000 By Julie A. Bolduc p103019
All items in our online shop ship free within the US only. I currently offer U.S. shipping only and it is from rural Maine. Delivery can vary from 2–14 days depending on your distance from Maine. Expedited shipping is not available.
Please note: I am now selling all of my paper bead making tools and other items from this web site using Paypal payments.
I have removed all of my paper bead making tools from Amazon. My Kindle crochet pattern books and paper template paperback books continue to be available on Amazon, as they are printed and fulfilled directly by Amazon. A limited number of paper bead making tools remain available on Etsy but I am not linking to those tools from this site.
Random Quick Tip!
Free Stuffing for Pincushions!Save all of your itty bitty scraps from your crochet, knitting, quilting and sewing projects to use as filler for pincushions! Use your rotary cutter and cutting mat to cut them up even smaller so they stuff the pincushions better.