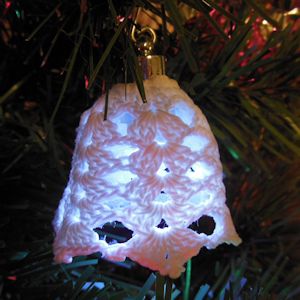
Glowing Bell Ornament
 Designed By Julie A. Bolduc
This little Bell ornament has a removable mini LED light in it which makes it glow! It is easy to make and would be a pretty addition to any holiday or special occasion decorating theme. I bought the little LED light at Amazon.com.
Materials Needed
Size 10 crochet cotton in white
1 battery operated Mini LED lite per ornament
1 ornament hanger
Glue and Water
Little Dish to mix glue and water in
Waxed Paper
1 Little Dylite Foam Liberty Bell* shape, 2 3/8" per bell for shaping crocheted bell
Size 7 steel crochet hook
Tapestry Needle for weaving in ends
Yarn Thickness: 10thread
Gauge: 8sc = 1"
Finished Size: 1½" h x 2" wide at bottom
Skill Level: Beginner to intermediate
Special Stitch Used: Picot. Ch3, slst in 3rd ch from hook.
Instructions
This first round produces a hole that should fit right over the mini light. If it is too big, you will need to weave your end through the stitches to gather them up a tiny bit to make it snug but not tight.
RND 1: Ch12. 24sc in ring. Join w/slst to first sc.
RND 2: Ch1, sc in same st as slst. (Sk next st. 2dc, ch2, 2dc in next st. Sk next st.) *Sc in next st. Rep bet () once. Rep from * around. Join w/slst to first sc.
RND 3: Slst in each of the next 2 dc and into the next ch2 sp. Ch3, 2dc, ch2, 3dc in same ch2 sp. Ch1. *3dc, ch2, 3dc in next ch2 sp. Ch1. Rep from * around. Join w/slst to top of ch3.
RND 4-6: Slst in each of the next 2 dc and into the next ch2 sp. Ch3, 2dc, ch2, 3dc in same st as slst. 3dc, ch2, 3dc in each ch2 sp around. Join w/slst to top of ch3.
RND 7: Slst in each of the next 2 dc and into the next ch2 sp. Ch3, 3dc, picot, 4dc in same ch2 sp. Picot. *4dc, picot, 4dc in next ch2 sp. Picot. Rep from * around. Join w/slst to top of ch3. Fasten off and weave ends into back of work.
Stiffening & Finishing
Step 1: Cover your foam bell shape with a piece of waxed paper. If you have the same bell shape I have, you will need a 5" x 5" square of waxed paper. I taped the bottom to keep the waxed paper on the bell but I did not let the tape touch the bell itself. I use them as moulds for bell ornaments and have had the same set since I started my web site back in 1998.
Step 2: Pour about 1tablespoon glue and 1teaspoon of water into a small dish and mix well.
Step 3: Dip your crocheted bell into this glue mixture and make sure to saturate the stitches well. Dab out the excess with a piece of paper towel.
Step 4: Put the bell onto your prepared bell shape and make sure the hole at the top is no bigger than ½" inside diameter.
Step 5: Allow to dry at least 6 hours or overnight before handling again.
Step 6: Remove crocheted bell from mould and slip onto the top of the mini light just so it rests on the clear rubber ring. You should be able to turn the mini lite on while the crocheted bell is on it. I am.
Step 7: Attach ornament hanger of choice to the little loop on the top of the light to hang on your tree. I made a hanger with a plastic coated paper clip. I straightened out the pin first, coiled one end into a flat coil, then opened it up a bit. The other end I made a hook, put the mini light on it, and closed the hook.
Darice VL429 Non Blinking Mini Party Lites, White, 12 Per Pack Available at Amazon.comDesign written on Monday, December 16, 2013. Copyright ©2013 By Julie A. Bolduc p103050
Buying Guide:
You can get the foam bells at: https://www.smoothfoam.com/category/Bells.html
Mini LED Light: Available at Amazon.com, just do a search for "SumDirect Pack of 12/30/50/100 Colorful LED Mini Non-Blinking Lights"

