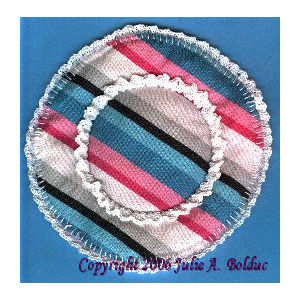
Thrifty Potholder
 Designed by Julie A. Bolduc
This potholder is made with recycled materials and is fun, fast and easy to make. And costs next to nothing. You can use any old fabric you want from a shirt to old jeans. Be creative!
Materials Needed:
An old shirt or fabric of your choice 1/3yd 44"wide will do.
An old worn out towel that is just thin without big holes. Or a clean cloth diaper.
Sewing thread and needle for basting
Lid from a large coffee can for template 8" diameter
3" diameter can for another template
Pencil
Size 10 Crochet Cotton White or desired color
Size 7 Steel Crochet Hook
Sharp tapestry or crewel needle
Sharp sewing scissors
Yarn Thickness: 10thread
Gauge: 10sc=1"
Finished Size: 8"diameter
Skill Level: Intermediate
Instructions
Step 1: Fold the towel until you have the desired thickness you would want for your potholder. Set it aside.
Step 2: Cut out your fabric so that you have 2 the same size but bigger than you need for the size of your potholder. About a 10"x10" square will do. Cut your towel layers to the same size.
Step 3: Lay one piece of fabric on the table wrong side facing up. Place the towel layers on top of it then lay the other fabric wrong side down on top of the towels.
Step 4: With your coffee can lid, place it down on top of your fabric and with your pencil, trace around it. Then use the small can and do the same centered inside the outer circle.
Step 5: Baste all layers together using your sewing thread. No need to knot the ends, you will be taking it out later. Make the basting stitches about 1" long and all over. There is no need to be accurate here. This is just to keep the layers together while you work on the edging. Keep your stitches a little bit away from your pencil lines and inside the outer pencil lines.
Step 6: Cut out the Circle following the outer circle only. The inner circle is for "quilting" later on.
Step 7: Here is where the fun begins. Work a blanket stitch all the way around the outer edge making each stitch about ¼" long and ¼" apart. Be sure to have an even number of stitches around. I did not count how many I had.
Step 8: Edging. Join thread in any stitch. Ch3, dc in same st. Ch2. Sc in next st. *2dc in next st. Ch2. Sc in next st. Rep from * around. Join w/slst to top of ch3. Fasten off and weave ends into work.
Step 9: Inside Circle. Work a running stitch on the inner circle making the stitches ¼" long. Doesn't matter how many you have here.
Step 10: Join thread to any of the running stitches on the circle. Ch3, 2dc, ch2, 3dc. Work the following in each of the rest of the stitches around. 3dc, ch2, 3dc. Join w/slst to top of ch3. Fasten off and weave ends into work.
I did not put a hanger on this but you could. Just sew a 1" bone ring any where on the edge for your hanger.
Design written on Wednesday, April 14, 1999. Copyright ©1999 by Julie A. Bolduc p102011

