
Pineapple Irish Rose Hair Bow
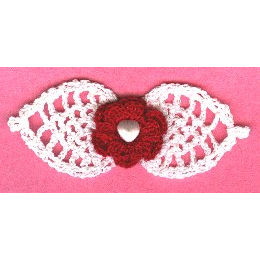
Designed by Julie A Bolduc
This hair bow is one that I designed a few years ago and never wrote the pattern down until now. It is one of my favorite designs. So pretty and perfect for your Valentine's Day outfit.
Materials Needed:
Small amounts each of Southmaid Crochet cotton size 10 in red and white.
1--3/8" diameter shank style heart or round shaped button
1---3" French Hair Clip (Spring Style)
Size 7 steel crochet hook
Thread Size: 10thread
Gauge: 10sc=1"
Finished Size: =3¼"long by 1¼" wide
Skill Level: Beginner
Note:
The pineapple and the rose are worked separately then joined together during final Assembly.
With White
RND 1: Ch4, join w/slst to first ch to form ring. Work 12 sc in ring. Join w/slst to first sc.
Pinapples worked in rows.
First Side
ROW 1: Ch3. Dc in same st as slst. Ch1. *Dc, ch1, dc in next sc. Ch1. Rep from * 2 times more. 2dc in next sc. Ch3, turn.
ROW 2: Dc in next dc. Ch3. *Sc in next dc. Ch3. Rep from * 5 times more. Dc in next dc and in top of ch 3. Ch3, turn.
ROW 3: Dc in next dc. Ch3. Sk first ch3 sp. *Sc in next ch3 sp. Ch3. Rep from * 4 times more. Ch3. Sk last ch3 sp. Dc in next dc and in top of ch3. Ch3, turn.
ROW 4: Dc in next dc. Ch3. Sk first ch3 sp. *Sc in next ch3 sp. Ch3. Rep from * 3 times more. Ch3. Sk last ch3 sp. Dc in next dc and in top of ch3. Ch3, turn.
ROW 5: Dc in next dc. Ch3. Sk first ch3 sp. *Sc in next ch3 sp. Ch3. Rep from * 2 times more. Ch3. Sk last ch3 sp. Dc in next dc and in top of ch3. Ch3, turn.
ROW 6: Dc in next dc. Ch3. Sk first ch3 sp. *Sc in next ch3 sp. Ch3. Rep from * 1 times more. Ch3. Sk last ch3 sp. Dc in next dc and in top of ch3. Ch3, turn.
ROW 7: Dc in next dc. Ch3. Sk first ch3 sp. *Sc in next ch3 sp. Ch3. Ch3. Sk last ch3 sp. Dc in next dc and in top of ch3. Ch3, turn.
ROW 8: Dc in next dc. Ch1. Dc in next dc and in top of ch3. Do not ch. Turn.
ROW 9: Slst into the next dc and in ch1 sp. Ch3. Dc in same ch1 sp. Fasten off and weave ends into work.
Second Side
Join thread in 7th sc of round 1. You will have skipped a sc. Rep as for first side. Weave all ends into work. Use Niagra Spray Starch to stiffen slightly.
RND 1: Ch4, join w/slst to first ch to form ring. Work 12 sc in ring. Join w/slst to first sc.
RND 2: In back lps only. Sc in same st as slst. Ch3. *Sk next st. Sc in next st. Ch3. Rep from * around. Join w/slst to first sc.
RND 3: Slst into the first ch3 sp. Sc, ch2, 4dc, ch2, sc in same ch3 sp and in each ch3 sp around. Fasten off.
Center
Join thread in front lp of first sc.
RND 1: Ch 3, 3dc, ch2, sc in first st. *Sk next st. Sc, ch2, 3dc, ch2, sc in next front lp. Rep from * around. Join w/slst to first ch of ch3. Fasten off and weave all ends into work.
Assembly
Sew rose to center of pineapples then secure with button in the center. Then sew the whole thing to the barrette. Gluing it to the barrette is not recommended due to the fact that the glue will show through and not look good.
Designed in February 1998 Copyright © 1998 By Julie A. Bolduc f109006
All items in our online shop ship free within the US only. I currently offer U.S. shipping only and it is from rural Maine. Delivery can vary from 2–14 days depending on your distance from Maine. Expedited shipping is not available.
Please note: I am now selling all of my paper bead making tools and other items from this web site using Paypal payments.
I have removed all of my paper bead making tools from Amazon. My Kindle crochet pattern books and paper template paperback books continue to be available on Amazon, as they are printed and fulfilled directly by Amazon. If you would like to shop my Etsy Store, follow the link in the header above.
Random Quick Tip!
Pillow Form StuffingI like to make pillow forms with tiny scraps from my sewing. I keep every single little scrap of fabric, batting and thread. If the fabric is too small for even a scrap quilt or applique project, I throw it into a small bucket and when the bucket is full, I dump it into an old pillowcase. When I need stuffing for a pillow form, I can use it in that pillow form along with polyester Fiber Fill. It adds weight and you can fill the corners with the polyester fiberfill since that is easier to pack into the corners.