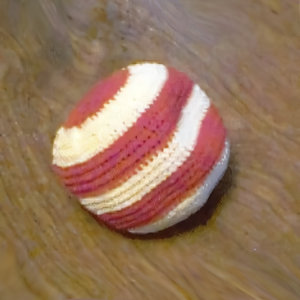
Bean Bag Ball
 Designed By Julie A. Bolduc
This ball was my first attempt at designing a hackysack. Well it is a little big so I just set it aside and made another one which was smaller. Now you can make this ball as part of a juggling set. You will need to make at least 3 to be able to call them juggling balls.<
Materials Needed:for 1.
¾ cup poly pellets or other similar stuffing.
An old sock which has no holes or nylon stocking.
Sewing threadsewing needle
Southmaid size 10 crochet cotton in Victory Red, White
size 7 steel crochet hook
tapestry needle
Yarn Thickness: 10thread
Gauge: 10sc=1"
Finished Size: =3" diameter
Skill Level: Beginner
Make the pellet form.
Step 1. Using a ¾ cup measure, pour pellets into the toe of a child's sock. Around shoe size 4 or age 5-8. Do not cut the sock yet. Make sure to have all the pellets crammed into the toe.
Step 2. Thread needle with 36" of thread, double up the thread and make a knot at the end of it. Stitch a running stitch around sock just above the pellets and make sure to leave the knotted end hanging out about 4 inches. This will make it possible to tie the threads together easily and make the gathers tight. Once the stitching around is done.
Step 3. Grab a hold of both ends of the thread and draw up the gathers tight and tie into a knot. You may need to tie it a few times. Leave needle on an do not cut threads yet.
Step 4. Trim the sock to about 3/8" above the stitching line. With the bottom end of the crochet hook, poke the seam alowance into inside of the form. Secure an close the hole with more stitches worked randomly back and forth across the hole drawing up each stitch tight. Trim threads to .5". Set aside Ball.
With Red, RND 1: Ch2, work 12 hdc in 3rd ch from hook. Join w/slst to first hdc.
RND 2: Ch2, hdc in same st as slst. 2 hdc in each st around. Join w/slst to top of ch2.
RND 3: Ch2, *2 hdc in next st, 1 hdc in next st. Rep from * around. 2 hdc in last st. Join w/slst to top of ch2.
RND 4: Ch2, *2 hdc in next st, 1 hdc in next 2 sts. Rep from * around. 2 hdc in last st. Join w/slst to top of ch2. Drop red. Do not fasten off.
RND 5: Join white in same st as slst. Ch2, *2 hdc in next st, 1 hdc in next 3 sts. Rep from * around. 2 hdc in last st. Join w/slst to top of ch2.
RND 6: Ch2, *2 hdc in next st, 1 hdc in next 4 sts. Rep from * around. 2 hdc in last st. Join w/slst to top of ch2.
RND 7: Ch2, *2hdc in next st. 1hdc in each of the next 5 sts. Rep from * around. 2hdc in last st. Join w/slst to top of ch2.
RND 8: Ch2, hdc in each st around. Join w/slst to top of ch2. Drop white. Do not fasten off.
RND 9-12: Pick up red and rep RND 8. Drop Red pick up white.
RND 13-15: Rep RND 8. Drop white pick up red.
RND 16-19: Rep RND 8. Drop red pick up white
RND 20: Rep RND 8.
RND 21: Rep RND 8.
RND 22: Ch2, hdc in next 4 sts. Yo insert hook in next st, yo draw up lp, yo draw thread through 2 lps on hook, insert hook in next st, yo draw up lp, yo draw thread through all three lps on hook. Dec made. *Hdc in next 5 sts. 1dec. Rep from * around. Join w/slst to top of ch2. Drop white, pick up red. Slip ball form into cover. Now work on the form from here.
RND 23: Ch2, hdc in next 2 sts. 1 dec. *Hdc in next 3 sts, 1 dec. Rep from * around. Join w/slst to top of ch2.
RND 24: Ch2, hdc in next 1 sts. 1 dec. *Hdc in next 2 sts, 1 dec. Rep from * around. Join w/slst to top of ch2.
RND 25: Ch2, hdc in next st. 1 dec. *Hdc in next 2 sts, 1 dec. Rep from * around. Join w/slst to top of ch2.
RND 26: Ch2. 1 dec. *Hdc in next st, 1 dec. Rep from * around. Join w/slst to top of ch2.
RND 27: Ch2, dec all the way around. Join w/slst to top of ch2.
RND 28: Ch1, sc in same st as slst. Sc in each st around. Join w/slst to first sc. Break off and weave ends into work. You will need to bring the thread through the stitches at the beginning and the end and draw the threads up tightly to close the little holes at each pole. Make sure to weave the ends in alot or they may work themselves out.
Design Written in May 1998 Copyright © 1998 By Julie A. Bolduc p113004

