
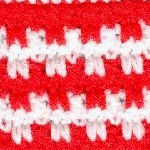
Static Stitch
This featured stitch is called the Static Stitch it is called this because when you use more than one color to make this stitch, it looks like a row of static. This stitch is used in 3 patterns as you will soon see. This is a stitch I developed my self with inspiration from the book "The Harmony Guide to Crochet" There is a similar stitch called the tooth stitch in there which is a bit more complicated so I decided to make the stitch easier and faster to do. This sample has 2 dcs at each end of each dc row.


To do this stitch follow these instructions.
Ch a multiple of 3 + 4 sts. In the example below, this will make a row of 4 repeats. So this is 3x4=12+4=16.
So we will start with a chain of 16 sts.
ROW 1: With first color, ch 16, sc in 2nd ch from hook and in each ch across. Ch 3, turn.
ROW 2: Dc in 2nd sc, *ch 2, sk 2 sts, dc in next st. Repeat from * across ending with 1 dc in each of the last 2 sc. Fasten off Color 1.
ROW 3: Tie on color 2, (Sc in the first 2 sts. Make a dc in each of the sk st in the previous row working over the 2 chs. Sc in dc, repeat from * across ending with a sc in each of the last 2 sts. Ch 3, turn.)
ROW 4: Repeat ROW 2.
ROW 5: Repeat row 3.
ROW 6: Repeat ROW 2.
Keep on going in this manner until you reach the desired number of rows. When finishing your project, add one row of sc's at the end.
All items in our online shop ship free within the US only. I currently offer U.S. shipping only and it is from rural Maine. Delivery can vary from 2–14 days depending on your distance from Maine. Expedited shipping is not available.
Please note: I am now selling all of my paper bead making tools and other items from this web site using Paypal payments.
I have removed all of my paper bead making tools from Amazon. My Kindle crochet pattern books and paper template paperback books continue to be available on Amazon, as they are printed and fulfilled directly by Amazon. A limited number of paper bead making tools remain available on Etsy but I am not linking to those tools from this site.
Random Quick Tip!
Glue Basting Quilt As You Go BlocksHere is another way to baste a quilt block when making your quilt sandwiches. I have done this and it works very well! Instead of using spray or fusible batting, you can put dots of liquid Elmer's School glue where you would normally put your safety pins. I would actually put the dots closer together. Think of this, when we use spray basting or fusible batting, there is glue, why not just use the least expensive option. Little dots of Elmer's school glue. You cannot feel the dots when you are quilting and they do not interfere with the needle in the machine. Just use little dots. The action of pressing the glued layers together flattens the glue dots and as long as they are tiny, you will not feel them. Also, the Elmer's school glue will wash out of clothing even after it is set with an iron. Plus you don't have to worry about overspray or breathing in the glue into your lungs. I have also made a glue/water mixture and brushed it on with a sponge brush. That works well also.