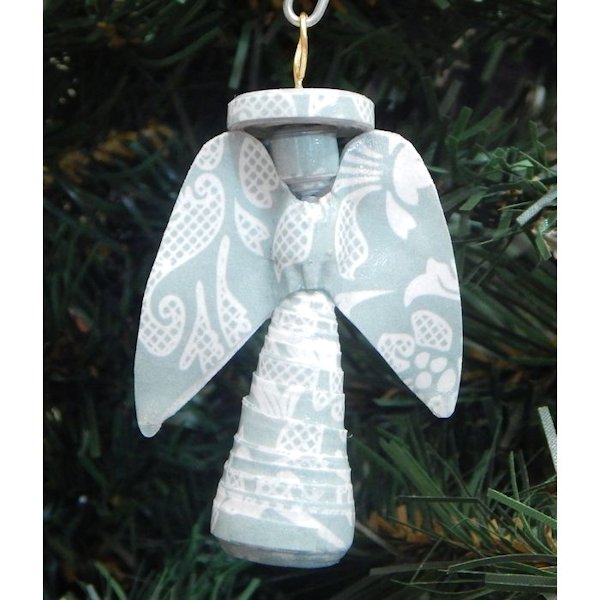
Pretty Paper Bead Angel

Designed By Julie A. Bolduc
This angel is completely made with paper and is dipped in glaze after it is assembled on the head pin! You can make several at a time and dip them in batches!
- Materials Needed
- 1 Sheet of 8-1/2" x 11" Scrapbook or Copy Paper for 1 Angel
- 1 Head Pin 3" Long in gold or silver color
- All Purpose White Glue
- Special Cutting Template, attached to this pattern
- Glaze of choice, I used PC-Petrifier and Liquid Laminate
- Ornament Hanger
- Tools Needed
- Size 1/16" OR 5/64" short paper bead roller
- Size 1/16" Long Paper Bead Roller
- Cutter of Choice
- Pair of Scissors
- Toothpick
- Needle Nose Pliers
- Drying Rack & Dipping Supplies
- Piece of 50lb Fishing line 4" long & a crimp bead
Finished Size: 2-1/4" Tall
Skill Level: Intermediate
Instructions
Step 1: Print the provided template sheet on either the back side of your scrapbook paper or on a cover sheet that you can layer with your scrapbook paper.
- Sizes of Strips:
- Skirt Pieces: 1A & 1B, 1-1/2" at the wide end, 3/4" at the narrow end, 8-1/2" long
- Skirt Pieces: 2A & 2B, 3/4" at the wide end, 1/8" at the narrow end, 8-1/2" long
- Head and Body Pieces: All of them, 3/8" at the wide end, 1/8" at the narrow end, 8-1/2" long
- Halo Pieces: 1/8" x 1/8" x 8-1/2" for all 8 of them
Step 2: Cut the pieces along the colored dashed lines. You will use one whole sheet of paper for each angel. Each of the skirt, head and body templates are labeled. Cut the wings just outside the solid lines so you see the solid lines. No need to actually cut on the solid lines. The wings are a basic guide to use to get a basic wing shape. You need 2 wing pieces.
Step 3: Halo: Start with the halo. With your 1/16" or 5/64" paper bead roller, roll all eight 1/8" strips one after the other to make one flat bead. Glue as you go and adjust as you go to keep the halo flat.
Step 4: Head: Layer the 2 head pieces together so they are even. Roll them up together. You might want to glue the wide ends together to ease in rolling them up.
Step 5: Body with Wings Roll the body pieces the same exact way you rolled the head. While the bead is still on your pin, apply a generous amount of glue all over the bead. Put the center of one wing on the bead and adjust as needed. Place the other wing on the front of the bead lining up the wings so they are even. Glue the front of the wings to the back of the wings encasing the bead completely inside. Remove from bead roller. Set aside for now.
Step 6: Skirt Glue the Skirt 2B's to the Skirt 1A to make it a strip twice as long. Then layer all four long strips together and roll them with the 1/16" long bead roller. When you take it off of the paper bead roller, you may need to adjust the skirt so it is flat on the bottom. You can do this by placing it on your work surface and pushing down on it until the bottom is flat.
Step 7: Assemble the Angel Place the skirt so the wide part is at the bottom. Add the body part with the wings. Add the Head then the Halo. Trim the head pin to within 1/4" of the halo. With your needle nose pliers, and keeping the angel beads as tightly together as possible, form a simple loop at the top of the head pin.
Step 8: Glaze the Assembled Angel Attach the 4" piece of fishing line to the simple loop at the top of the head pin and crimp it closed. This is a dipping loop and the loop you can use to hang the angel on your drying rack. Dip your angel into the PC-Petrifier a total of 4 times allowing it to dry 1 hour between coats. Then dip one last time into either Liquid Laminate, Vibrance or some other top coat. Allow to dry overnight. Then remove the fishing line and attach the ornament hanger of your choice!
Design written on December 16, 2014. Copyright ©2014 By Julie A. Bolduc f201001

