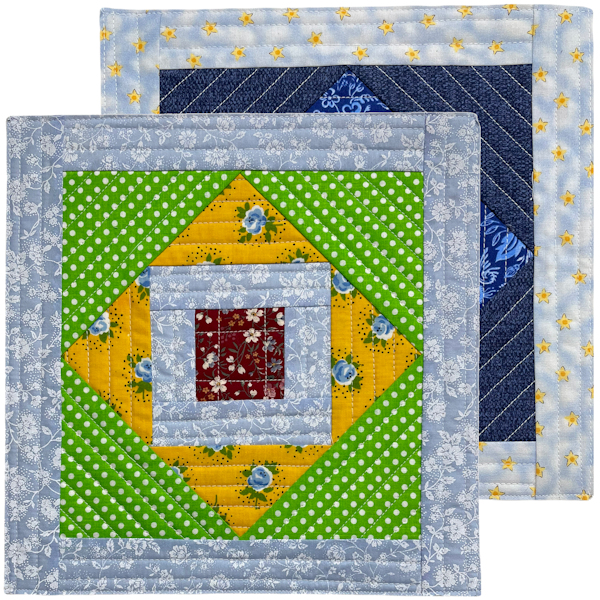
Stratton Square Block

Using the Kouché Method formerly the Quilt as You Piece Method
This is the 14th quilt block tutorial in a series on how to make quilt blocks using the Kouché Method formerly the Quilt as You Piece Method. This quilt block can be completely made in the Quilt as you Piece method.
- Materials Needed Makes one Block:
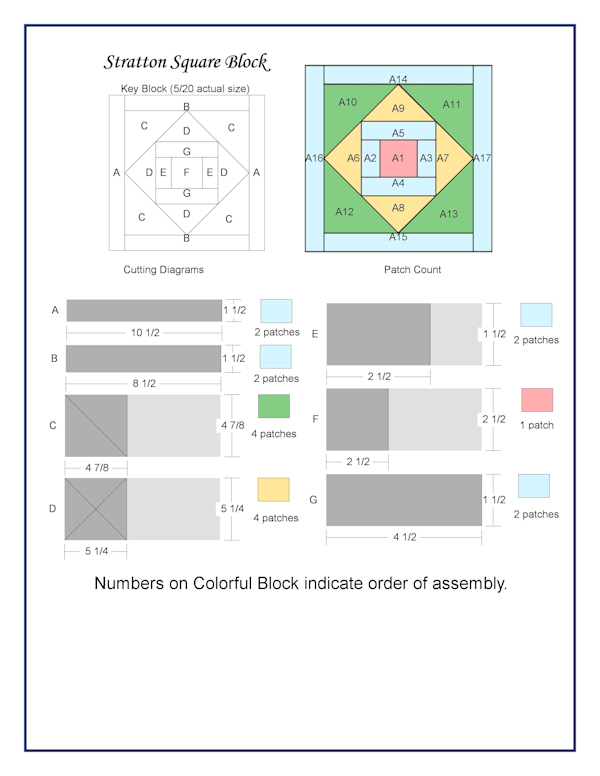
- Fabric: Follow the diagram for the sizes but make each piece bigger and longer than indicated for trimming up after each addition. Cut double the number of pieces indicated for the front and back.
- Batting Follow the diagram for the sizes making them exact. Cut one piece of batting for each patch in the key block.
- Cotton Sewing thread in neutral color, 50wt preferred.
- Washable Liquid Glue
- Washable Glue Stick
- Paper for printing templates. Templates are included in the PDF file.
- Double stick tape for back side of cut out templates
- Tools Needed These are the tools I used. Use what you have.
- Rotary Cutter & Cutting Mat
- Pair of Fabric Scissors
- Temporary Marking Device
- 18"x3" quilt ruler
- 10.5"x10.5" Square Ruler
- Dry Iron & Pressing Board
Note: You can quilt the pieces as you add them or wait until your block is all pieced.
Instructions- Use the Quilt as You Piece method for all pieces. Quilt as you add each piece or wait until the block is complete.
- Starting in the center, fuse the layers of the center block, quilt and trim to the size of 2-1/2" x 2-1/2".
- Add pieces A2 and A3. Trim edges where A4 & A5 will go.
- Add pieces A4 and A5.
- Trim block to 4-1/2" x 4-1/2"
- Add triangle pieces A6 & A7.
- Add triangle pieces A8 & A9.
- Trim block to 6-1/8"x6-1/8".
- Add triangle pieces A10 & A11.
- Add triangle pieces A12 & A13.
- Trim block to 8-1/2" x 8-1/2".
- Add Strips A14 & A15. Trim edges where A16 & A17 will go.
- Add Strips A16 & A 17.
- Trim to 10-1/2" x 10-1/2". Do stay stitching, an 1/8" in from the edges, all the way around.
Block Name & Design Disclaimer: I do not know if this block exists anywhere else. If it does, I do not know the actual name for it. This one came out of my head. If you know the actual name of this block, I would not mind changing it and giving credit where credit is due. The name for this block is named for a town in Maine. Since I live in Maine, any blocks that come out of my head, and I cannot find the name anywhere, I will be giving it a name of either a county, town, river, lake, or mountain in Maine.
This pattern sheet just provides what materials you need and what size pieces you need to make a 10" block and in what order to sew the pieces of the block together. It does not go into complete detail how I put them together in the Quilt as You Piece manner, please refer to our tutorial of the Five Strip Rail Fence Block for the basic concept and instructions on how to do Quilt as You Piece for this block and all other blocks in this series.
Design written on November 17, 2021 by Julie A Bolduc of Just Plain Fun © 2021 by Julie A Bolduc p401011


